Entering Time and Recording Time Off in Time Sheets
How to manually enter time in Time Sheets, punch in and punch out in Time Sheets, and record time off in Time Sheets.
Employee Time Entry
Depending on your company’s configuration, employees can enter their time worked manually on a time sheet, or by punching in and out.
Enter Time Manually
To enter time worked manually:
-
Click Timecard/Expenses on the Namely homepage.
-
Select Data Entry.
-
Select your Job (if applicable).
-
Enter time worked for each day.
-
If you have the correct permissions, you can click Auto Fill Time Sheet to fill your sheet with your scheduled hours.
-
Click Save Changes.

Note: Employees can be given the option to certify their time to approve the hours they are submitting. For more information, reach out to your Namely contact.
Punch In and Punch Out
To punch in and out:
-
Click Timecard/Expenses on the Namely homepage.
-
Click Punch In / Start Your Day / Good Morning.
Note: This message may be different depending on what has been entered on the Clock In Label on the Shift screen.
-
As your shift progresses, click any subsequent links (for example, Punch Out / Lunch / Good Night) to punch out.
-
Note: These messages may be different depending on your company’s configuration.
-
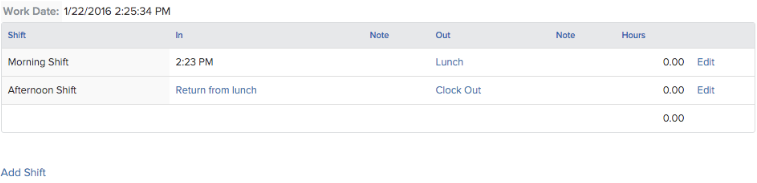
To log time worked outside of normal work hours, click Add Shift.
-
At the end of your pay period, review your hours by clicking Time Sheets in the navigation menu.
Note: Employees can be given the option to certify their time to approve the hours they are submitting. For more information, reach out to your Namely contact.
Note: Employees with the correct permission can edit their punched hours by click Edit.
Viewing Your Timesheets
To view your time sheet:
-
Click Timecard/Expenses on the Namely homepage.
-
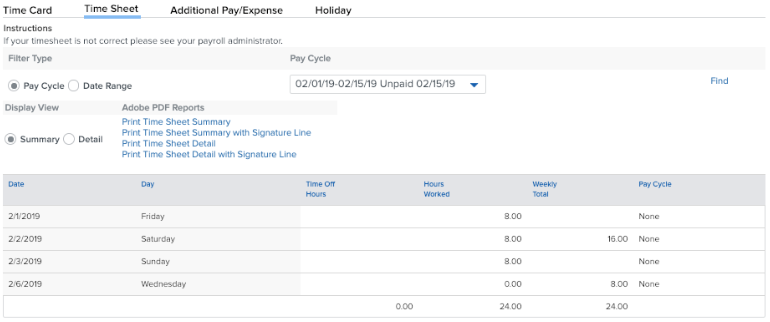
Click Time Sheet in the navigation menu.
-
Filter your time sheets by Pay Cycle or Date Range.
-
Select Summary or Detail to change the Display View.
-
View and download a PDF copy of your time sheets under Adobe PDF Reports.
Recording Time Off in Timesheets
Depending on your company’s settings, there are two display options for employees recording time off in Time Sheets—basic view and advanced view.
Record Time Off - Basic View
To record time off:
-
Click Timecard/Expenses on the Namely homepage.
-
Click Request Time Off.
-
Select Add.
-
Enter the date, hour type*, and number of hours for your request.
-
Click Save.
*Note: Employees must be assigned the hour benefit for the time off type to appear in the dropdown.
Record Time Off - Advanced View
To record time off:
-
Click Timecard/Expenses on the Namely homepage.
-
Click Request Time Off.
-
Select Single Day to request one day off, or select Date Range to request multiple days off.
-
Enter the dates, hours per day, and select the type* of time off from the dropdown menu.
-
Click Generate.
*Note: Employees must be assigned the hour benefit for the time off type to appear in the dropdown.