Creating and Assigning Work Scheduled in Time Sheets
How to create and assign work schedules in Time Sheets.
Creating Work Schedules
You can create multiple work schedules for your organization in Time Sheets. Examples include:
-
Full-time and part-time employees
-
Hourly and salaried employees
-
Multiple shifts
-
Overtime state rules
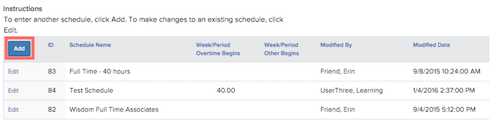
To edit a work schedule you’ve created, click Edit.
To add a work schedule:
-
Go to Time Sheet > Work Schedule.
-
Click Add.
-
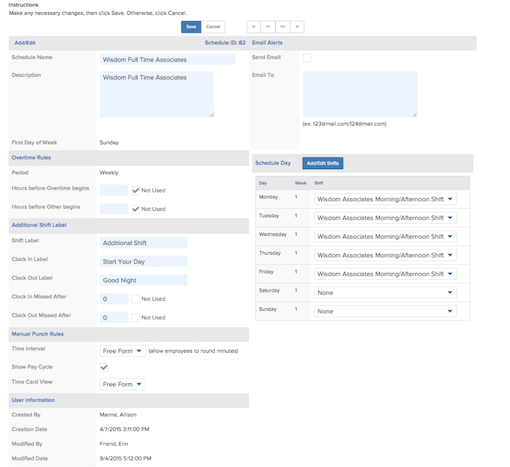
Enter a Schedule Name.
-
Enter a Description.
-
Under Overtime Rules, select a Period:
-
You can select Weekly or Bi-Weekly.
-
If your overtime is calculated on a weekly basis, enter how many hours must be worked in a week before Overtime begins.
-
Select Not Used if the schedule is not eligible for overtime, or if your overtime is calculated on a daily basis (commonly in California).
-
Enter how many hours must be worked in a week before Other begins.
-
Other can be used for states or organizations that have double time rates.
-
Select Not Used if the schedule is not eligible for other rates or if your overtime is calculated on a daily basis (commonly in California).
-
Under Additional Shift Label, enter a Shift Label.
-
If your organization uses automatic clock in and clock out, enter 0 in the Clock In Missed After and Clock Out Missed After fields, and deselect the Not Used checkboxes.
-
Under Manual Punch Rules, select if you want to allow employees to round up their minutes worked by certain Time Intervals.
-
If you select this option, employees will be prompted to select a time from a dropdown menu rather than manually enter it.
-
Select if you want to Show Pay Cycle to employees.
-
If you select this option, employees will only be allowed to enter time for dates within their current pay period rather than a date range.
-
Select a Time Card View.
-
To send unapproved time card reminder email alerts to employees who are not assigned managers, enter their email addresses in the Email To field and select Send Email.
-
Click Next.
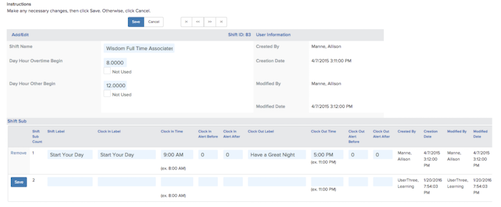
Adding or Editing Shifts
Before your work schedule can be assigned, you need to add shifts to it. Depending on your organization, you may have one shift (like 9:00 AM to 5:00 PM) or multiple shifts.
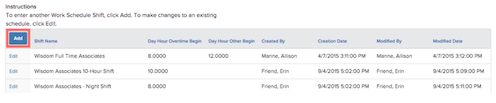
To add a shift:
-
From within a work schedule, click Add/Edit Shifts.
-
Click Add.
-
Enter a Shift Name.
-
If your overtime is calculated on a daily basis, enter how many hours must be worked in a day before Overtime begins.
-
Select Not Used if the shift is not eligible for overtime, or if overtime is calculated on a weekly basis.
-
Enter how many hours must be worked in a day before Other begins.
-
Other can be used for states or organizations that have double time rates.
-
Select Not Used if the shift is not eligible for other rates, or if they are calculated on a weekly basis..
-
Under Shift Sub, enter a Shift Label.
-
Enter a Clock In Label.
-
Enter a Clock In Time.
-
Note: All alerts, autofills, and automatic clock-ins are dependent on this value.
-
If you do not want employees to receive warnings when they clock in before or after their shift starts, enter 0 in Clock In Alert Before and Clock In Alert After.
-
Entering a number other than 0 in these fields will result in an employee receiving a warning if they attempt to log in X minutes before or after their shift starts.
-
-
Enter a Clock Out Label.
-
Enter a Clock Out Time.
-
Note: All alerts, autofills, and automatic clock-outs are dependent on this value.
-
If you do not want employees to receive warnings when they clock in before or after their shift ends, enter 0 in Clock In Alert Before and Clock In Alert After.
-
Entering a number other than 0 in these fields will result in an employee receiving a warning if they attempt to log in X minutes before or after their shift ends.
-
Click Save next to the sub shift you created.
-
Enter as many sub shifts as you need.
-
For example, you can create a morning shift that ends at noon, and an afternoon shift that starts at 1:00 PM to account for a lunch break.
-
Click Save.
Assign Shifts to a Work Schedule
Once you have added your shifts, you can assign them to the work schedules you created.
To assign your shifts to a work schedule:
-
From within a work schedule, use the dropdown menus to select the shifts you want to assign for each day.
-
Click Save.
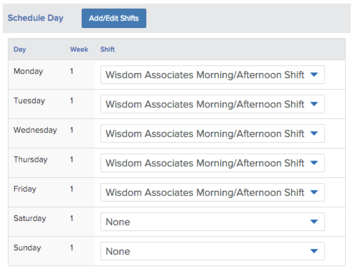
Note: As a best practice, we recommend assigning shifts for every day of the week an employee may work. This will ensure employees are still able to add hours on days that are outside their normal schedule.
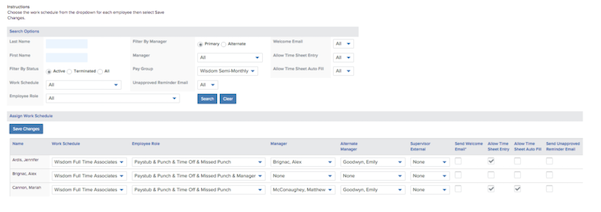
Assigning Work Schedules
After you’ve created your work schedules, you can assign them to employees. Any employee that will be using Time Sheets must also be assigned an Employee Role specifically for Time Sheets.
When assigning work schedules, you can filter your employees and view them by:
-
Name
-
Active or terminated
-
Work schedule
-
Employee role
-
Manager
-
Pay group
To assign a work schedule:
-
Go to Time Sheet > Assign Work Schedule.
-
For each employee, select a Work Schedule.
-
If you have multiple pay groups, use the Pay Group dropdown to make sure you are searching for your employee(s) in the correct pay group.
-
Select the appropriate Employee Role.
-
Paystub: Allows employees to view their paystub.
-
Punch: Allows employees to clock in and out.
-
Missed Punch: Allows employees to adjust their punches on their time sheet before submitting.
-
Time Off: Allows employees to request time off through Time Sheets.
-
Manager: Allows the employee to approve time sheets.
-
Selecting a role that includes Manager will automatically add the employee to the Manager dropdown for approvals. It is best practice to set up your managers before setting up the rest of your employees.
-
Any employee who has Payroll Admin rights does not need to be assigned as a manager—they automatically have access to approve their time even if they are not assigned.
-
-
Note: Employees do not need to be assigned a role for Time Sheets if they do not use it.
-
Select a Manager.
-
Managers can be assigned by reporting lines, or anyone who is responsible for approving time.
-
Note: This drop down will not populate until at least one employee has been assigned as a Manager in the Employee Role dropdown. For this reason, it is best practice to set up your managers before setting up the rest of your employees.
-
Select an Alternate Manager (optional).
-
To allow the employee to manually enter their time worked on a time sheet, select Allow Time Sheet Entry.
-
Deselecting Allow Time Sheet Entry will require the employee to punch in and punch out.
-
Select Allow Time Sheet Autofill to let employees automatically populate their hours based on the time(s) entered in the shift they are assigned for that day based on their work schedule.
-
Note: Employees will be able to edit their hours if they miss their punch in or punch outs.
-
To send a welcome email to the employee, select Send Welcome Email.
-
To automatically send emails to managers who have unapproved time cards, select Send Unapproved Reminder Email.
-
Note: You can set the number of days after which the email is sent by going to Company > Pay Group > Edit.
-
Click Save Changes.