Importing Unlimited Additional Pays
Now you can add an unlimited number of one-time additional payments to employees’ checks within a single pay cycle.
OVERVIEW
Need to add additional payments to employees’ checks for commissions, bonuses, retro pay, or other one-time occurrences? With our latest release, now you can add an unlimited number of additional payments to one or multiple checks within a single pay cycle with a few simple clicks. Read on to learn more!
HOW IT WORKS
If this is the first time you’ll be importing additional payments, you’ll need to begin by submitting a case in the Namely Help Community to request that the service team add import functionality to any pay type codes you’ll be using.
-
Submit a case using the taxonomy Payroll > Company Setup > New Pay Type Code Request.
Accessing the Additional Pay Tool
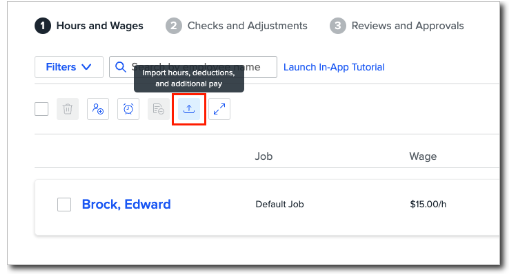
You can access the additional pay tool during Step 1 of Payroll by clicking the Import icon, where the option to Import hours, deductions, and additional pay appears when you hover.
Preparing Your Import File
As you prepare your .csv file, note that the import additional pay feature requires that you include these three column headers and the corresponding information for each header in your import file:
-
Employee ID
-
This column is where you’ll input your employees’ unique identifier
-
Three different identifiers are permitted in this column of your import file—Namely Employee ID, Company Employee Number, or Employee UID.
-
Note that your column header must match the type of unique identifier you choose to use.
-
For example, if you decide to use Employee UID instead of Namely Employee ID, your column header should read “Employee UID.”
-
-
Also, note that you must use the same identifier type for all employees in your import.
-
-
-
Pay Type
-
These import codes are provided by our service team. If you do not have importable pay type codes set up for your organization, submit a case for assistance using the taxonomy Payroll > Company Setup > New Pay Type Code Request.
-
Note that pay type codes are case-sensitive.
-
-
Amount
-
This field refers to the dollar amount of each additional pay.
-
These three required column headers are marked with an asterisk in the import modal.

Also listed are additional column headers you can include in your .csv file for import, including:
-
Check Number (this field can be used to separate additional pays onto multiple checks )
-
Job Code
Importing Your Additional Pay File
To import additional pay, you have the option to Drag & Drop your file into the popup window, or you can Browse to select the file from your computer.
Once you’ve dropped or selected a file to import, a summary of the import will appear before the import is finalized. This summary allows you to:
-
Validate that your import file is free of errors
-
Review the number of employees, records, and total payment amount included in the import.
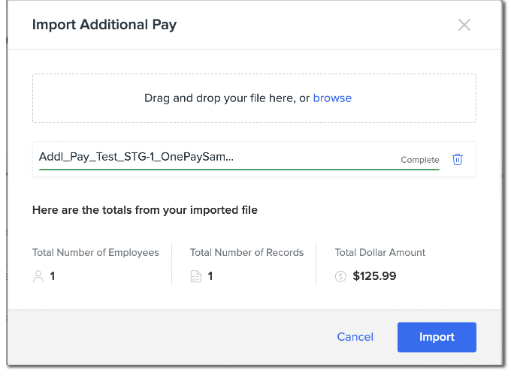
If you’re satisfied with the information on this confirmation screen, click Import to finish.
Viewing Imported Additional Pay
As soon as importing is complete, you’ll be directed back to the Step 1 payroll screen, where additional pay amounts will appear immediately.
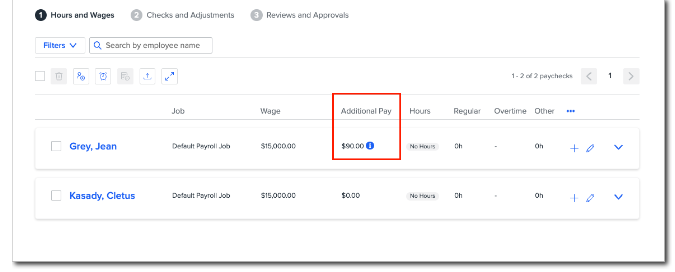
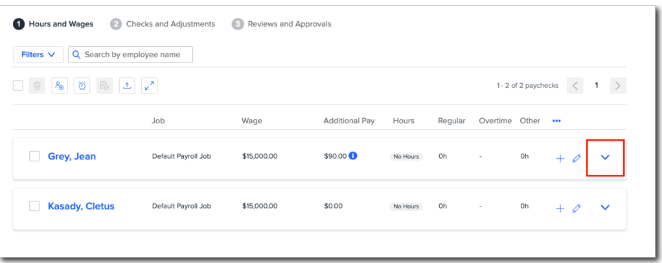
You can hover over the Information icon beside the additional pay amount to view a breakdown of individual additional pay.
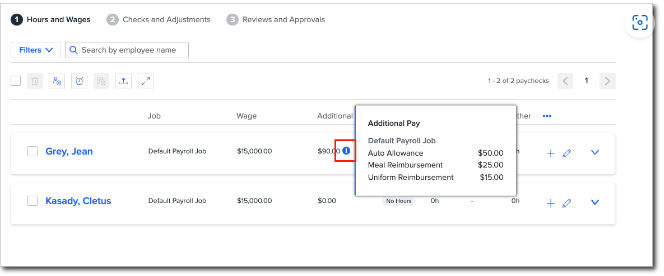
You can also view even more information on additional pay—including additional payments that may not be visible in the Additional Pay pop-up if you have a large number of imported payments—by expanding the employee check card.
Click on the dropdown arrow to the right of the employee check menu and scroll down to view.
Creating Separate Checks for Additional Pay
If you’d like any additional payments to appear separately on their own checks, you can specify the individual check number where you’d like each additional pay to appear in your import file using the Check Number column header.
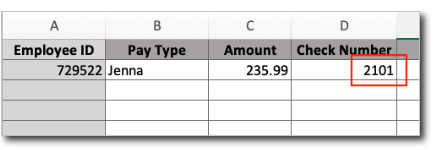
You can also group multiple additional payments on the same check by specifying the same check number for multiple additional payments in your import file.
-
In this case, all additional payments with the same check number will be grouped into the total amount on that specified check.
Importing Additional Pay Using Multiple Jobs
If you’re uploading additional payments and using multiple job codes on a single paycheck, note that additional payments will be applied to the first listed job code by default.
If you’d like to apply additional payments to other jobs on the same paycheck, you can do so by specifying the other job codes to which you’d like to apply the additional pay in your import file.
-
Begin by ensuring the job codes you need have already been created by following the instructions in the article Adding a Job Code in Namely Time.
-
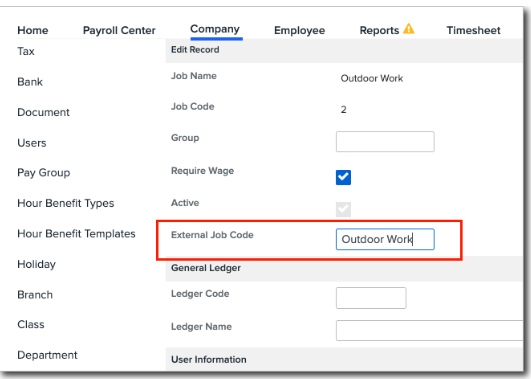
Then, in Namely Payroll, navigate to Company Settings > Job, where you can add an External Job Code.
-
Note that you must assign an External Job Code in Namely Payroll in order to import job codes successfully using the Import Additional Pay feature.
In the case that some additional payments in your import file specify job codes, while other payments do not list specific job codes, any additional payments where the job code field is left blank will be applied to the first listed job code by default.
If you’d like to view the job codes where additional payments have been applied, click on the dropdown arrow to the right of the employee check menu to view the employee’s check card, then scroll down to see additional details.
Common Import Errors
If there are any data errors in your original import file, you’ll receive an alert in the validation summary with a link to download a .csv file listing any data that needs to be corrected.
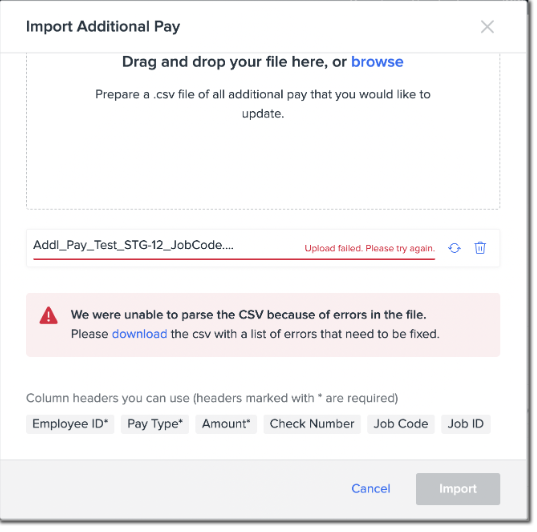
Some common error messages include:
-
Could not parse “value x” check number—meaning that your original import file includes the Check Number column header, but the listed row (row “x”) does not specify a check number.
-
Note that if you’ve included Check Number as a column header, you must specify a check number for all additional payments.
-
The number(s) listed in this error correspond to the rows where this data is missing.
-
-
Invalid Employee ID—meaning the Employee ID included in your import file does not exist.
-
Unmapped or Missing Pay Type—meaning the corresponding Pay Type code in your import file does not exist or does not match.
-
Employee not in Paycycle Pay Group—meaning the Employee ID entered was valid but was associated with an incorrect pay group.
Correcting Import Errors
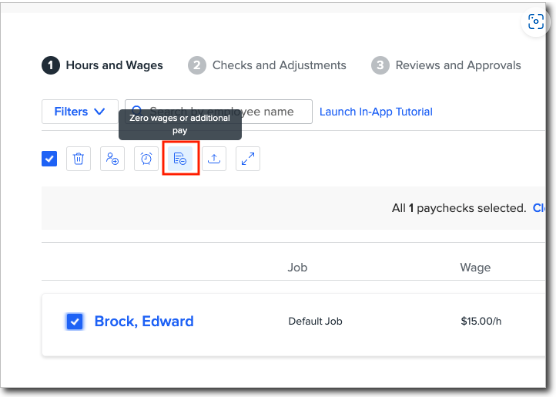
If you discover an error in your import file after the import has already been completed, one way to make corrections is with the option to Zero Additional Pay.
-
Locate this option by selecting the check(s) for which you would like to zero additional payments in Step 1 of Payroll.
-
Select the Zero Pay icon.
-
Note that using the Zero Additional Pay option to make corrections will zero all additional payments on the selected check(s)—this includes recurring additional pay that may not have been uploaded in your recent import.
Alternatively, if you’d like make corrections but want to avoid zeroing any recurring additional payments, you can reset the payroll by:
-
Clicking the Reset button next to the pay cycle in the Payroll Center to start it over.
-
Note that any one-time changes you have made within the cycle will be lost.
-
LEARN MORE
With this release, Namely is making importing additional pay within a single pay cycle easier than ever!
-
Note that our new Import Additional Pay feature applies to one-time payments uploaded to a single pay cycle.
-
To learn how to set up recurring payments that occur on every pay cycle, see the article Payroll Imports: Employee Recurring Additional Pay.
-
To learn how to import one-time payments over multiple pay cycles, see the article Global Additional Pay Imports.
-