Namely Time: Individual Hours Overview
This article breaks down the Individual Hours section of Namely Time, and provides instructions on making common adjustments to hours.
OVERVIEW
The Hours section of Namely Time is where you will spend most of your time. You can access it by clicking Individual Hours.
INSTRUCTIONS
After selecting an employee, a grid will display hours in Open Weeks (the default period). Once a week is closed (Company menu), the hours are hidden, but can still be accessed by adjusting the date range and clicking Update. This article will provide you with an overview of the interface. 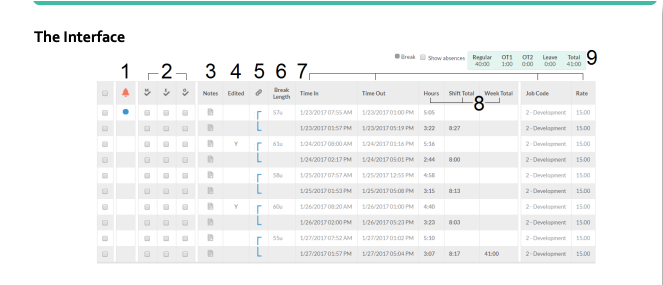
-
Exceptions: This column includes the exceptions. An exception is anything that impacts hours or payroll. So if a shift is missing approval or contains something important such as an employee clocking in early or overtime then a bubble will appear. If you hover over the bubble then it will show you the exception(s) that exist for that record.
-
Approving Hours: M for Manager, E for Employee, and O for Other. Many companies will have the manager and employee approve every shift. The manager could approve from this screen and see if the employee approved it. Some companies have a third person approving every shift (Other). An example of Other could be an alternate manager or timecard approver.
-
Shift Notes: The Notes column allows one or more notes to be added. If a note was added then the icon will look like this: Sometimes it is necessary to add a note. For example, an employee is late from a flat tire, leaves early for an emergency, or is approved for overtime.
-
Edited: The Edited column will include a Y if the record was manually created by a user or edited. Clicking on the Y will open an audit log with more details on the change. If the record was created by an employee clocking in and was not edited then nothing appears in the column.
-
Breaks: This column shows a bracket that connects one segment to another to help you easily identify which segments make up a shift. Although it’s called the Breaks column, this is not referring to a rest break, but a break in the shift. A shift will be broken into segments when the employee goes on a break or changes job code.
-
Break Length: This column shows the length of the break. In the example above, the employee took a 57-minute break on January 23 after the 7:55 AM record. 57u is unpaid 57p is paid.
-
Shift Information: These columns include the start and end time of each segment, the job code, and the rate if rates are being tracked.
-
Shift Totals: These columns include the total hours of each segment, shift, and week.
-
Hour Breakdown: This table breaks down the regular, overtime, leave, and total hours. This column is most important. The hours in this column are exported from Namely Time into payroll.
Adding, editing, and approving timecard hours
When adding leave (e.g., sick, vacation, holiday), it is a common practice to create a timesheet. Example: "Joe used x hours of vacation” instead of “ Joe went on vacation from 8 AM-5 PM.”
-
Click Add Segment.
-
Place a check next to Time sheet entry.
-
For Time In, enter when the leave began. For example, if they took the day off, enter 8 AM. If they took the afternoon off, enter 1 PM.
-
For Hours, enter the length of leave.
-
For the job code, choose the leave code.
-
Click Save.
Adding Multiple Days
There is a Days drop-down list if the record should apply to more than one day. For example, if you're adding an eight-hour time sheet consisting of vacation to Monday, choosing 5 from the drop down would apply to Monday through Friday.
-
Click Add Segment.
-
Place a check next to Time sheet entry.
-
For Time In, enter when the leave began.
-
For Hours, enter the length of leave.
-
For the job code, choose the leave code.
-
For Days, select 5.
-
Click Save. The Days drop-down list will appear when adding shifts as well as time sheets. It only appears when adding a record - not editing.
Editing Hours
Sometimes an employee forgets to clock in or out, forgets to change job code, or leave on break. Or maybe the employee was unable to access WebClock. The manager or administrator can fix this.
Clocking In a Shift
-
Click Add Segment
-
Place a check next to: Individual is clocked in. This will remove the Time out fields.
-
Place a check next to: Missed in punch.
-
For the Time In, enter the date and time of the punch.
-
Choose a job code.
-
Click Save.
Clocking Out a Shift
-
Select the clocked-in segment by placing a check to the far left.
-
Click Manage Segments and choose Edit.
-
Remove the check next to: Individual is clocked in.
-
Place a check next to: Missed out punch.
-
For the Time Out, enter the time they ended their shift or went to lunch.
-
Do not choose a break type.
-
Click Save.
Changing Job Codes
-
Clock out of the employee’s current segment and choose a break type.
-
Add a clocked-in segment that begins when the segment from step 1 ended.
-
Place a check next to: Missed in punch.
-
Choose the new job code.
Putting an Employee on Break
-
Select the clocked-in segment by placing a check to the far left.
-
Click Manage Segments and choose Edit.
-
Remove the check next to: Individual is clocked in.
-
Place a check next to: Missed out punch.
-
For the Time Out, enter the time they ended their shift or went to lunch.
-
Choose a break type.
-
Click Save.
Editing and Deleting
-
Select the segment by placing a check to the far left.
-
Click Manage Segments and choose Edit or Delete.
Approving Hours
-
In Individual Hours, place a check in the M or O column next to each record. O which stands for Other, could be a timecard approver or alternate manager.
-
Click Apply Changes to save the approvals. The M at the top of the column will approve all hours.
-
What about the E column? The users won’t place a check in the E column. As the employees approve their time in WebClock, the approval will appear in the E column.
Disabling or Re-Enabling an Automatic Break
Example: I am using automatic breaks, but if an employee works through lunch, how would I disable the automatic break for that shift?
-
Select the segment with the break.
-
Click Manage Segments and choose Edit.
-
Click on the Extra button.
-
Place a check next to Disable automatic deduction.
-
Click Save to save the Extra screen and Save the edit. You would remove the check if you need to re-enable the automatic break.
Forcing Overtime or Removing an overtime force
Example: I want to force a shift to overtime. How would I do that?
-
Select the segment.
-
Click Manage Segments and choose Edit.
-
Click on the Extra button.
-
Select Force overtime 1 or 2.
-
Click Save to save the Extra screen and Save the edit.
-
Repeat these steps for each segment that should be paid overtime. You would select Do not force overtime to remove a force.