IP Restrictions in Namely Time
Clients may require their employees to only be able to clock in/out from a certain IP address. Such instances would be if hourly employees are to only be able to perform timecard functionality if they're within the range of a company's work location. IP restrictions can be configured on an individual profile or role level. Role level IP restrictions would ensure a group of employees under a specific role are able to clock in within an IP range versus setting this configuration on the individual profile.
OVERVIEW
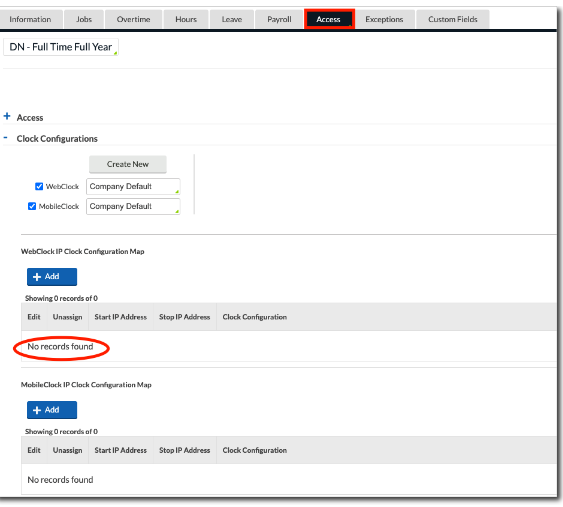
IP restrictions are necessary for companies who want to grant only certain IP addresses to allow clock in/out. If an IP address is not listed, it will allow the employee to clock in/out from any location. Below is an example of a client who does not currently have IP restrictions:
PROCESS
Follow the steps below to successfully set up IP restrictions on an individual profile level. If the IP restriction needs to be configured for multiple employees under the same role, the instructions are the exact same. The only difference is selecting an employee role versus an individual profile.
-
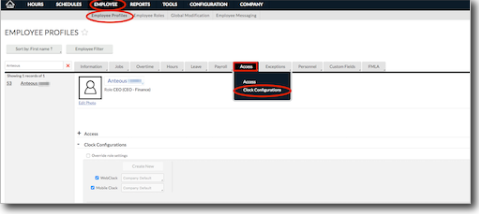
Go to Employee > Employee Profiles.
-
Select the appropriate employee then click Access and select Clock Configurations.
-
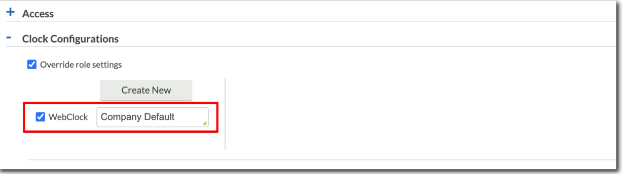
Ensure the proper clock configuration is in place from the WebClock drop-down menu before adding an IP address. If Company Default is listed, employees are able to clock in from any location. If you want employees to have clock-in capabilities within a certain IP range, you'll need to create a new configuration and label it View Only/No Clock In.
If you need to create a new configuration please continue reading. If you already have a proper configuration please skip ahead to step 7.
-
Select Override role settings > Create New from the selected employee's profile. This needs to be check marked to confirm the change that will only affect the selected employee.
Tip:
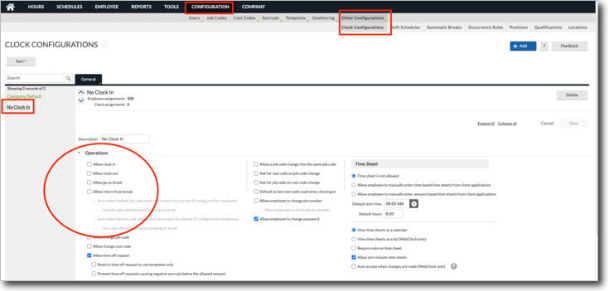
A View Only/No Clock In configuration is required under the existing options that can be managed through the following tabs: Configuration > Other Configurations > Clock Configurations. Select Add to create a new clock configuration if not available.
-
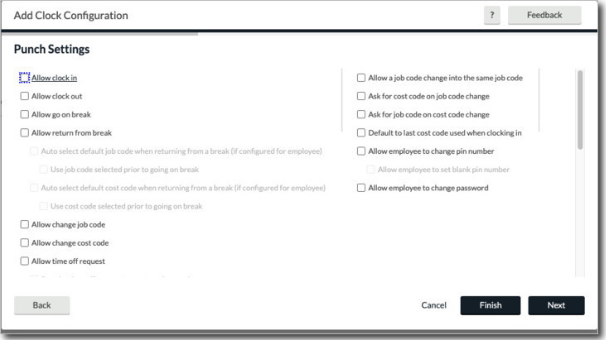
In the Description column, input the label View Only/No Clock In and click Next. On the following screen, deselect all Punch Settings as shown below then click Finish.
See below for the View Only/No Clock In clock configuration.
-
Once the clock configuration is correct, it must be assigned to the Employee Role or Employee Profile. Select the relevant role or profile from the following tabs: Employee > Employee Profiles or Employee Role > Access > Clock Configuration. Under the WebClock drop-down menu, select the newly created configuration View Only/No Clock In.
-
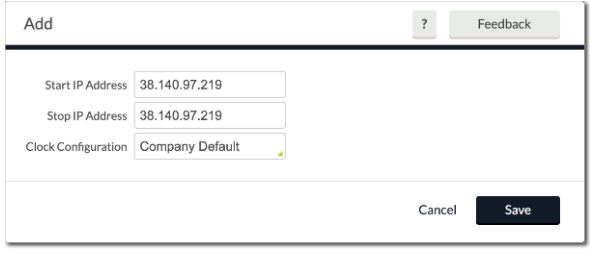
Under WebClock IP Clock Configuration Map click Add and enter the relevant Start and Stop IP Address.
-
In the Clock Configuration column, select Company Default. This will allow the employee to only be able to clock in from the listed IP range.
-
Click Save.
TIP:
IP address can be found by searching "What's my IP?" in Google.
-
In the top right corner, click Save to finalize the newly added IP range.