Payroll Import: YTD Imports (Implementation)
REQUIRED DOCUMENTS
-
Payroll Register in Excel Format
-
Payroll Register in PDF Format - If available
-
Quarterly Tax Packet - For Closed quarters
PAYROLL REGISTER REQUIREMENTS
-
Excel Format: A register must be in Excel and columnular format. If the client is only able to provide a PDF, or the Excel is not in columnular format, you can create a case in Salesforce using the following taxonomy to get it reshaped by Data Services.
-
If a client is going live mid-quarter, the previous full quarter(s) will need to be imported and each individual check date’s register will need to be imported. If a client is going live on the first check date of a quarter, only the previous quarter(s) register(s) will need to be imported.
-
Case Record Type: Professional Services
-
-
Product Name: Payroll
-
Product Feature: Employee Payroll Profiles & Data
-
Function: Reshapes
-
PDF: Check Box if file is a PDF
-
Mission Control Project: Find the Mission Control Project
-
Subject: CID XXXX - [Client Name] - [Register Date] Reshape
-
Description: “Please reshape the [Register Date] register” [Provide Google Drive Link to the File]
-
Contact Name: Enter the name of a contact on the account. This will be used to link the case to the Salesforce account.
-
Data Points - Must contain the following with a row for each employee. It is okay if an employee has multiple rows as long as the data is not duplicated. You can consolidate the rows using Excel .
-
Employee Name
-
All earnings broken out by earning type (Bonus, Commission, Regular, etc.)
-
EE Deductions broken out by deduction type (Medical, Dental, Garnishment, etc.)
-
ER Deductions broken out by deduction type (Basic Life, HSA, LTD)
-
EE Taxes broken out by tax type (Social Security, AZ WH, NY RES, etc)
-
ER Taxes broken out by tax Type (AZ UI, FUTA, Medicare, etc)
-
-
PDF Format - Though not required, a PDF version of the register is helpful as a secondary reference for auditing and review.
QUARTERLY TAX REQUIREMENTS
For all closed quarters, you will need the client’s Quarterly Tax Return for all Federal and State filed for that quarter. Statement of Deposits (SODs) is acceptable since they contain the same information.
TIP:
Tax Packets may not be available if the quarter just recently closed. It can take some providers almost a month to make them available to clients.
Phase 1: Balancing the Register
Balancing the register is used to confirm not only the taxability of each earning and deduction but to make sure that the register provided matches what they reported to the IRS on their tax return.
-
Open the Payroll Register you are importing and Save As using the naming convention [Date of Register] Register FOR BAL and save it in the Client’s Google Drive Folder under Payroll > YTD.
-
Example: “Q1 Register FOR BAL” or “9.15 Register FOR BAL”
-
-
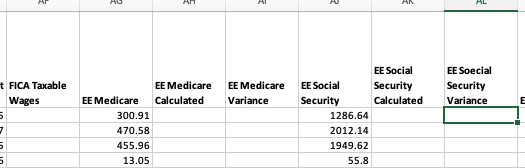
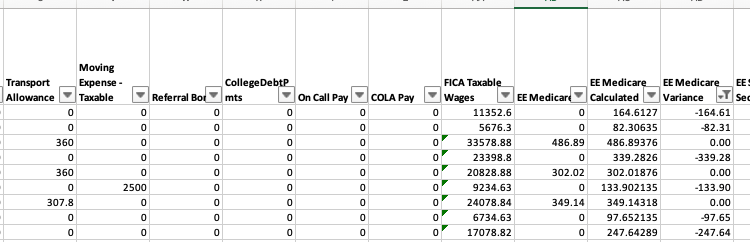
Find the EE and ER Social Security and Medicare columns and move them next to each other. Insert (1) column to their left and label this FICA Taxable Wages. Insert (2) Columns to the right of the EE Medicare column labeling them EE Medicare Calculated & EE Medicare Variance. Repeat this step for EE Social Security.
-
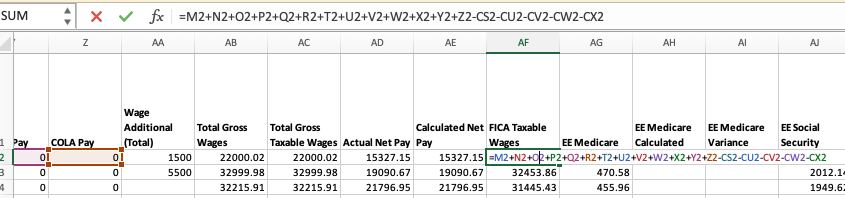
In the first cell under the FICA Taxable Wages column, use an Excel formula to calculate the FICA Taxable Wages by adding all FICA taxable earnings and subtracting all Pre-Tax deductions, and copy that formula for each row.
-
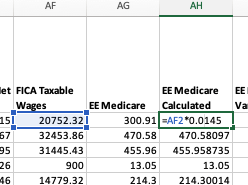
In the first cell of the EE Medicare Calculated column, use an Excel formula to calculate the Medicare tax that should have been withheld based on your FICA Taxable Wages calculation. Copy that formula for each row.
-
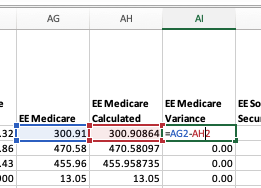
In the EE Medicare Variance column, subtract the EE Medicare column from the EE Medicare Calculated column. Copy that formula for each row. You can use the Decrease Decimal button in excel to move the number to 2 decimal places.
-
Repeat Steps 4 & 5 for EE Social Security.
-
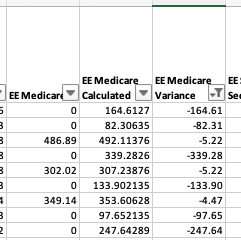
Using a filter on the EE Medicare Variance column, filter out any variance that are less than or equal to +/- .02.
-
You will notice in the above screenshot, there are a handful of employees who did not have any Medicare withheld. It is safe to assume they are FICA Exempt. You will need to confirm this with the client and make sure they exempt these employees from FICA taxes on their Namely Payroll profile in their Tax tab.
-
There are three employees, however, who have Medicare withheld but still show a variance. This means there is an Earning and/or Deduction that was/wasn’t included in the FICA Taxable Wage calculation OR and Earning and/or Deduction is not taxed the way we assumed it to be (i.e. an earning is non-taxable when it should have been taxable, a deduction was pre-tax when it’s actually post-tax). It can also mean that an employee has reached a wage base limit, depending on the date of the register (e.g. Unless an employee is a high earner, FICA limits may be reached later on in the year and shown in the variance columns).
-
In the first example with the employee having a -$5.22 variance, because the variance is negative this means our FICA Taxable Wage calculated for this employee is higher than the FICA Taxable Wage used to calculate EE Medicare when this payroll was processed. This means we included an earning that should not have been included (earnings increase taxable wages) OR we did not include a deduction that should have been included (pre-tax deductions reduce taxable wages).
-
The best way to find out what is causing this is to take the variance amount and divide it by the Medicare rate to find the taxable wage amount causing this variance. 5.22 / .0145 = 360. We can now search for an Earning or Deduction in the amount of 360. In this example, you can see that the Transport Allowance was included as a taxable wage when it should not have been.
-
If any Earnings and Deductions are found to be set up incorrectly, make sure to adjust their setup before doing any imports.
-
We can now remove it from our FICA Taxable Wage calculation which will then adjust all FICA Calculated and Variance Columns as well leaving the assumed to be FICA Exempt Employees as the only rows with a variance of more than +/- .02.
-
Repeat Step 7 for the EE Social Security Variance column.
-
Repeat Steps 4-8 for the ER FICA columns. Save the file to save your progress.
-
Sum the EE/ER FICA & Federal Income Tax columns and compare them to the 941 to make sure the amounts match. It is okay if they are off by a couple of cents. If the totals do not match it could mean that there are employees missing from the register or a register(s) missing from the totals for that register. You will need to work with Data Services/the Client to either re-run the report or find out why they are not matching.
Phase 2: Validating the Register
Validating the register is used to get the Employee IDs on the file which will be used as a unique identifier for the import. This step will also help you find any employees that have YTD data but no Namely Payroll Profile created.
-
Save a copy of the Balanced Register in the Payroll > YTD folder using the naming convention [Date of Register] Register FOR VAL. Example: Q1 Register FOR VAL or 10/15 Register FOR VAL
-
Remove any superfluous columns -- any totals columns, taxable wages columns, the columns added during the Balancing Phase, etc. The only columns needed are the employee names, Earnings, EE/ER Taxes, EE/ER Deductions amounts.
-
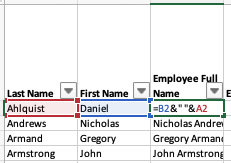
If the employee’s full name is already in one column, go to Step 4. Otherwise, Concatenate the Employee’s First and Last Names into one column and label the Column as Employee Full Name. Copy and paste values to remove the formula leaving the formula value in the cell instead.
-
Save the File and open up the Import Tool. Click +Start New Import. Select the Company. For the Import Type select Find Payroll EmployeeID From Email/SSN/Full Name.
-
Click the Choose File button and select your FOR VAL file. Go through the Import Tool Steps.
-
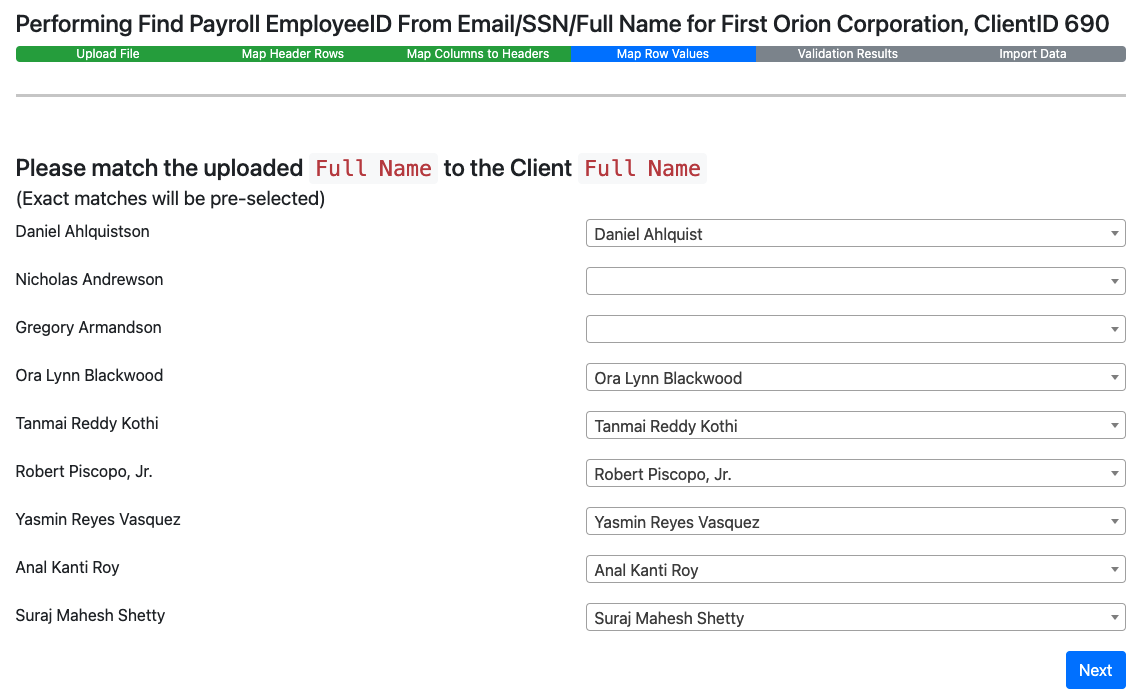
There may be a couple of employees that the system was unable to find based on the employee's full name. It could be that there slight differences in the name used on the register versus what is in the system (e.g. Tom vs. Thomas, etc). You can search for them in the drop-down if you know who the employee is.
-
If the employee is not in the drop-down, that means they do not have a Namely Payroll Profile. Check HRIS to see if they have an HR profile and are just missing a pay group. If they are missing in HRIS, you will need to work with Data Services/the Client to get them added. You can select Skip in the dropdown for any employees currently missing a Namely Payroll Profile and manually add their Employee IDs once the profiles are created and their Employee ID is available.
-
-
Once all the employees available are mapped, click Next. You can now click Download Complete Import File to save your file that now has the EmployeeIDs on it. Save this file in the client’s Payroll > YTD folder and rename it to [Date of Register] Register FOR TRANS. Example: Q2 Register FOR TRANS or 8/15 Register FOR TRANS
Phase 3: Transforming the Register
-
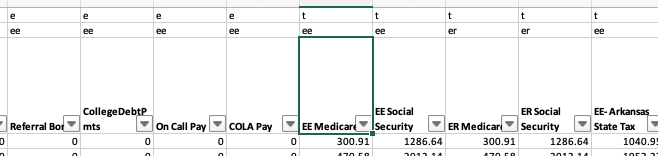
Open up the FOR TRANS file and add two rows above the first row.
-
On the first row above each earning, tax, and deduction column add an “e” if it’s an earning, a “t” if it’s a tax, and a “d” if it’s a deduction.
-
On the second row above each earning, tax, and deduction column add an “ee” if it’s an Employee Amount and add an “er” if it’s an Employer Amount.
-
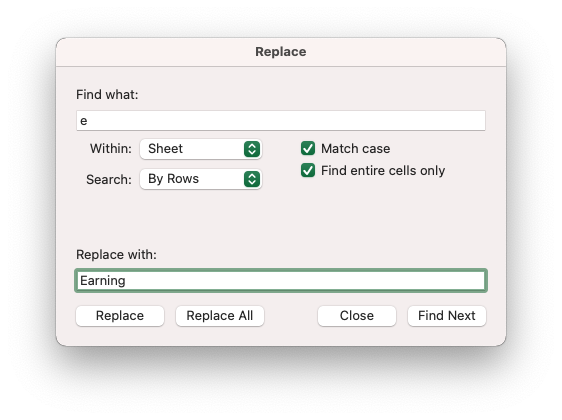
Highlight the first row and click Control + H on your keyboard to do a Find and Replace.
-
Find What: e
-
-
Match Case: Check
-
Find entire cells only: Check
-
Replace With: Earning
-
Click Replace All. Repeat for “t” for “Tax” and “d” for “Deduction”
-
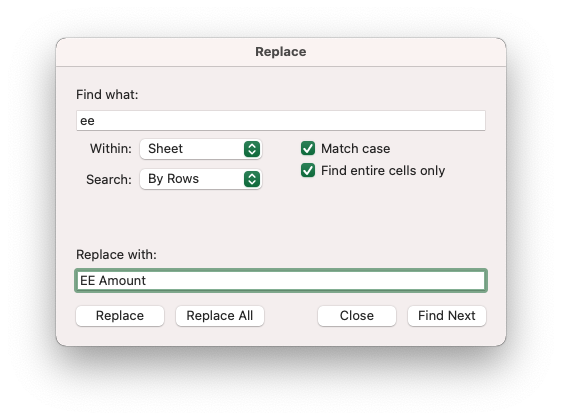
Repeat Step 4 on the second row for “ee” for “EE Amount” and “er” for “ER Amount”. Save your progress.
-
Open up Transformer and select Reshape. Select your FOR TRANS file and click Reshape.
-
Download the reshaped file and save it in the Payroll > YTD folder using the naming convention [Date of Register] Register FOR IMPORT.
Phase 4: Importing the Register
-
Open Back Office Legacy > Taxes > YTD and Void. Select the Client, Pay Group, and the Start and End date for the register being imported. For single registers, use the pay date as the Start and End date. For Quarterly registers, use the last date of the quarter. Example: Q1 Register - Start Date: 3/31/xx; End Date: 3/31/xx. 9/15 Register - Start Date: 9/15/xx; End Date: 9/15/xx
IMPORTANT: Once the cycle is created, check the Export Exclude box and click Save.
Repeat this step for each pay group with the same check date. You can import one file into multiple pay cycles.
-
Open the Import Tool and select the +Start New Import button. Select the Company. Import Type: YTD - Configure Employee YTD Earnings, Deductions, and Taxes. Select the file. Click Begin Validation.
-
On the first page, click Next.
-
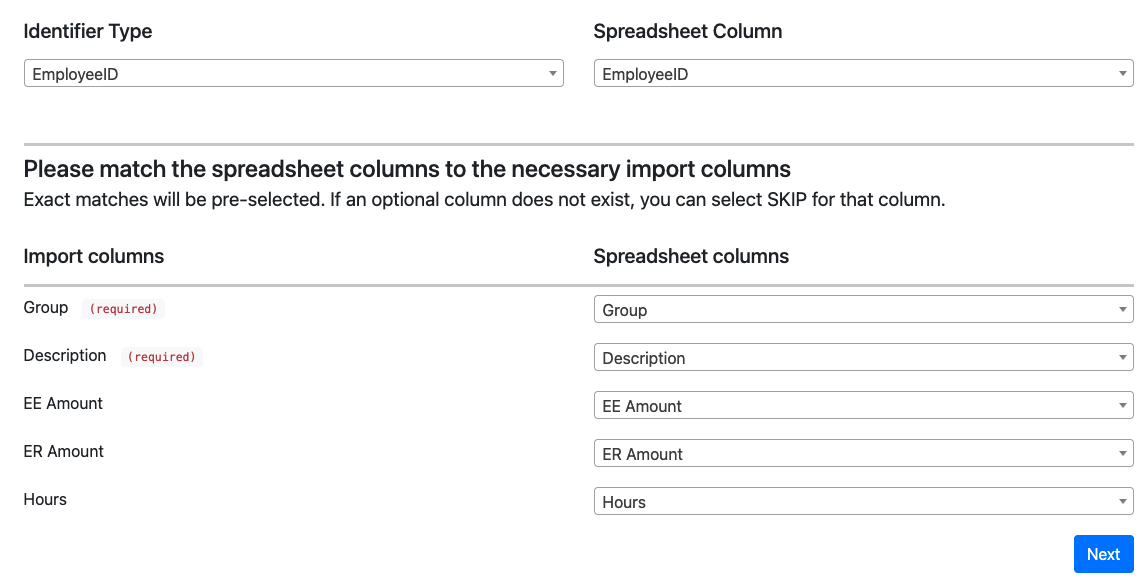
On the second page, the mapping should auto-populate. If not, map the identifier type which should be the EmployeeID, as the import columns.
-
The next page is where each of the earnings, taxes, and deductions are mapped. You are mapping the respective earnings, taxes, and deductions on your file to their respective earning, tax, or deduction in the system.
-
Lastly, enter the Pay Cycle ID(s) of the pay cycle(s) you are importing into. The pay cycle must be open for data to be imported or else the import will fail.
-
-
If a deduction is showing in the Earning or Tax sections, or any other variation of this instance, this means the wrong header was added in Phase 3 Step 4. This can be corrected by opening your FOR IMPORT file, filtering for that transaction and updating the value in the Group Column.
-
If an Earning, Tax, or Deduction is not showing up in the drop-down, that means it has not been created in the system. Earnings can be created using Apollo MIssion 7. Deductions can be created in Namely Payroll > Company > Deductions. Taxes can be created in Namely Payroll > Company > Tax.
TIP:
Map all the possible fields leaving the ones that need to be created blank. Then go back and create the objects that are missing. Once created, you can click the back button on your browser, then the Next button the page, and the Remap ## stored values button to remap the fields you had already mapped and map the fields you had just created in the system.
-
Click Next. Review any warnings or errors and make corrections to your file and start the import process over as needed. Click Import.
-
Once the import Status says “success”, go back into BOL and open the cycle(s) and click Update Emp Totals & Close PayCycle to close the cycle.
Phase 5: Reconciling the Import
Reconciling the import is a step used to make sure all the fields to be imported have been imported and were imported to the correct fields.
-
In Namely Payroll, go to Reports > Pay Cycle or Date Range depending on if the register was imported into one (Pay Cycle) or more (Date Range) pay cycle. Download a Payroll Register (Excel) Report. Save this file as [Date of Register] Register FOR RECON as an Excel file, not a csv.
Example: Q1 Register FOR RECON or 8/15 Register FOR RECON
Add a Totals row at the very bottom for each column.
-
Open the FOR VAL file and add a Totals row at the very bottom for all columns that were imported if a totals column is not already present.
-
Compare the totals for each item in the FOR VAL file to the FOR RECON file. As each total is confirmed to match, highlight that field showing that the totals match.
There may be instances where multiple columns on one file or the other were mapped to one field when importing. Keep this in mind when confirming totals.
-
Make sure all columns that need to be imported were imported and all totals match. Make adjustments accordingly. After all adjustments have been made in the system, complete Steps 1-3 until all totals match and all items were imported correctly.
Once all five Phases of the import are complete, move onto the Out-of-Balance Audit process.