NAMELY
Introduction to Roles & Permissions

Roles & Permissions
Welcome to Namely Roles & Permissions
This course will provide you with extensive knowledge in permission configuration and management. We will cover the following topics:
• Namely Roles
- Default roles
- Role management
- Permission descriptions
• Field Group Bundles
- Default bundles
- Bundle configuration
- Bundle and role assignment
• Administrator System Access
- User role management
- New profile fields
- Permission management
Namely Roles
Roles & Permissions:
Namely offers a robust, customizable framework for managing access roles and user permissions. Client access to roles and permission settings is initially disabled until administrative training is conducted.
When new Namely sites are created, four (4) default, staff access roles are added:
- Employee
- Manager
- Executive
- HR Support Admin
Each of the above roles may be adjusted and configured to the system administrators’ specifications. Upon initial import, all employees are assigned the Employee access role, which is the most conservative and limited.
Namely System Administrators by default have access to view and manage all company and employee data settings. Administrators are the only users with unlimited access roles. As few individuals as possible should have this level of access to ensure system security.
Permission configurations are typically established during an organizations’ initial implementation (prior to staff rollout) but may be maintained and updated on an ongoing basis.
Basic Navigation
Access role and permission settings directly from the Namely homepage. Select the Company tab from the upper, black ribbon dashboard.
Note:
Most individuals will not view or have access to the Company tab in Namely.
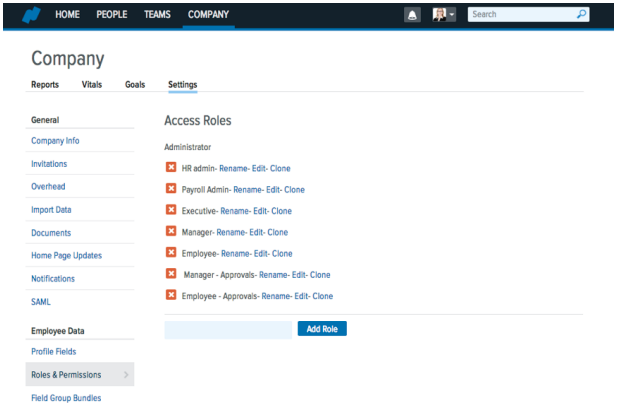
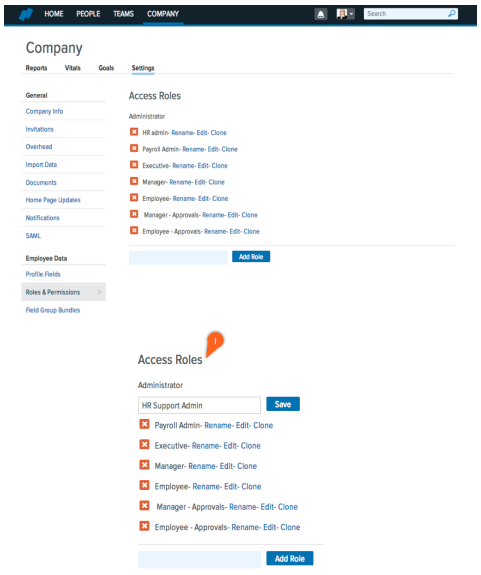
Access Roles
Roles & Permissions:
From the Company tab, select Settings. Under the Employee Data column, find the default user roles in the Roles & Permissions section.
Access Roles:
Any access role in this section is available for user assignment. Roles may be configured and managed by taking the following actions:
- Rename
- Edit
- Clone
- Delete
- Add Role
Rename Role:
Default role names may be changed to reflect an organizations’ users. Select, Rename to update the title of an existing role’s name.
Edit Role:
By selecting Edit, the permissions and settings behind each role will display. Administrators may adjust individual role permissions at any time. Updates become effective immediately after saving.
Clone Role:
Administrators may clone an existing role to efficiently create a new access role. When creating a new role, begin by cloning the existing Employee role, and then add or subtract permissions as appropriate.
Delete Role:
Administrators may delete superfluous access roles to avoid them being assigned to any users in the organization. Deleted roles may not be recovered. Ensure no user has a role assigned before deleting it.
Add Role:
An entirely new role, with no permissions prefilled or selected, may be added by selecting Add Role. Once added, select Edit to configure the role permissions and settings.
Permission Configuration
Access role settings are configured by selecting Edit, to the right of the appropriate role name.
Permissions:
Role permissions are displayed in a vertical list with a series of checkboxes. Features and settings may be enabled by selecting the applicable checkbox.
Permission Scopes:
Certain permission settings may be scoped by different criteria to facilitate unique access restrictions. By double clicking on a permission lacking a checkbox, a series of additional scope options will appear in a vertical list. Permission scopes will be specific to each Namely platform’s divisions, custom teams and user roles.
Permission Scopes:
- All
- Same department
- Same division
- Same profit center and same department
- Report under via team
- Report under via company
- Directly report under via company
- Directly dotted line under via company
- Self
Scopes help define the breadth of a user’s management capability in Namely. One or more scopes may be selected and combined to expand or limit a user’s access level. The amount of scopes will vary based on your organization’s use of divisions and teams. Infinite scope combinations are possible. Layered permission scopes require a user to meet all requirements, i.e. the user must be a member of both the departments and divisions in the scope.
Exceptions:
Feature permissions with scopes accommodate access exceptions effortlessly. Exceptions may be defined by a division, access role or unique user name.
Whitelists:
Alternatively, feature scopes also support providing divisions, departments, access roles or unique user names with a particular permission privilege. The act of whitelisting allows for permission privileges to be granted on a selective basis.
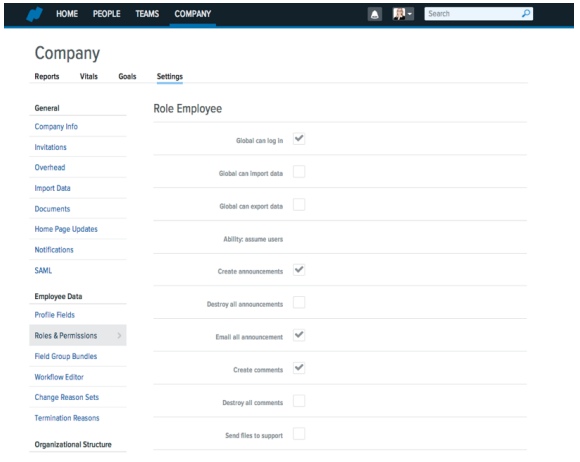
Permission Descriptions
Global can log in:
Grants login access to Namely HRIS.
Global can import data:
Allows a user to import CSV files via Namely’s import tool in Company Settings.
Global can export data:
Enables a user to be able to export data files.
Ability: assume users:
Only administrators are able to assume other users’ profiles. This permission allows other access roles to view as the profile of another employee.
Create announcements:
Share an update in the organization’s newsfeed on the Namely Homepage.
Destroy all announcements:
Allows the user to audit the organization’s newsfeed, and delete inappropriate announcements shared by others.
Email all announcement:
Enables the checkbox “Email update to all” when sharing announcements in the newsfeed. Without this permission, users may only post directly to the newsfeed with no emails.
Create comments:
Permits users to comment on previously shared announcements, including activity posts from the Namely widgets (i.e. birthdays, new hires and work anniversaries).
Destroy all comments:
Allows the user to audit previously shared comments, and delete any comments that are inappropriate.
Send files to support:
Permits a user to access the Support File portal, through which confidential, proprietary data files may be sent to the Namely Support and Services teams. A user with this permission, may also access and view other previously sent support files. Password protect all sensitive files.
Company can view vitals:
Allows the user access to the Company’s Vitals dashboard, which displays utilization on custom teams, growth percentages, new hires and departures (within the last 30 days), and company-wide performance levels.
Company can view reports:
Allows the user to access a small library of standard reports viewable in the Company tab.
Company setting info:
Grants access to the company info tab within the Company Settings, under the General section.
Company settings overhead:
Allows a user to view and update the company overhead multiplier and annual billable hours per person.
Company settings team categories:
Opens the user to the Team Categories tab under Employee Data in Company Settings.
Company settings skill tags:
Allows the user to manage the company’s list of skill tags, which once created may be assigned and searchable. Users may also create their own skill tags, if allowed.
Company settings divisions:
Allows a user to manage the divisions viewable on the Team page of Namely.
Company performance review ratings:
Permits the user access to manage the custom performance rating labels and colors in the Performance section of Company Settings.
Company settings job titles:
Grants the user access to manage job titles and tiers. Users with this permission may add, edit or delete job titles and tiers.
Company settings roles:
Enables the user to access and manage the platform’s roles and permissions.
Company settings terminated reasons:
Permits the user to manage the custom termination reasons that are tagged to departed employees’ profiles.
Company settings fields:
Allows the user to manage the creation of custom profile fields, as well as the organization and layout of the profile field display to users.
Company setting time off:
Grants the user access to time off types, plans, settings and employee assignment in the Company Settings.
Company settings notifications:
Allows a user to manage the global time off notifications for all users on the platform.
Company settings documents:
Permits the user to upload, download and manage the company wide documents that are viewable in all employees’ profiles.
Pay groups:
Grants the user access to manage a payroll client’s pay groups. Initially pay groups are created and assigned by the Namely Implementation team.
Company settings goals:
Allows a user to view and update the organization’s goals in the Company tab.
Company settings competencies:
Permits the user access to manage and assign employee competencies in the Performance section of Company Settings.
Company settings holidays:
Grants the user access to view, create, and manage the company holiday plans.
Company settings workflow templates:
Enables the user to access and manage the organization’s workflow templates for employee and manager change requests.
Reporting engine:
Permits the user to gain access to the reporting engine to create custom reports. Note a users’ permissions will always be respected in the reporting engine; users are not able to report on data beyond their permission settings.
Integrations zenpayroll:
Deactivated permission.
Integrations payroll admin:
Grants the user access to Namely Payroll as an administrative user.
Payroll timesheet always on:
Enables an hourly user’s ability to enter their time into time cards and against projects or jobs.
Payroll paystub always on:
Allows a user to access the Pay Stub tab in Namely Payroll to view their current and historical pay checks.
Tasks manage all:
Grants the user access to manage all task lists created on the platform. By default, users are only able to manage the task lists created by them or lists of which they are owners.
Tasks can create:
Enables the Tasks feature, accessible from the users’ personal springboard on the Namely Homepage.
Team add remove teams:
Activates the Custom Team feature, accessible from the Team page. Users may add or delete teams.
Team draft share:
Grants the user access to view any Custom Team with a status of draft.
Team can view goals:
Permits the user to view the goals of Custom Teams. This does NOT allow users to view division or departmental goals.
Ability: team read structure:
Allows users to view the reporting relationships (org charts) within Custom Teams.
Ability: team read reports:
Grants the user access to the library of standard reports viewable within each Custom Team. Users lacking permission to view salary, experience or performance, will not view activity in the reports.
Ability: team modify structure:
Enables a team member (usually Lead of Team) to change reporting relationships within the Custom Team.
Ability: team modify settings:
Allows a user to access the Custom Team Settings, and make changes to all of the existing settings.
Ability: team modify goals:
Grants the user access to create, edit and delete Custom Team goals.
User create:
Enables the Add New Person tab viewable on the People page.
User delete:
Allows a user to delete an employee profile. Note this is not recommended. Profiles may be set as Inactive (user status) and archived. Deleted profiles are not recoverable or accessible.
Ability: user can view tier salaries:
Grants the user access to view tiered salary comparisons in the Compensation & Benefits tab of users’ profiles.
Ability: user see:
Permits a user to see and be seen by other users in the platform.
Ability: user add to team:
Allows the user to add others to a Custom Team.
Review create:
Enables the user to utilize the Review Creation tool in Performance Management. This tool is not recommended.
Review delete:
Grants the user access to delete a performance review. Deleted reviews are not accessible or recoverable.
Review template create:
Enables a team member to access and manage performance review templates, including the template index page and folders. This permission must be combined with Review Create to allow a user to update templates.
Ability: review view:
Allows a user to view feedback shared with them in performance review cycles. Typically this is scoped to ‘Self’ for employees to access only their own information.
Ability: review manage:
Grants the user access to manage the reviews of others. Typically managers have this permission scoped to their direct reports’ performance reviews.
Review view all self reviewers:
Enables the employee to view their previously provided feedback on other users’ performance
reviews. In other words, users are able to see all reviews that they have written.
Review batcher manage:
Allows a user to access and manage the performance review cycle wizard. Note with this access, users will be able to view and manage all performance review cycles.
Ability: access hidden goals:
Grants the user access to view goals in draft status.
Ability: time off manage:
Permits a user to approve and decline time off requests for others. Typically scoped to direct line employees.
Ability: time off basic view:
Allows the user a basic view of time usage in the Namely Calendar, not in the Time Off & Sick Leave section of profiles.
Ability: division modify settings:
Enables the user to modify the organization’s division’s settings, (e.g. divisions, departments etc.).
Ability: division read structure:
Grants the user access to view all division reporting relationships and org charts.
Ability: division modify goals:
Enables a team member to access and modify division goals.
API permanent access token:
Allows a user to have full and complete access to the platform, with the ability to manage the API access token and connection.
API access:
Grants the user access to manage and interact with the API on a limited basis, with permission scopes implemented.
Change requests manage all:
Allows a user to manage all submitted change requests company-wide. Typically users are only able to manage the requests submitted to them for approval.
Company settings SAML:
Permits a user access to setup and manage single sign-on (SSO) on the platform.
Edit onboarding templates:
Grants the user access to view, create, edit and delete onboarding templates used to induct new hires onto the platform.
Administer onboarding sessions:
Allows a user to administer and manage onboarding sessions for new hires.
Role Field Group Bundles:
Beneath the permission settings of every access role, a group of field group bundles will display. Field group bundles within the role, control the aspects of a users’ profile that may be viewed and modified.
Once assigned, field group bundles determine the profile fields a user may view and edit of themselves, their peers, and their direct reports.
Save:
After updating an access role’s permissions, select Save in the bottom left corner.
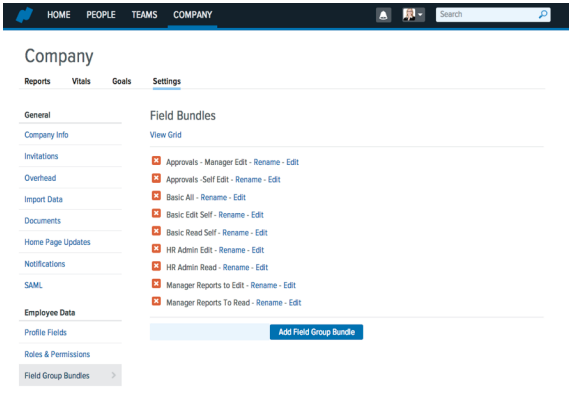
Field Group Bundles
Role Field Group Bundles:
Beneath the permission settings of every access role, a set of field group bundles will display. Field group bundles within the role control the aspects of a users’ profile that may be viewed and modified.
Once assigned, field group bundles determine the profile fields a user may view and edit of themselves, their peers, and their direct reports.
Manager reports to edit:
Refers to the profile fields a manager may edit in the profiles of their direct reports.
Manager reports to read:
Refers to the profile fields a manager may only view in the profiles of their direct reports.
Field Group Bundle Scopes:
Every field group bundle has a series of scopes by which users may read, edit and request information. By double clicking on the three options, (e.g. user read, edit and request), a series of additional scope options will appear in a vertical list. Permission scopes will be specific to each Namely platform’s divisions, custom teams and user roles.
Permission Scopes:
- All
- Same department
- Same division
- Same office location
- Same profit center
- Same department and same office location
- Same department and same division
- Same division and office location
- Report under via team
- Report under via company
- Directly report under via company
- Directly dotted line under via company
- Self
Scopes help define the breadth of a user’s management capability in Namely. One or more scopes may be selected and combined to expand or limit a user’s access level. The amount of scopes will vary based on your organization’s use of divisions and teams. Infinite scope combinations are possible. Layered permission scopes require a user to meet all requirements, i.e. the user must be a member of both the departments and divisions in the scope.
Field Group Bundle Scopes
Scope types
- User read
- User edit
- User request
Exceptions:
Field group bundles with scopes accommodate access exceptions effortlessly. Exceptions may be defined by a division, department, access role or unique user name.
Exception Scenario:
The access role ‘Regional Director (North America)’ allows the user to view the compensation, time off, goals, and performance history for all staff ranked lower in the reporting tree EXCEPT for the users in Finance, Operations and Sales divisions for the Canada office location.
Whitelists:
Alternatively, feature scopes also support providing divisions, departments, access roles or unique user names with a particular permission privilege. The act of whitelisting allows for permission privileges to be granted on a selective basis.
Field Group Bundle Assignment:
By not selecting a scope type within the role’s field group bundle, the permission is not granted to the user. All field group bundles created will display at the bottom of every role, but only those bundle rights relevant to the users’ role should be assigned.
Save:
After updating a access role’s permissions, select Save in the bottom left corner.
Field Group Bundles
Field group bundles map to the unique field configuration in each Namely platform.
Add Field Group Bundle:
As your list of custom user roles grows, it may be necessary to create additional field group bundles. Create a new bundle by entering its name and selecting Add Field Group Bundle. After creation, the bundle may be customized and assigned in user access roles.
Rename Role:
Default bundle names may be changed to reflect an organizations’ users. Select, Rename to update the title of an existing bundle’s name.
Edit: By selecting Edit, the permissions and settings behind each role will display. Administrators may adjust individual role permissions at any time. Updates become effective immediately after saving.
Delete Role:
Administrators may delete superfluous access roles to avoid them being assigned to any users in the organization. Deleted roles may not be recovered. Ensure no user has a role assigned before deleting it.
View Grid:
Select View Grid beneath Field Bundles to view all field bundles map to their respective profile fields with permission rights assigned according to each users’ role.
Field Group Bundles
Field group bundles map to the unique field configuration in each Namely platform.
View Grid:
Select View Grid beneath Field Bundles to view all field bundles map to their respective profile fields with permission rights assigned according to each users’ role.
Field Group Bundle Grid:
The Field Group Bundle Grid depicts how field group bundle permissions are assigned to user profile fields.
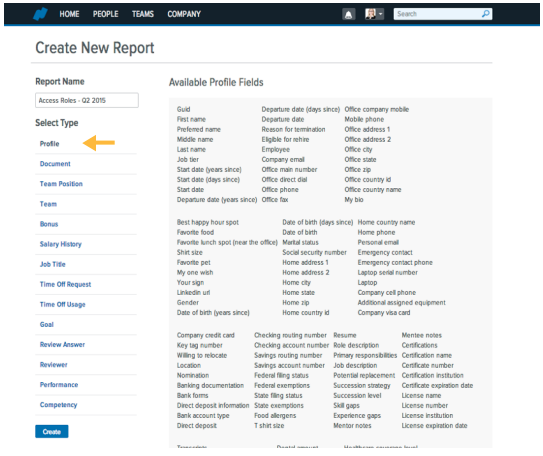
Profile Fields:
Standard and custom profile fields list in the left vertical column. Profile section headers (e.g. General, Skills & Experience, Compensation, Teams & Allocations, Performance, Goals etc.) display in bold. As new custom profile fields are created, they will display in this list.
Group Bundles:
Group bundles display across the top of the grid. View the role assignments by selecting the letter (i) for information. Field group bundles unassigned to roles will be blank.
Save:
After updating field group bundle permissions, select Save in the bottom left corner.
Administrator System Access
New Profile Field Permissions:
Administrators may create new custom profile fields in the Profile Field section of Company Settings. Once created, administrators are the only ones to view and edit these fields until permissions are assigned to other access roles.
New Fields in the Field Group Bundle Grid:
Depending on the type of profile field created, administrators may navigate to the Field Group Bundle section of Employee Data in Company Settings. In the vertical column, apply the appropriate check marks to allow for view and edit rights for the applicable access roles.
Profile Field Permission Confirmation:
Upon adjusting custom profile field permissions, assume the corresponding user profiles to confirm that they’re able to view and edit the field data as intended.
User Role Management
Administrators may search and filter by Access Role on the People page. All access roles created in Namely will surface in the dropdown menu. Select, Filter to view the individuals with this access role assigned.
Before modifying or eliminating an access role, confirm the individuals with the role assigned. Access roles should not be deleted until they have been unassigned to all users. Upon selecting Delete, Namely will guide you in reassigning the users to a different access role.
Permission Management:
Administrators may also access the Reporting Engine to monitor and manage access role assignment.
Reporting Engine:
Any Profile type report will include Access Role as an additional column. Select Profile as the Type of report. Once created, select Access Role in the Add Column task bar on the left side.
Apply Filters:
Apply Access Role filters to quickly view all users with an assigned access role. Print, save or download the report as needed.
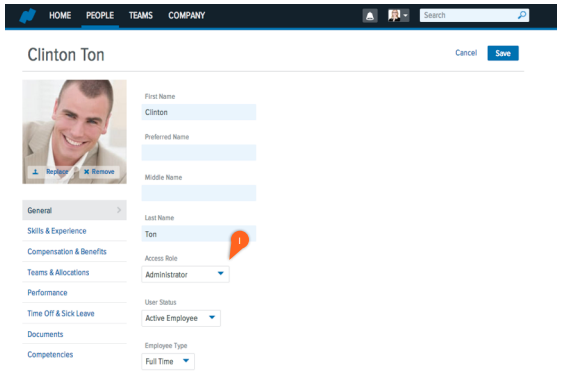
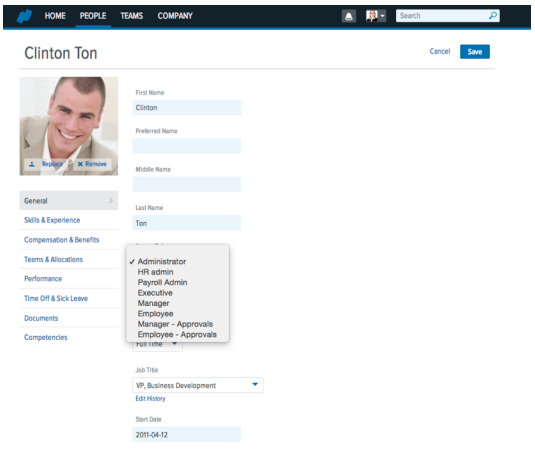
User Role Management
Upon creating a new profile, the Access Role must be assigned to employees by an administrator with role management permissions.
Assign Access Role:
In edit mode, select the Access Role field. A dropdown menu of active access roles will display. Assign the appropriate role and select Save in the top right corner.
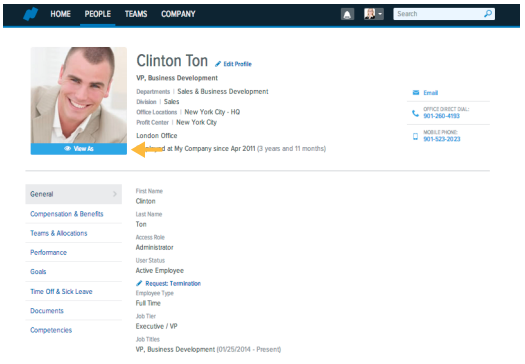
View As Profiles:
After updating employees’ access roles, administrators may confirm their permissions by viewing as the profile of the employee.
View As:
Beneath every employees’ profile, displays a blue ribbon titled ‘View As’. Select this tab to assume the user’s profile and confirm their permission settings.
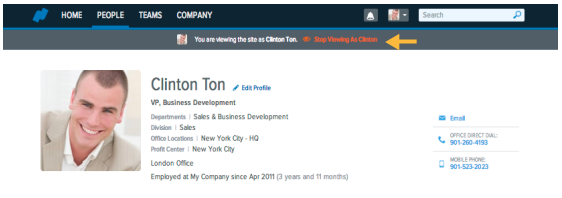
Stop View As:
Stop viewing as a user by selecting the orange text ‘Stop Viewing as….” at the top center of the Namely ribbon dashboard.