HRIS Imports: Banking Information
This article provides tips and instructions on how to successfully mass import active employees' banking information data in Namely HRIS.
OVERVIEW
An employee's Banking Information data can be added to HRIS. This data is needed if an employee would like to be paid via Direct Deposit. If you need to add banking information in bulk, you can do so by completing a Banking Information Import. This import is commonly used when onboarding multiple new hires and their banking information needs to be added to the system.
IMPORT TEMPLATE
-
Template: Banking Import Template
-
Required fields available for import: Nickname (used as a bank identifier), Account Type, Routing Number, Account Number, Amount, Calculation Type
-
Optional fields available for import: Payroll Company Name (for employees set up in multiple EINs)
-
You must also include one Unique Identifier on your template: EmployeeID, Social Security Number or Employee Email (recommended)
-
-
Reports: The Profile report type in HRIS contains the unique ID needed to complete this import.
SAVE A COPY
It's always best practice to save a copy of your data prior to processing an import, in case anything goes awry.
PREPARING AND UPLOADING THE IMPORT TEMPLATE
Prepare the Import template
-
Download the Employee Banking/Taxing Info report to collect the employees’ data.
-
In Namely Payroll, click Reports > Date Range. Click on the Employee Banking/Taxing Info report, in the Microsoft Excel column.
-
Use the unique ID information provided from the report and insert it into the import template. You should only include data on employees that need banking information added on your template.
-
Once the employee information has been added to the corresponding fields, save the file as a .csv format.
-
Nickname (column B) is used a bank identifier.
-
Account Type (column C) is generally Checking or Savings.
-
Routing Number (column D) should always be nine digits so include any leading zeroes.
-
Account Number (column E) should include any leading zeroes.
-
Calculation Type (column F) includes one of the following: Dollar / Percent / Balance
-
For employees who wish to have more than one bank account set up, there must be a line that includes Balance Type.
-
-
Amount Type (column G) is a required field if you selected Dollar or Percent as the Calculation Type (column G).
Import the template.
Tip:
Test the import first by importing a single row of data and confirming that the import is successful on an employee's profile prior to proceeding with the full import. If you need additional support with the import, refer to HRIS Imports.
-
When the import file is complete, go to Company Settings in Namely HRIS.
-
Click Settings > Import Data under the General tab..
-
Scroll down to the Banking Information Import section.
-
Click Choose File > upload the completed import template > Upload CSV file.
-
Under Assign Fields, select the unique employee identifier you used in your .CSV file.
-
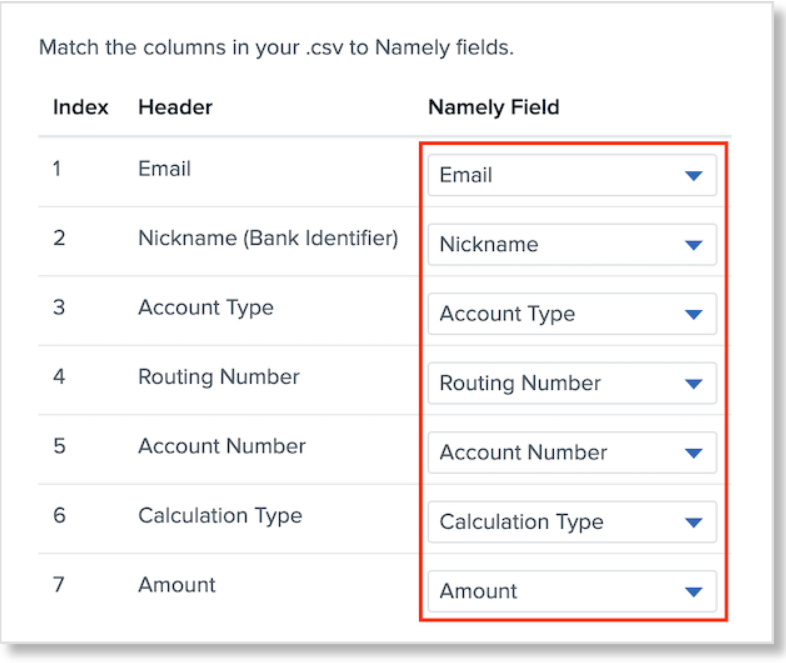
Use the dropdown selection to map the fields in your import file to their corresponding Namely Field.
-
Click Continue > Import Data.
TROUBLESHOOTING
If an error occurs during the import process, an error report will automatically be generated in a .CSV format. Download the file and refer to Common HRIS Import Error Messages to resolve the errors. Once the errors have been resolved, re-import only the rows of data that had issues.
If you're still encountering issues or unresolved errors, submit a case in the Help Community and include the import file and any screenshots of the errors as an attachment.
Product Name: HRIS Settings
Feature: Company Settings
Function: Imports
TIPS
-
Your .csv file cannot exceed 5 MB.
-
The first row of each column should be treated as a header row.
-
Each employee must be listed on a separate row.
-
Each row must have Unique ID to match your records to Namely records. Employee email is used as the primary unique identifier within Namely.
-
Dates should be formatted: MM/DD/YYYY