How to Use Custom Reports
Custom Reports is a new, highly customizable reporting engine that will eventually centralize all reporting capabilities across Namely HCM, Payroll, and Benefits into a single tool.
PERMISSIONS
Access to Custom Reports can be granted on a universal or data-specific level. Both are controlled by user role permissions in Company > Settings.
-
To access the Audit Report Type you must have an Administrator Access Role. This allows for viewing, managing, and exporting in the report builder.
-
The Custom Reports Administrator permission provides the ability to see and interact with information from any data that can be queried by Custom Reports. Users with this permission can edit reports created by any user. This permission cannot be scoped and is appropriate for HR administrators and IT. All users with the Administrator access role will automatically have this permission.
-
The Can Access Auditing in Custom Reporting permission provides the ability to see and interact with information within audit reports created by other users via the share feature. Users with this permission can create and edit their own audit reports.
-
The Can Access Payroll Register Data for Custom Reports permission provides access to Custom Reports and the ability to interact only with Payroll Register data. Users with this permission can only edit reports that they created. We recommend this permission is granted to Payroll Administrators.
-
The Can Access Benefit Changes in Custom Reports permission provides access to view all information included in the Benefit Change report and reports created by other administrators.
Note for multi-EIN clients: Custom Reports are not EIN-specific and will return data across all payroll subsidiaries at your company. Granting either of the above permissions to a user will give them that permission for all payroll subsidiaries at a company.
TIP:
Auditing permissions will supersede HCM Access Role Permissions. Users will only be able to access data they have the qualifying permission for.
Ex. If a user only possesses the Can Access Auditing in Custom Reporting permission, but not Custom Reports Administrator or Can Access Payroll Register Data for Custom Report, they will only be able to see audit reporting information. They will not have access to paychecks or other Custom Report data.
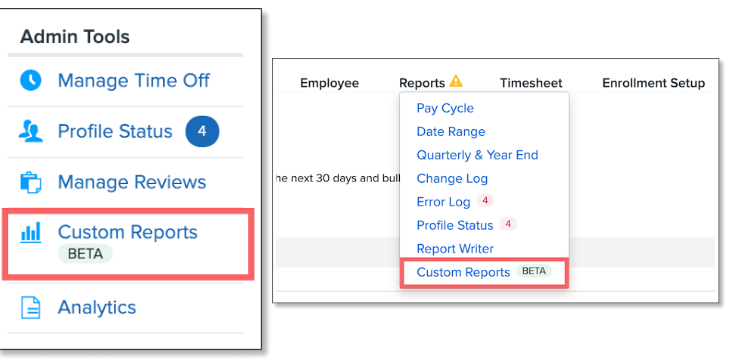
HOW TO ACCESS
Custom Reports can be accessed by eligible users from the Admin Tools section of the left-hand menu in Namely HCM or the Reports menu in Namely Payroll.
VIEWING YOUR REPORTS – LIST VIEW
All users with access to Custom Reports will be able to view all reports that have been created at your company. Only users who create a specific report can edit it (or users who have the Custom Reports Administrator permission, which provides the ability to edit all reports).
Any changes made to a report will be reflected for all users viewing or editing it.
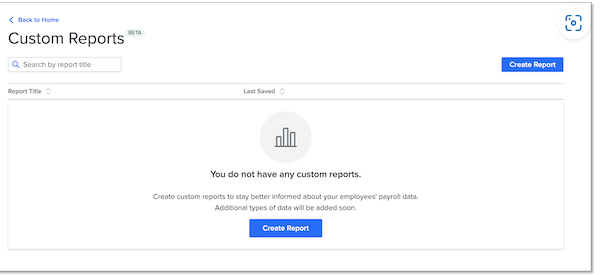
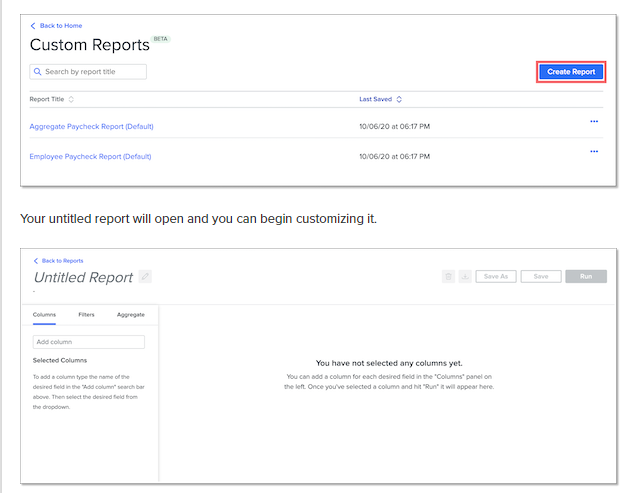
The first time you or another user at your organization access Custom Reports, there won’t be any reports to select.
TIP:
You can also view custom Pay Cycle and Date Range reports where you can create a report based on a unique range of time.
SEARCH REPORTS
As you create more reports, you can search for a specific report by entering its title in the search bar.
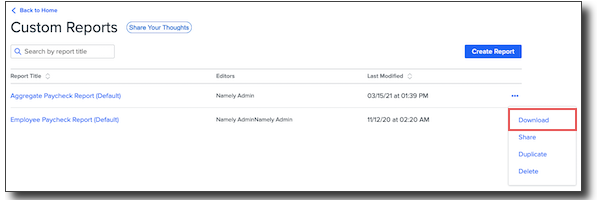
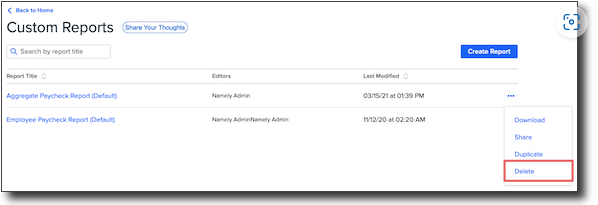
DOWNLOAD REPORTS
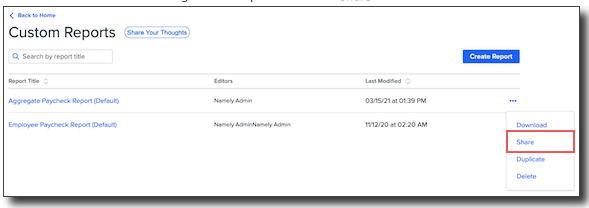
To download a CSV file of a report, click the menu icon to the right of the report and select Download
TIP:
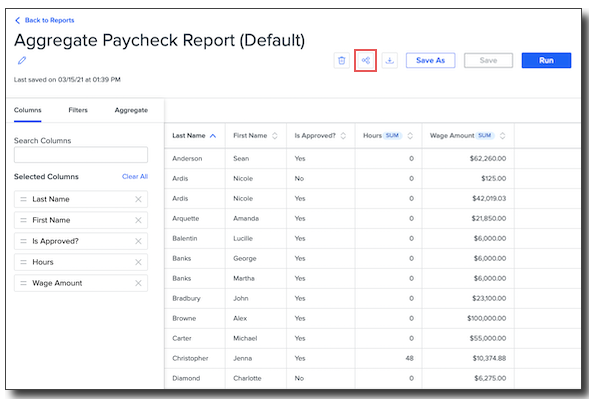
You can also download from within the report itself by clicking the download icon in the top right corner.
SHARE REPORTS
To share a report with another user at your company:
-
Click the menu icon to the right of the report and select Share.
-
Either copy the link to provide access to anyone with permission to see the report, or enter the name of another user to make them an editor.
-
Click Save Changes.
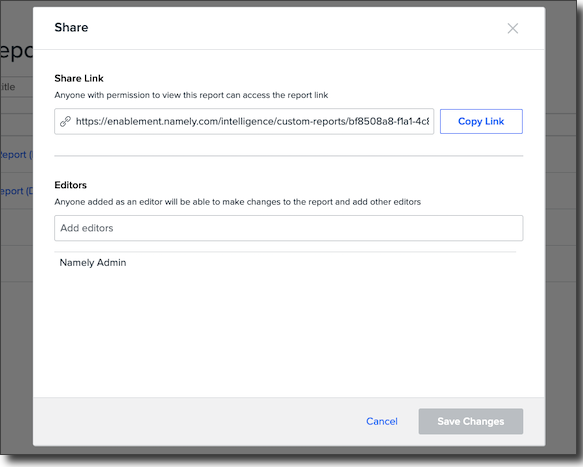
You can also share a report from within the report itself by clicking the share icon in the top right.
DUPLICATE REPORTS
To make a copy of a report:
-
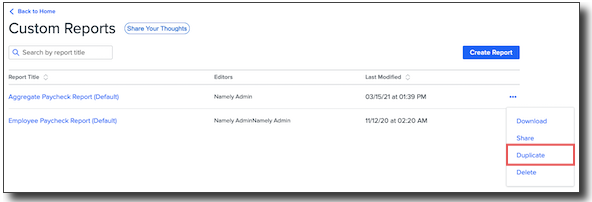
Click the menu icon to the right of the report and select Duplicate.
-
Enter a title for the report copy. By default, the title will be [name of original report] Copy.
-
Click Duplicate. The new copy of the report will open in a new tab of your browser.
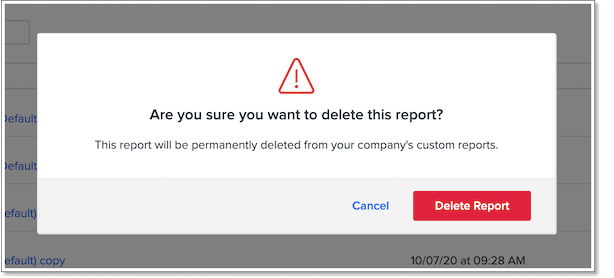
DELETE REPORTS
-
Click the menu icon to the right of the report and select Delete.
-
Confirm you want to delete the report by clicking Delete Report.
Tip:
You can also delete from within the report itself by clicking the trash icon.
CUSTOM REPORT TYPES
AGGREGATE PAYCHECK REPORT
The Aggregate Paycheck Report (Default) provides a summary view of pay data, with one line per employee per pay date.
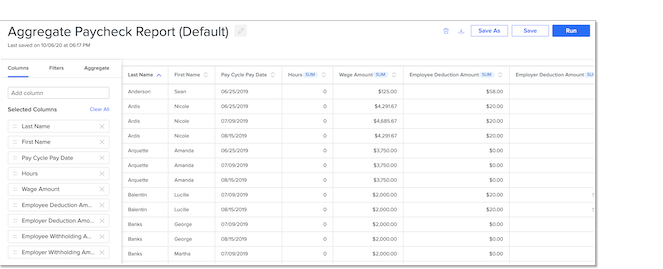 The data points pulled into the report as columns include:
-
Last Name
-
First Name
-
Pay Cycle Pay Date
-
Is approved? — Notes whether the data has been approved.
-
Hours
-
Wage Amount
-
Employee Deduction Amount
-
Employer Deduction Amount
-
Employee Withholding Amount
-
Employer Withholding Amount
Measurable columns are automatically aggregated into sum totals. The default Pay Cycle Pay Date filter is set to the last 30 days.
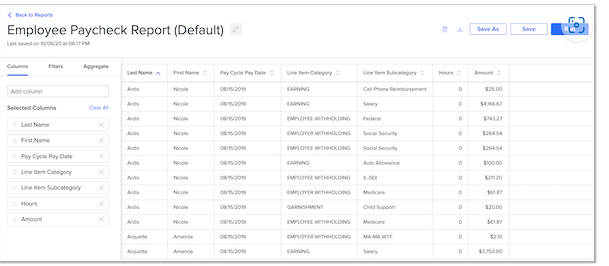
EMPLOYEE PAYCHECK REPORT
The Employee Paycheck Report (Default) provides a more detailed view of employee pay data.
The data points pulled into the report as columns include:
-
Last Name
-
First Name
-
Pay Cycle Pay Date
-
Is approved? — Notes whether the data has been approved.
-
Pay Cycle ID
-
Line Item Category
-
Line Item Subcategory
-
Hours
-
Amount
In this report, each individual line item on a paycheck is given a row.
-
Line Item Categories correspond to types of line items on a paycheck, like an Earning, Withholding, or Garnishment.
-
Line Item Subcategories are the specific value for a line item type, for example, Cell Phone Reimbursement or Salary for Earning, and Federal or Social Security for Withholding.
The default Pay Cycle Pay Date filter is set to the last 30 days and row aggregation is disabled.
TIP:
Payroll Register data is not pulled into Custom Reports in real time and may not reflect recently made changes. For real-time auditing purposes, or to review payroll data in conjunction with a pay cycle you are currently processing, please use the Payroll Register Report in Namely Payroll.
AUDIT REPORTS
Currently, you can audit the following data types:
-
Company Level Org Units and Benefit Classes (such as Department, Office Location, Division, and Class)
-
Employee Salary Data and other Employee Profile Data (changes made after 9/1/2021)
-
Employee Compensation changes after 3/31/2022.
-
Time Off EE Settings
Read more about this report in our article Custom Audit Reporting.
PERSONAL PROFILE REPORTING
You can view reports pertaining to Personal Profile data such as an address, birthday, or email. These reports can be utilized to produce a singular snapshot of all employee personal profile data at that time.
The default report contains standard fields for active employees, including:
-
First Name
-
Last Name
-
Preferred First Name
-
Preferred Last Name
-
Pronouns
-
Date of Birth
-
Personal Mobile
-
Personal Landline
-
Work Landline
-
Work Mobile
-
Work Fax
-
Language
Currently, only standard personal profile fields are viewable in the report, though in the future, you will be able to also view any custom fields added by you or your organization.
You can also view information related to Reporting Structure, including the First, Last, Full, and Legal Name of an employee's manager, and Job Details, including the Job Type (full/part time, etc.), Job Title, Job Tier, and Reason for the most recent job assignment (new hire, promotion, etc.).
EMPLOYEE TENURE
We've added employee work period and tenure data to the Profile Report and created a new default Employee Tenure Report. The default report contains the following fields:
-
First Name
-
Last Name
-
Work Email
-
Original Start Date
-
Rehire Start Date
-
Company Tenure
-
Payroll Company
-
Latest Work Period Start Date
-
Latest Work Period Tenure
Note: The default report includes a filter to include active employees only.
TIME OFF REPORTING
Also available to you within Custom Reports is the ability to view reports containing information about Time Off requests. The two main reports are the Aggregated Time Off Report and Time Off Daily Breakdown Report.
Within the Aggregated Time Off Report, you will find information that is aggregated by time off request. The report includes
-
First Name (Requestor)
-
Last Name (Requestor)
-
Job Title (Requestor)
-
Work Email (requestor)
-
First Name (Approver)
-
Last Name (Approver)
-
Work Email (Approver)
-
Requested Day
-
Time Taken (in Days)
-
Time Off Type
-
Created At
-
Approved At
-
Request Status
Within the Time Off Daily Breakdown Report, you will find information showing all individual days taken off. The report includes
-
First Name (Requestor)
-
Last Name (Requestor)
-
Job Title (Requestor)
-
Work Email (requestor)
-
First Name (Approver)
-
Last Name (Approver)
-
Work Email (Approver)
-
Day Off
-
Time Taken (in Days)
-
Time Off Type
-
Carryover (in Days)
-
Accrual (in Days)
-
Created At
-
Approved At
-
Request Status
CREATING AND EDITING A REPORT
To create a new report, click Create Report.
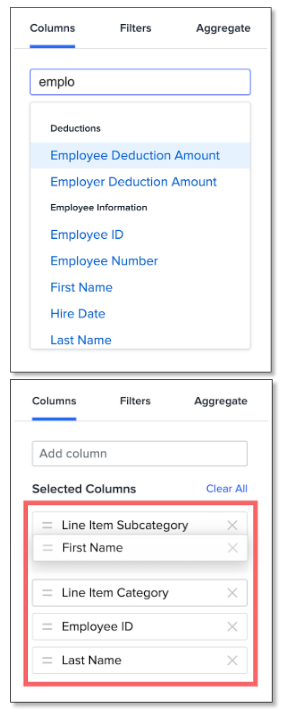
ADDING COLUMNS
Use the Columns panel to select data types you want to add to your report as columns. All potential data types will surface, and you can type to search for a specific one.
-
Note: At launch, only data types associated with the Payroll Register report will be available. For a list of all possible Payroll Register data types, visit our Custom Reports — Payroll Register Column Definitions guide.
After you have selected your desired data types, you can rearrange their column order by dragging and dropping them.
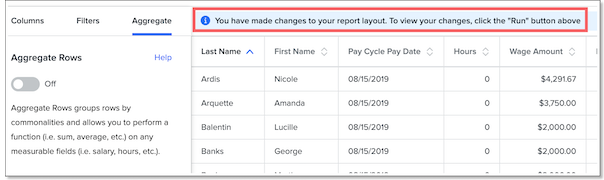
RUNNING YOUR REPORT
Changes made in the Columns, Filters, and Aggregate panels will not be reflected in the report until you click Run. A banner will remind you of this each time you make a change to the report.
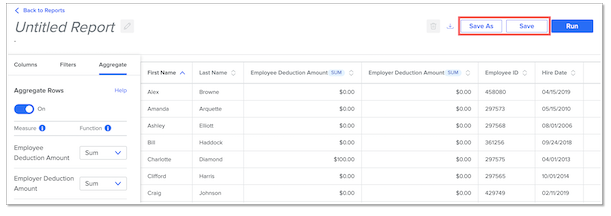
SAVING A REPORT
After you have finished setting up and running your report, you can save it by clicking Save As or Save. Enter a name for your report when prompted and click Save. After you have saved your report, it will appear in your report list for future use.
SAVING CHANGES TO REPORTS
After you have created and saved your report, click Save after making any additional changes you want to keep. Custom Reports does not autosave changes, and you will lose any edits you make without saving if you exit the report.
After your initial save, clicking Save As will create a duplicate of the report. Use this function when you want to keep an original version of a report and make changes to a copy of it.
RENAMING A REPORT
After your initial save, you can rename a report by clicking the pencil icon next to the report title, entering a new name, and clicking Save.
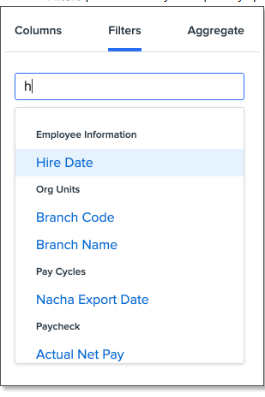
ADDING FILTERS
Use the Filters panel to filter your report by specific data types.
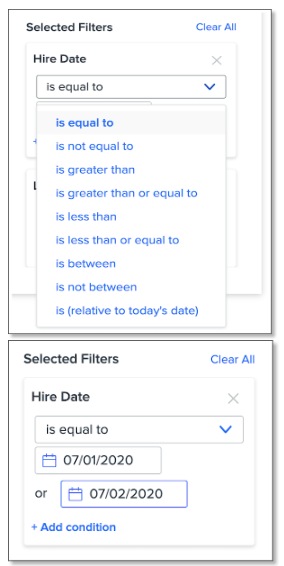
Depending on the type of filter you select, you can add conditions to the filter, such as is equal to, is not equal to, is greater than, etc., and a corresponding value. The conditions available will depend on the specific filter selected.
Some filters allow you to add multiple conditions within a filter, which act as “or” conditional statements. Click the trash icon to remove a condition you've added. In the example below, the report will return results for employees with a Hire Date of July 1, 2020 OR July 2, 2020.
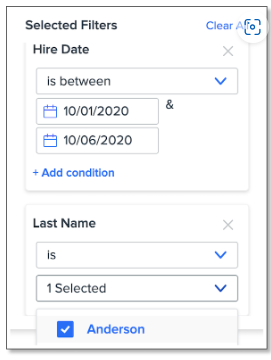
Multiple filters can be applied to a single report. Multiple filters are treated as “and” conditional statements. In the example below, the report will return results for employees with a Hire Date between October 1, 2020 and October 6, 2020 AND a Last Name equal to Anderson.
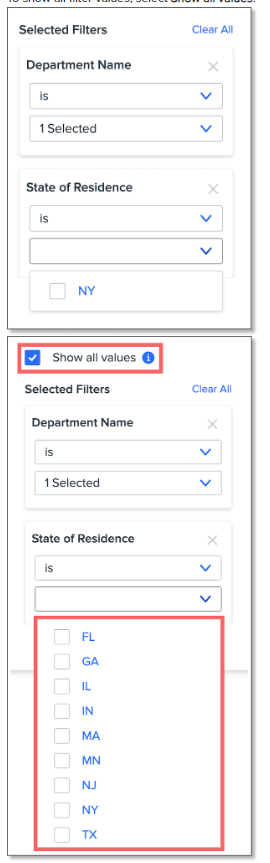
By default, only filter values related to your current data will display when selecting a filter value. For example, if you filter by Department is equal to Product and apply a second filter for State of Residence, only states with employees in the Product department will display as possible selections
To show all filter values, select Show all values.
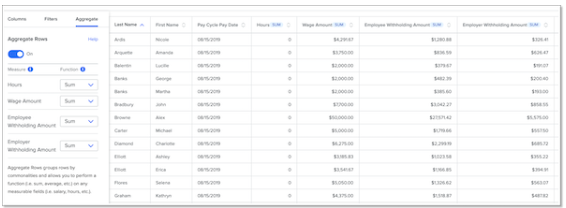
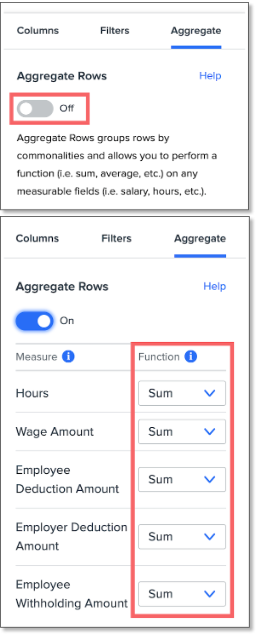
AGGREGATE ROW DATA
One of the most impactful features in Custom Reports is the ability to aggregate your report data. This provides additional options for grouping your rows by commonalities to perform a function (like sum, average, etc.) on any measurable fields (like salary, hours, etc.).
Aggregates are always grouped by all selected non-measurable columns. Adding or removing a non-measurable column will change the granularity of the aggregates.
To aggregate your report data, select Aggregate Rows in the Aggregate panel. Any measurable data types you’ve added in the Columns panel will display.
Select what Function you want to perform on each of your measurable data types.
-
Note: At launch, you’ll be able to select Average or Sum as potential aggregate functions.
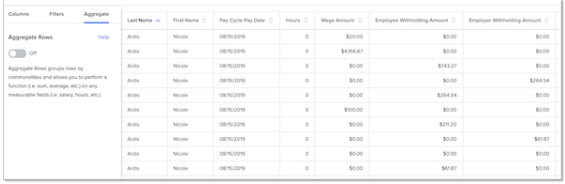
NON-AGGREGATE VIEW
In the example below, employee Nicole Ardis has a row for each individual Wage Amount, Employee Withholding Amount, and Employer Withholding Amount in the pay cycle that was paid on August 15, 2019.
AGGREGATE VIEW
When we aggregate the data using the Sum function for each measurable column, the individual Wage Amounts, Employee Withholding Amounts, and Employer Withholding Amounts have been added together to display in a single row for Nicole (and every other captured employee).