Employee Data Settings: Change Reason Sets
How to add, edit, and delete change reason sets for workflows.
Change Reason Sets
A change reason is the triggering event for any workflow request made in Namely. For example, if an employee requests to change their last name, the change reason might be that they were recently married. Similarly, if a manager requests a salary increase for one of their direct reports, the change reason could be that the employee received a promotion.
You can add as many change reasons for your organization as you want, and group them in change reason sets. Change reason sets are assigned when Creating a Workflow. Two sets are automatically created on all Namely platforms:
-
Change reasons
-
Employee updates
Additionally, a set of termination reasons, used for termination requests, will also be automatically created for all Namely platforms. For more information, see Employee Data Settings: Termination Reasons.
Note: Only users with the appropriate permissions can access and edit change reason sets.
Access Change Reason Sets
To access your organization’s change reason sets:
-
In the navigation bar, click Company.
-
Click Settings.
-
Under Employee Data, click Change Reason Sets.
Add, Edit, or Delete a Change Reason Set
To add a change reason set:
-
Click Add Reason Set.
-
Enter a reason set name.
-
Click the checkmark.
Note: Change reason sets will not display until at least one change reason has been added to the set.

To edit the name of a change reason set:
-
Hover over the name of the reason set.
-
Click the pencil icon.
-
Enter a new reason set name.
-
Click the checkmark.
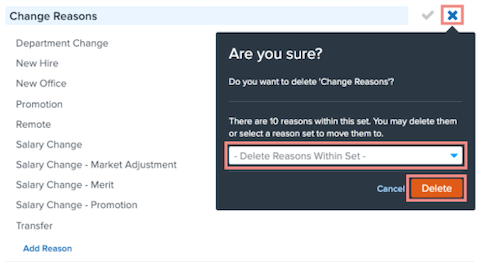
To delete a change reason set:
-
Hover over the name of the reason set.
-
Click the pencil icon.
-
Click the X icon.
-
Use the dropdown menu to delete the change reasons or move them to another set.
-
Click Delete.

Add, Edit, or Delete a Change Reason
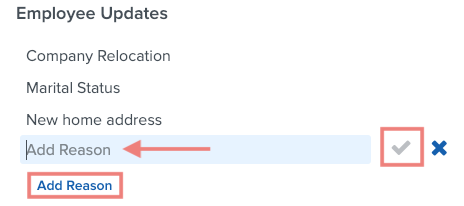
To add a change reason:
-
Click Add Reason.
-
Enter a change reason name.
-
Click the checkmark.
To edit a change reason:
-
Hover over the change reason.
-
Click the pencil icon.
-
Enter a new change reason name.
-
Click the checkmark.

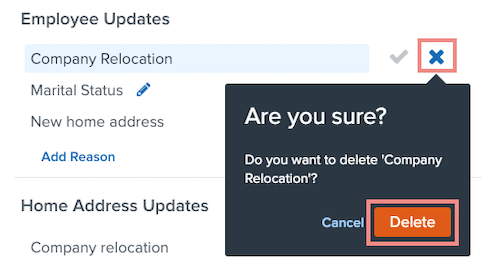
To delete a change reason:
-
Hover over the change reason.
-
Click the pencil icon.
-
Click the X icon.
-
Click Delete.
