Creating a Workflow
How to create workflows in Namely.
Refer to this video: Workflows
Workflows are approval chains you can create to oversee and approve any requests to change employee information in Namely. These requests can be submitted by an employee, or by a manager on behalf of an employee. Approval chains can be configured to apply to all employees or to segmented groups, and approvers can be specific employees or selected by job title or reporting structure.
For more information on workflow requests, see Submitting a Workflow Request.
ACCESSING THE WORKFLOW EDITOR
The workflow editor is used to create your organization’s workflows.
To access the workflow editor:
-
Click Company in the navigation bar.
-
Click Settings.
-
Under Employee Data, click Workflow Editor.
The workflow editor displays any workflows you have created, along with the profile fields affected by the workflow and the workflow’s status.
You can edit or delete any new workflow you have created by clicking the three dots next to the workflow.
CREATING A NEW WORKFLOW
To create a new workflow, click Add Workflow.
Workflow Details
-
Enter a workflow name the employee will see when they request a change.
-
Enter a workflow description to help the requester understand it better.
-
Select the fields the employee can request changes to.
-
To make a field required, select the Required checkbox.
-
To make a field editable, select the Editable checkbox.
-
To delete a field you’ve added, click the trash icon.
-
To add another field, click Add another.
-
Note: Employees must have at least Read access to any fields you add to a workflow in order to submit or approve a change request.

-
Select a workflow permission field.
-
Any employee with access to request an update to this field in their roles and permissions can kick off this workflow. For more information, see Enabling Workflow Permissions.
-
Select a change type.
-
The Change Type field specifies a change reason set. For more information, see Employee Data Settings: Change Reason Sets.
-
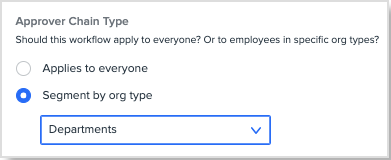
Select whether the workflow applies to everyone or a segment by org type.
-
If the workflow applies to a segment, use the dropdown to select the org type.

-
Click Save and Continue.
Note: The new data will only populate on the employee's profile on the effective date.
TIP:
Classes cannot be updated through a workflow request and file fields cannot be added.
Approvers
You can create approval paths and assign them to different org units.
-
Note: An org unit can’t be assigned to more than one approval path.
To create a new path:
-
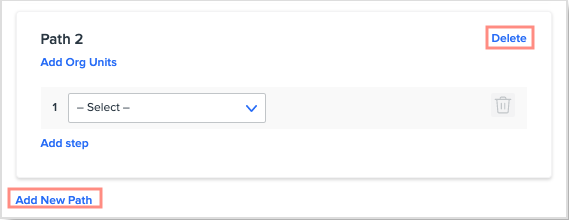
Click Add Org Units.

-
Select the org units you want to add and click Save.
-
To edit the org units you want the path to apply to, click Edit.
-
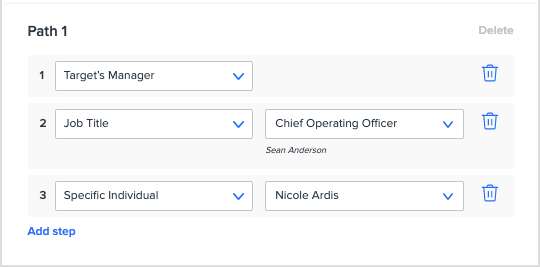
Use the dropdown(s) to select who should receive the workflow request.
-
You can select specific employees, or by reporting structure or job title.

-
Click Add step to add approvers.
To create another approval path, click Add new path.
-
Org units selected for previous paths can’t be assigned to new paths.
To delete a path, click Delete.
Unassigned Employees
For employees who do not belong to any org unit in the approval paths you create, you can use the dropdown to assign them to an approval path or create a new path for them.
After creating your approval paths, click Save and Continue.
Notification and Access
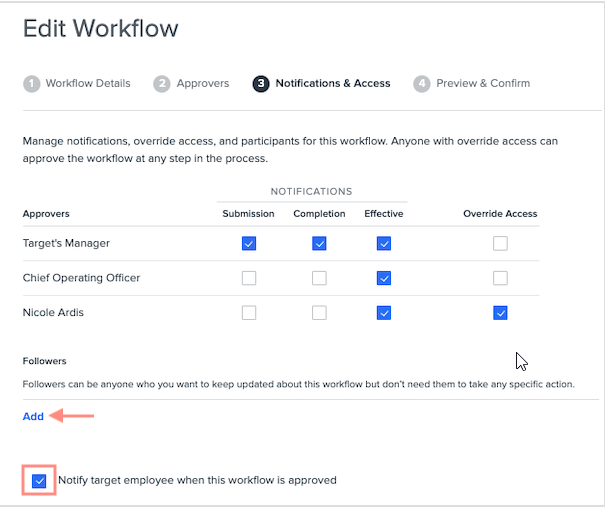
Use the checkboxes to select which approvers you want to receive notifications when a workflow has been submitted, completed, or becomes effective.
Select Override Access to let an approver complete a workflow at any step in the process.
You can also add Followers you want to keep updated about a workflow but who aren’t required to take any specific actions.
-
Click Add and select an employee from the dropdown to add them as a follower.
Select the checkbox to notify the target employee when the workflow has been completed.
After making any desired changes, click Continue.

Preview and Confirm
Before activating a workflow, you can preview how it will appear to the employee who requests the change.
If you need to make any changes, click Back to Last Step to navigate to a previous step.
To activate a workflow, click Activate.
After creating a workflow template, you’ll need to make sure employees have the correct permissions in order to use them. For more information, see Enabling Workflow Permissions.