Automated Onboarding Task Lists
How to automate the tasks associated with onboarding a new hire.
OVERVIEW
Automated task lists for onboarding can help you track all of the tasks associated with bringing on a new hire onboard! This feature allows you to:
-
Build onboarding templates that you can reuse for each new hire.
-
Create tasks within onboarding templates that are assigned to the appropriate individuals automatically when an onboarding session begins.
-
Provide links to resources outside of the system.
-
Give new hires the ability to keep track of their tasks and provide a clear picture of items to accomplish beyond their first day onboard.
-
Automate reminders about tasks that are not complete but nearing dues dates.
-
Monitor onboarding via an updated dashboard.
-
Dedicated page that splits out onboarding Actions & Analytics
-
Updated Widgets
-
HOW IT WORKS
If you are using Onboarding, the Automated Task List Feature will be added to your Onboarding tools automatically. Learn how to take advantage of all of the features of automated task lists to streamline your onboarding process.
Setting Permissions
In order to access automated task list features, users must have the appropriate permissions. Administrators are granted access by default and other users can gain access if they are granted onboarding session and template access rights. Navigate to Company Settings > Roles and Permissions > click Edit on the desired access roll. Then, enable the Administer Onboarding Session option.
Using the Onboarding Dashboard
The onboarding dashboard is your one-stop location for accessing and creating new automated task list templates.
To access your onboarding dashboard, navigate to Admin Tools > Onboarding.
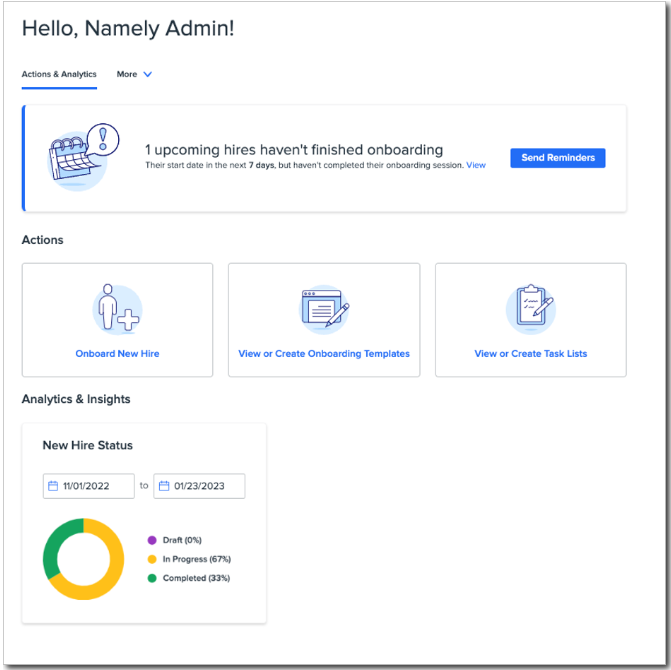
Analytics & Insights
The onboarding dashboard includes links to onboard a new hire, to view or create onboarding templates, and view or create task lists. The page also includes new hire status and analytics widgets, tabs to access onboarding templates and task lists, as well as a tab to get to the onboarding session page.
When referencing the new hire status widget, note that the date range selected refers to the date of hire. The widget graphic shows the status of the onboarding session between those dates.
Templates & Task Tabs
There are two ways onboarding administrators can access the onboarding tasks list and templates.
-
Onboarding administrators can navigate to the Onboarding menu under Admin Tools to access the updated Dashboard. From there, you can click View or Create Task Lists to access the My Tasks, All Tasks, and Templates tabs.
-
Onboarding administrators can also access the task by clicking on the Tasks menu on the home page and then clicking the Onboarding Tasks tab. Once clicked, all three onboarding task tabs will appear.

-
The My Tasks tab shows a list of your assigned tasks.
-
The All Tasks tab shows all the onboarding tasks associated for all new hires.
-
This is an administrator-only view
-
-
The Templates tab shows all your existing onboarding templates.
-
This is an administrator-only view
-
For all other employees that are not administrators or do not have the Administer onboarding session permission enabled will only have access to the My Tasks tab. They can access this tab by navigating to Tasks from the home page and then clicking on the Onboard Tasks tab.
Creating New Task List Templates
Task Lists provide you the option to create and set up automated task list templates. Task list templates serve as the base for the task list that is eventually assigned during a new hire’s onboarding session. 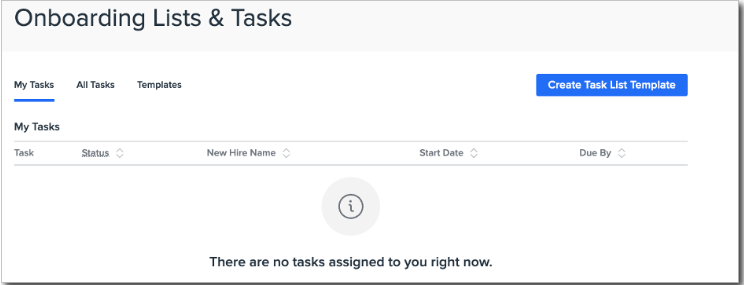
The Templates tab shows admins all of the templates built into the system and allows you to create and manage your organization’s automated task list templates.
Click the Create Task List Template button to launch the modal to create new automated task list templates. Then, provide a specific Template Name and description before finalizing by clicking Create Task List Template.

Copying and Deleting Task List Templates
Admins have the ability to Edit, Copy, and Delete a task list template. Making changes to a template will not affect an onboarding session that has already been launched. Select the three dots Action icon next to the template you want to update and the Edit, Copy, and Delete options will appear.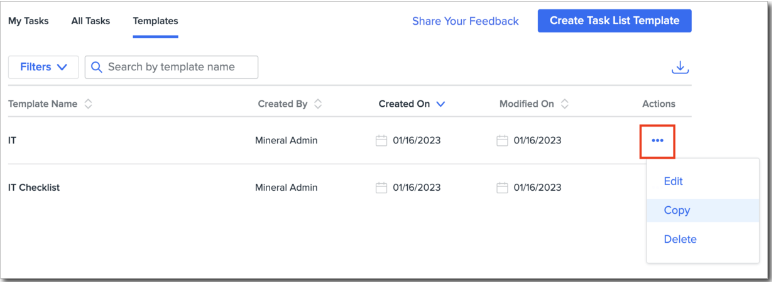
Creating Tasks
In order to populate your task list templates, you’ll need to create tasks. The first step to creating a new task is to select or create a task category. 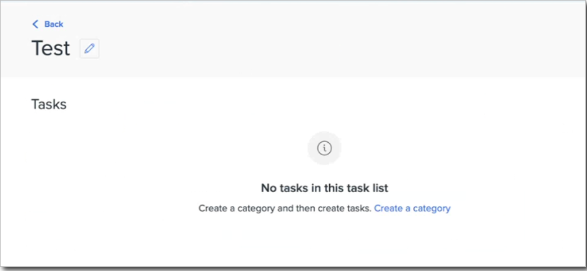
Categories are a way to define or organize a bunch of related tasks, for example, IT Task, Task for New Hire, Pre-Hire, Post-Hire, etc. Currently, your organization can create an unlimited number of task categories. Click Create a category to begin, then type your desired category name into the text field.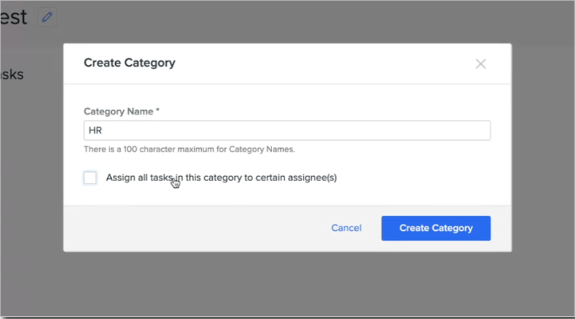
Once you’ve created a category, select the pencil icon to begin creating new tasks.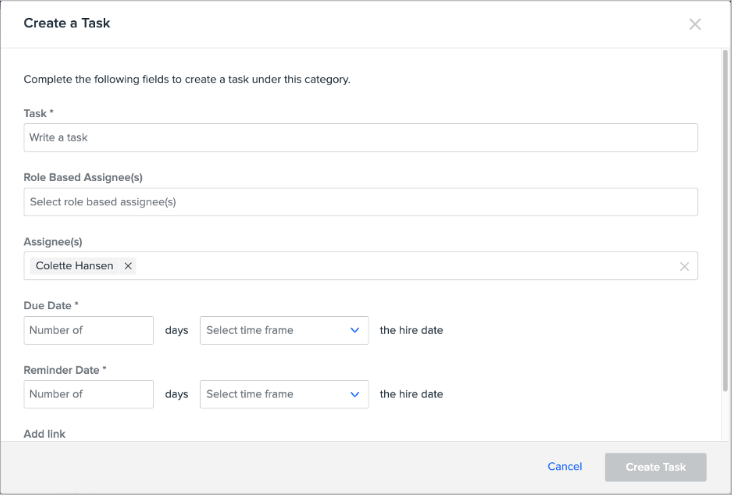
Here, you’ll be presented with a number of options to customize your tasks automation options.
-
Start by inputting a Task Name
-
Select a Task Assignee. Options include:
-
Role Based Assignees
-
The role-based option pulls assignments in your automated task lists based on the Reports To and Employee Name data in Namely, rather than assigning tasks to specific individuals by name. You have the option to assign tasks to the new hire’s manager via the Reports to field or the New Hire themself.
-
-
Assignee
-
This option pulls an all-employee list, allowing you to select assignees by name.
-
When using this option, note that all automated task lists containing this task will always automatically pre-populate your selected assignee by name, but you will have the option to edit assignees manually within your task lists.
-
Also note that when using the Assignee option, if your designated assignee leaves your organization, you will have to manually change the assignee in order for your tasks to be assigned.
-
-
You also have the option to assign multiple employees to a task (including an option to assign all tasks in a category to one person).
-
-
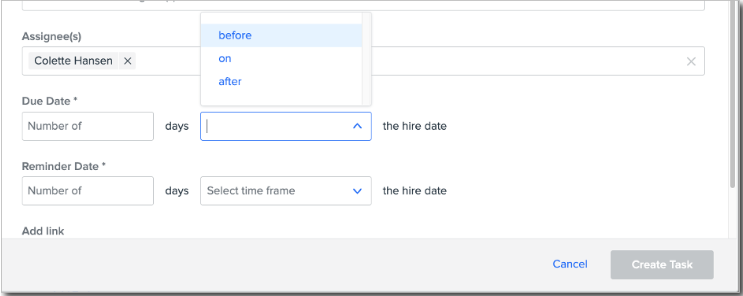
Select a Due Date
-
Your due date can be On the new employee's hire date, or you can select a due date to occur on a specific number of days Before or After the hire date.
-
-
Select a Send Reminder date.
-
Your reminder can be selected to occur on a specific number of days Before or After the hire date
-
-
Add a URL.
-
This option allows you to add a link to both internal or external documents that are relevant to the specific task.
-
-
Click Create Task.
Editing & Deleting Tasks
Click the pencil icon to edit specific tasks within a task list, and the trash icon to delete tasks.

Organizing Task Lists
Once your task list contains multiple categories, you can use the up and down arrows to organize categories within the list.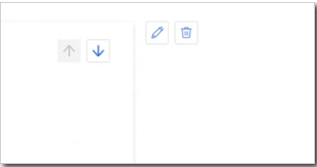
Note that the tasks will display in ascending order by due date. If two or more tasks have the same due date, they will display in alphabetical order.
Using Task List Templates During Onboarding Sessions
Linking Templates to Onboarding Sessions
Once a task list has been created, that list can be linked to specific onboarding templates. To link task lists, go to your existing onboarding templates under Onboarding > Task List.
Note that adding Task Lists is optional and not required to kick off onboarding sessions.
Editing Linked Task List Templates
You have the ability to change and edit the task list templates that are assigned to a particular onboarding session until you kick off the onboarding session. To update task list templates that are linked to an onboarding session, delete, edit the desired task list template, resave the template, and then read the template to the onboarding session.
Kicking Off an Onboarding Session
For full instructions on how to kick off an onboarding session see our article.
Note that generated dates or assignments for specific tasks cannot be edited from within the session page, so you’ll want to be sure your dates and assignments are as you intend them before kicking off your onboarding session.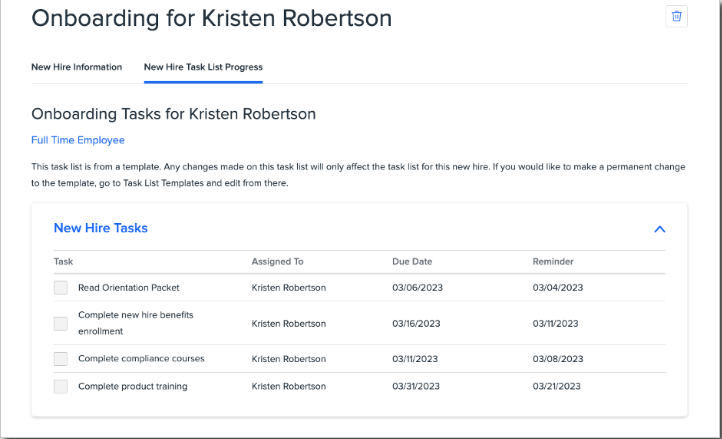
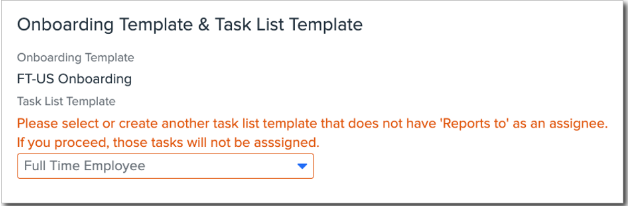
Note that there will be a warning in Onboarding templates when using the Reports To function in Task Lists.
Task Reminder Notifications
Once templates are linked and an onboarding session is kicked off, automatic notifications go out to users assigned to specific tasks. These notifications will come in the form of an email and system notification.
The person(s) assigned to the task will also receive a reminder notification when the task is not marked completed by the reminder date and will receive overdue reminders when the task is not marked completed by the task due date.
Reminders are clickable and displayed in the notifications tab.
When a task is overdue, the assignee will receive daily reminders until the overdue task is completed.
Admins can monitor the progress of specific tasks under Onboarding. View from Sessions page. Click on the person's name and see all tasks. Admins can see all tasks, not just tasks they have been assigned. Participants who aren’t admins can only see and mark their own tasks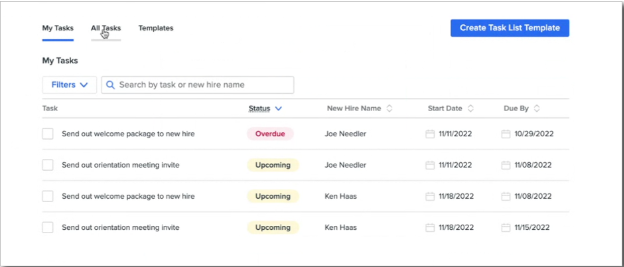
Admins also have the ability to mark tasks completed in case someone being gone, on vacation, etc.
Task Details and Reports
On the All Tasks page, admins have the option of selecting an overview of an employees' task list with a progress bar or a detailed view of all tasks with the status, assignee, new hire, start date, and due date. Both options have Filters and Search Bars for easy Navigation.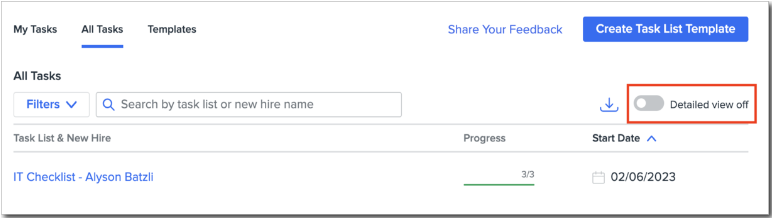
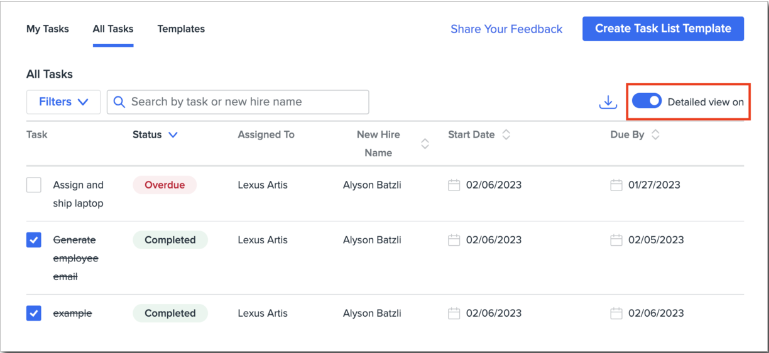
Admins also have the ability to download reports of either view based on the selection of the toggle. Just switch the toggle to the view you prefer and then click the download icon to the right of the view toggle. A CSV report will download directly to your computer.