Using the Open Enrollment Dashboard
We're releasing a new dashboard that allows administrators to easily configure, manage, and finalize their company's Open Enrollment periods.
Refer to this video:Open Enrollment Dashboard (vimeo.com)
HOW TO ACCESS
You can access the Open Enrollment Dashboard by clicking Manage Benefits on the Namely homepage and then Open Enrollment.
SETTING UP OPEN ENROLLMENT
To begin configuring your Open Enrollment, click Set Up Open Enrollment.
You can save your Open Enrollment as a draft at any time during the configuration process by clicking Exit and then Save and Exit.
You can re-enter your draft after saving at any time by clicking Continue Open Enrollment Setup on the main Dashboard page.
General Information
Preferences
-
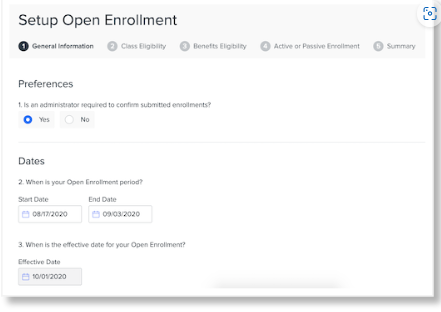
Select whether an administrator is required to confirm submitted enrollments.
Dates
-
Enter the Start and End Dates of your Open Enrollment period.
-
Enter the effective date for your Open Enrollment.
-
Enter the date you want to start testing for your Open Enrollment.
Class Eligibility
-
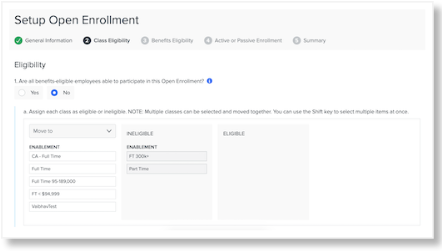
Select whether all benefits-eligible employees are able to participate in the Open Enrollment.
-
If you select No, assign each of your classes to either the eligible or ineligible columns.
-
Click the desired class(es) and use the Move to drop down to assign them to a column.
-
You can select multiple classes at once by holding the shift key while selecting the classes.
-
Any classes that were set up as ineligible for benefits at the company level are automatically marked as ineligible for Open Enrollment and can’t be made eligible.
-
-
Important notes about eligibility:
-
All classes must be assigned to either the eligible or ineligible columns. At least one class must be marked as eligible.
-
Classes that have been end-dated or set up as ineligible for benefits at the company level will be automatically marked as ineligible for Open Enrollment.
-
If you add a new class in Company > Settings after completing this page, you’ll need to return to it and assign the new class to an eligibility column.
Benefits Eligibility
-
Select whether all classes are eligible for the same benefits.
If you select Yes:
-
Map which benefits should be included in the Open Enrollment. You must select at least one benefit to continue.
-
Benefit coverage lines are grouped by coverage line categories as they appear in the Enrollment Wizard (health, company-provided, etc.). Category names are defined by the benefit administrator when configuring their coverage lines.
-
Only coverage lines that are active on the Open Enrollment’s effective date will display. Should you change the Open Enrollment effective date, the coverage lines available to be mapped may change as well.
-
If you select the checkbox next to a coverage category, all coverage types in that category will be mapped.
-
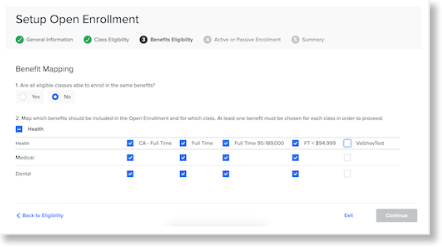
If you select No:
-
Map which benefits should be included in the Open Enrollment and for what class(es). You must select one coverage line per class.
-
If you add a new class in Company > Settings after completing this page, you’ll need to return to it and assign coverage to the new class.
-
Note:
for Multi-EIN Companies: If your company has multiple payroll entities, you will have to complete the mapping for each EIN.
Active or Passive Enrollment
-
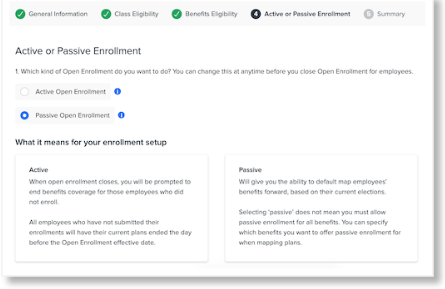
Select whether you want to set up an active or passive enrollment.
-
If you select active, when enrollment closes, you'll be prompted to end benefits coverage for any employees who did not enroll. All employees who have not submitted their enrollments will have their current plans ended the day before the Open Enrollment effective date. These employees will still be enrolled in plans that are cannot be waived.
-
If you select passive, you can map employees' benefits forward to default plans based on their current elections. You do not have to allow passive enrollment for all benefits—you can specify the benefits for which you want to offer passive enrollment when mapping your plans.
-
Note: By law, you can't offer passive enrollment for flexible spending accounts. These benefits require active enrollment.
Summary
On the Summary page, you can review everything you entered in the previous steps. Once you have confirmed everything is correct, click Finish to activate the Open Enrollment.
-
Once you activate the Open Enrollment, all of the OE information will be viewable, but not editable, in Payroll.
NEXT STEPS
Please note: You can't finalize your Open Enrollment until you have completed any required actions in the Next Steps section.
Review and Approve Benefits
If your Open Enrollment is only offering active enrollment and each non-waivable benefit only offers one plan option per class, you do not need to map currently offered plans to those being offered for the upcoming plan year. You should, however, review and approve all non-waivable benefits to confirm they were set up correctly.
-
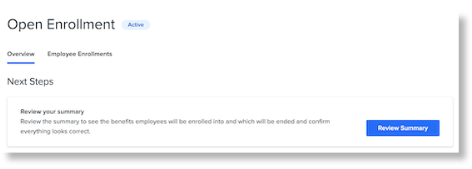
In the Next Steps section, click Review Summary.
-
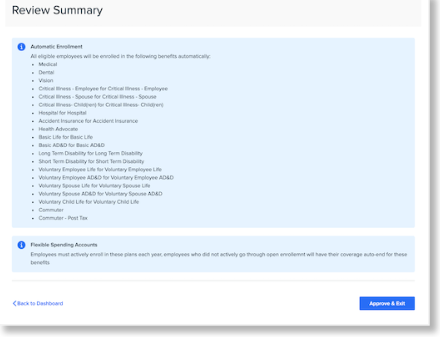
Review the non-waivable benefits employees will be automatically enrolled in, as well as any benefits that do not offer passive enrollment.
-
Click Approve and Exit.
Benefit Mapping
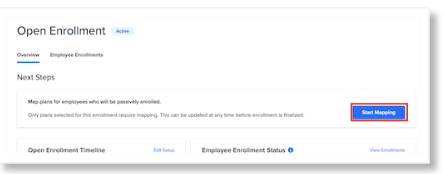
If your Open Enrollment contains non-waivable benefits with multiple plan options for a single class, or you are offering passive enrollment to your employees, you'll need to complete benefit mapping to tie your currently offered benefits to those being offered for the following plan year.
Visit Benefit Mapping for Passive Open Enrollment and Non-Waivable Plans to learn how to complete the mapping process.
Completed Steps
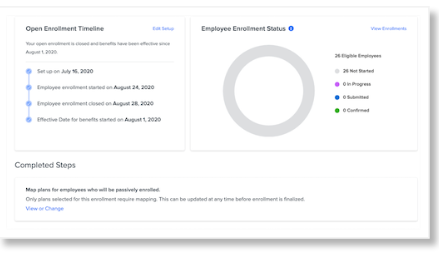
After you have reviewed and approved your non-waivable benefits or completed any required benefit mapping, the Next Steps section will move to the bottom of the dashboard and read Completed Steps. From here you can view or edit your mapping (if applicable) as needed.
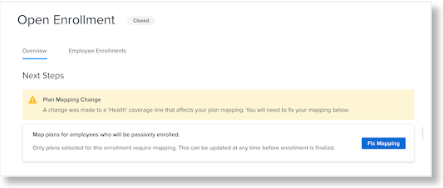
If changes are made to your Open Enrollment setup that require you to re-map your benefits, this section will resurface under Next Steps and notify you that action is required to fix your mapping.
VIEWING THE OPEN ENROLLMENT DASHBOARD
Once your Open Enrollment has been set up, the dashboard will populate with the Open Enrollment Timeline and Employee Enrollment Status.
Open Enrollment Timeline
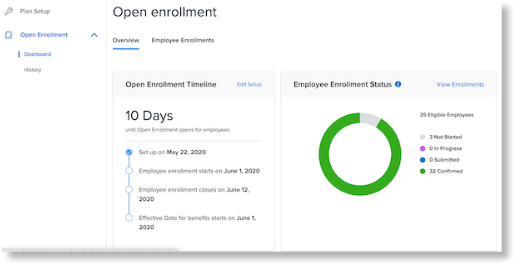
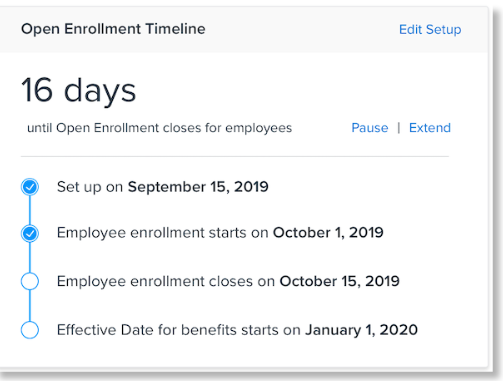
The Open Enrollment Timeline provides a list of important milestones related to the Open Enrollment period and a countdown showing the number of days until your next milestone. It also provides options to Edit, Pause, or Extend your Open Enrollment.
Dates and Countdown
The timeline of milestones includes:
-
The date your Open Enrollment was set up.
-
The start, close, and effective date you defined in the General Information step of OE setup.
The countdown displays the number of days between the current date and the next milestone.
-
If the Open Enrollment period has not started yet, it will give the number of days until it kicks off.
-
If the Open Enrollment has started, but not ended, it will give the number of days until it closes.
-
Once the end date has passed, it will give the number of days until the effective date.
Edit Setup
Click Edit Setup in the Open Enrollment Timeline to make any changes to your Open Enrollment. Any edits to dates will be reflected in the timeline once saved.
-
Note: You can’t edit the effective date of the Open Enrollment once it has started.
Extend Open Enrollment
If for any reason you need to extend your Open Enrollment period, click Extend.
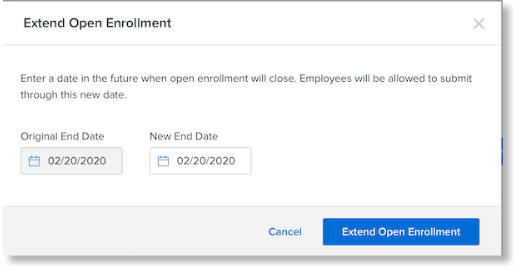
Enter a New End Date and click Extend Open Enrollment.
Pause and Reopen
Clicking Pause allows you to prevent employees from enrolling for a short period of time. You can resume Open Enrollment by clicking Reopen.
Tip:
On the last day of an Open Enrollment event, the Open Enrollment will officially close at 12:00 AM UTC (7:00 PM ET).
Status Chart
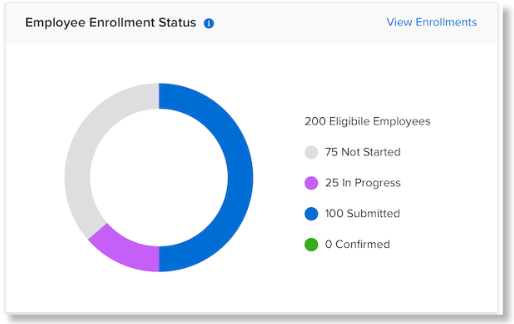
The Status Chart gives an overview of the number of employees who are eligible to participate in the Open Enrollment period, as well as the status of their enrollment:
-
Not Started: The number of employees who have not started their enrollment.
-
In Progress: The number of employees who have started, but not submitted their enrollment.
-
Submitted: The number of employees who have submitted their enrollment but not had it confirmed by an administrator.
-
Confirmed: The number of employees who have had their enrollment confirmed by an administrator.
Only employees who are eligible to enroll will be counted in the above statuses, meaning:
-
They are in a benefit eligible class as of the OE effective date
-
They are in a class that is eligible for this Open Enrollment
-
They are not terminated before the effective date
-
They have a new hire wait period that ends before the effective date
Managing Employee Enrollments
Click the Employee Enrollments tab, or click View Enrollments from the Employee Enrollment Status chart, to view and manage your employees’ enrollments.
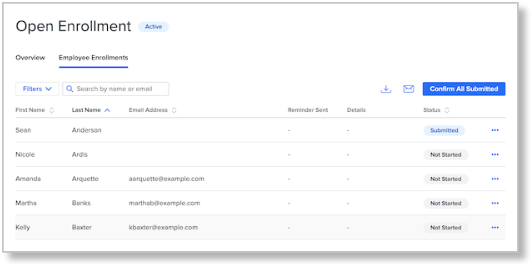
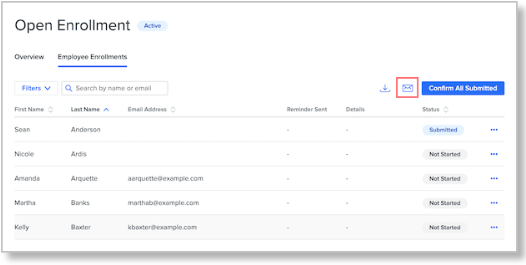
The Employee Enrollments page includes a list of all employees eligible for Open Enrollment, along with their email addresses, the date they were last reminded to complete Open Enrollment, any details related to their enrollment, and the status of their enrollment (Not Started, In Progress, Submitted, and Confirmed).
-
You can sort all columns except the Details column by clicking the arrows in the column headers. The Status column is sorted by chronological status order, not alphabetically.
-
Use the Search box to search for specific employees by name or email address.
-
Use the Filter to filter by enrollment status or details. If you are an administrator at a multi-EIN company, you will also be able to filter by payroll subsidiary.
-
Click the download icon in the top right of the table to export a CSV of the data displayed in the Employee Enrollments table. The download file will only include enrollments that are captured by the current filter selected.
Bulk Actions—Confirm Enrollments
-
Click Confirm All Enrollments to bulk confirm all enrollments with the status Submitted. A modal will ask you to confirm that you want to confirm all submitted enrollments. Click Yes to proceed.
-
Any enrollments that do not contain errors will display a status of Confirmed and the Details column will display the date on which the employee was confirmed. You can hover over the information icon to see by whom they were approved.
-
Once confirmed, all elections will be applied and become viewable in Payroll.
-
If there are errors with any employee enrollments, an error banner will display the number of employees who received the error. The Details column will display a red View icon, which can be clicked to view the specific error.
-
Any enrollments that did not contain an error will be approved.
Individual Actions—Enroll, Reset, Reject, and Confirm
Click the menu icon (the three dots) next to an employee’s enrollment to manage that individual enrollment.
-
Select Enroll to enroll on behalf of the employee or test the environment before it is opened to all employees. This action will only display when the enrollment is in the Not Started or In Progress statuses.
-
Select Reset to wipe out any In Progress enrollments and require the employee to start their enrollment over. This option will only display when an enrollment is in the In Progress status. Once selected, the enrollment will return to the Not Started status.
-
Note: Selecting Reset will wipe out any elections that are in progress—not only ones related to Open Enrollment life events.
-
-
Click Reject to reject a submitted enrollment. Rejected enrollments will return to the In Progress status, and the Details column will include a note with the date the enrollment was rejected. Hover over the info icon to see who rejected the enrollment and at what time. The employee will have the option to edit their enrollment or restart it from scratch. Once the enrollment has been resubmitted, any notes in the details column about the rejection will be removed.
-
Click View Confirmation Report and View Change Report to view the details of a submitted enrollment.
-
Click Confirm to confirm a submitted enrollment. The enrollment’s status will change to Confirmed and the details column will display the confirmation date. Hover over the info icon to see who confirmed it.
Reminders – Individual and Mass
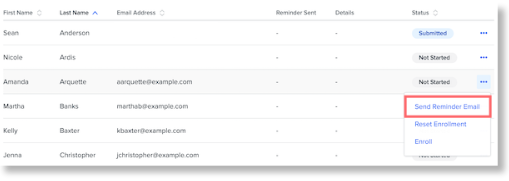
You can send reminder emails individually or in bulk to employees who have not submitted their elections and have a status of In Progress or Not Started.
To email a reminder to an individual:
-
Click the menu icon next to an employee and select Send Reminder Email.
-
Select the appropriate sender and reply to options.
-
If you select Namely as the sender, employees will not be able to send a reply to the email.
-
If you select Your Name as the sender, employee responses will be sent to you.
-
Edit the subject line (or use the default).
-
Edit the email message (or use the default).
-
Click Preview Email to view a preview of your email.
-
Click Send Emails.
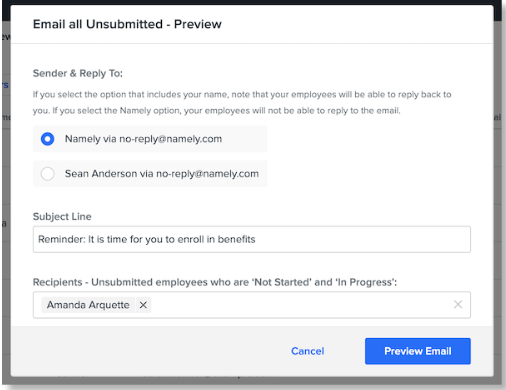
To send an email reminder to multiple employees:
-
Click the Email all Unsubmitted button.
-
Select the appropriate sender and reply to options.
-
If you select Namely as the sender, employees will not be able to send a reply to the email.
-
If you select Your Name as the sender, employee responses will be sent to you.
-
Edit the subject line (or use the default).
-
The Recipients box will automatically include any employees who have not submitted their elections. Your can remove any as needed.
-
Edit the email message (or use the default).
-
Click Preview Email to view a preview of your email.
-
Click Send Emails.
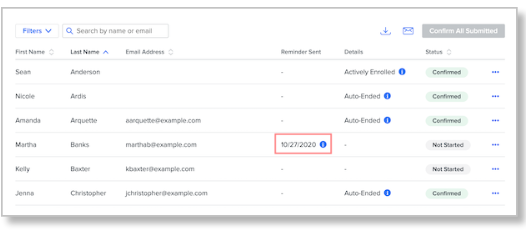
The date an employee was last sent a reminder will display in the employee table.
FINALIZING OPEN ENROLLMENT
The last step in the Open Enrollment process is to finalize your OE, at which point any employees who have not submitted their elections will have their benefits ended or they will be auto-enrolled, depending on whether you chose an active or passive enrollment.
Please note: You can't finalize your Open Enrollment until you have completed any required actions in the Next Steps section.
Reminders to Finalize
Once the end date of your Open Enrollment period has passed, if your organization has yet to finalize the OE, a reminder email will be sent to any user who:
-
Has the Administrator role
-
Has the Access Benefits Admin AND Benefits Setup permissions enabled
-
Is in a Payroll role with the Enroll permission
Reminders are sent at 9:00 PM ET the day after your OE period closes.
Active Open Enrollment
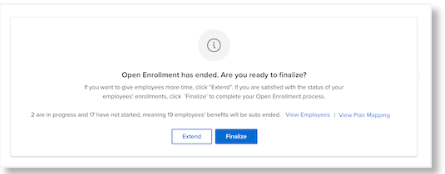
Once the close date for an Open Enrollment period has passed, the dashboard will display options to Extend or Finalize the enrollment.
-
Click Extend to extend the dates of the Open Enrollment period.
-
Click Finalize to finalize the Open Enrollment period.
Clicking Finalize will surface a confirmation modal.
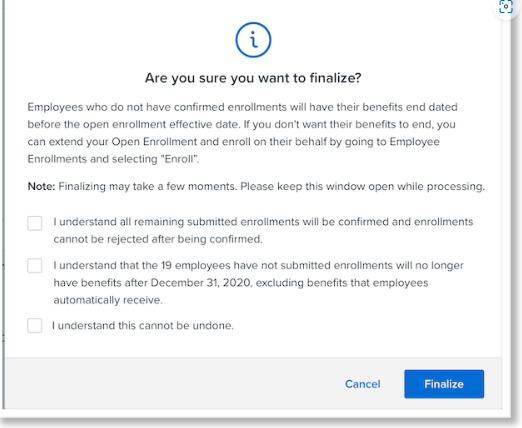
To finalize the Open Enrollment, you must confirm you understand that:
-
All submitted enrollments will be confirmed. Once confirmed, the enrollment can’t be rejected.
-
All current benefits (except non-waivable benefits) of any employees who have not submitted their enrollment will end at the date listed.
-
Namely will behave as if the employee waived all benefit elections offered.
-
A life event record and confirmation report showing all elections as waived will be generated.
-
Any employees who did not submit an enrollment will display the status Confirmed along with a note that benefits were auto-ended.
-
Employees will be auto-enrolled in any non-waivable benefits.
-
-
This action can’t be undone.
After clicking Finalize, if there are any issues with a specific employee's enrollment, an error will surface instructing you to fix the error to finalize that employee's enrollment. All other employee enrollments will not be impacted and will be finalized.
Passive Open Enrollment
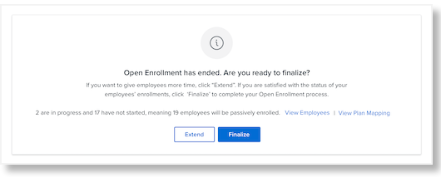
Once the close date for an Open Enrollment period has passed, the dashboard will display options to Extend or Finalize the enrollment.
-
Click Extend to extend the dates of the Open Enrollment period.
-
Click Finalize to finalize the Open Enrollment period.
Clicking Finalize will surface a confirmation modal.
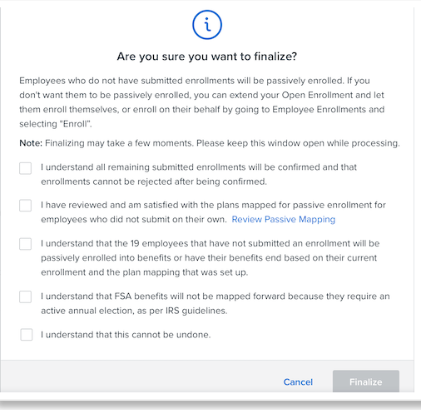
To finalize the Open Enrollment, you must confirm you understand that:
-
All submitted enrollments will be confirmed. Once confirmed, the enrollment can’t be rejected.
-
You have reviewed and are satisfied with the plans you mapped for passive enrollment.
-
Any employees who have not submitted their elections will be auto-enrolled into the new plans you mapped to the current offered benefits.
-
Namely will behave as if the employee enrolled into the new plans themselves.
-
A life event record and confirmation report of benefits waived or enrolled in will be generated.
-
-
You understand FSA plans will not be mapped forward as they require active enrollment per IRS guidelines.
-
This action can’t be undone.
After clicking Finalize, if there are any issues with a specific employee's enrollment, an error will surface instructing you to fix the error to finalize that employee's enrollment. All other employee enrollments will not be impacted and will be finalized.
AFTER FINALIZING
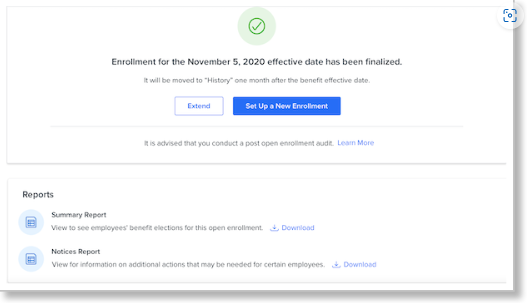
Once the Open Enrollment is finalized, administrators will have to perform an admin change or import if they want to enroll employees again.
Click Extend to reopen the enrollment period for any new employees who have been hired and missed the enrollment period. This will not reopen enrollment for any employees who have already had their elections confirmed (or for those who did not complete enrollment and had their elections waived by the administrator).
Click Set Up a New Enrollment to set up a new Open Enrollment if you have two enrollment periods back to back.
-
If you select this option, the finalized enrollment will be moved to the History tab and you will not be able to extend the enrollment period.
Click Summary Report to export a CSV file containing a summary of all elections made by employees and their dependents during Open Enrollment.
Click Employee Benefit Notices Report (only displays for passive enrollments) to see:
-
Dependents who were removed from enrollment because they were over the eligible age.
-
Volume plans that require an EOI.
-
Beneficiaries who are needed. Namely will allow the enrollment to be finalized without a beneficiary but the administrator will need to update the information later.
-
Employees who need PCP information and did not have it in their data.
History
The History tab will be empty until your first Open Enrollment period has been finalized and one month since the effective date has passed. It will display the Open Enrollment dates, the date and name of who finalized the Open Enrollment, and an option to download the same summary.

