Plan Setup Assistant: Transportation
How to set up company Transportation Plans.
ACCESSING TRANSPORTATION BENEFITS
To access transportation benefits configuration, click Manage Benefits on the Namely homepage.
Benefits Setup Page
On the Benefits Setup page, you can view your past, current, and future benefits plans. Click Transportation to view commuter/transit, parking, and bicycle plans once they have been configured.
TIP:
Note: Only active plans will migrate to Enrollment Setup > Plans and be available for employee enrollment. Draft plans will only appear in the setup assistant.
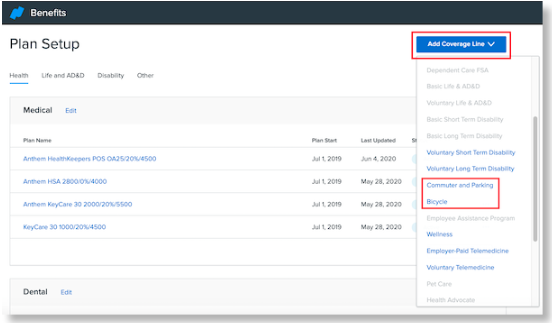
ADDING A COVERAGE LINE
To add a coverage line:
-
Click Add Coverage Line.
-
Choose the type of coverage line from the dropdown menu.
-
For transportation plans, you can choose Commuter & Parking or Bicycle.
COVERAGE SETTINGS - COMMUTER AND PARKING
The coverage line setup assistant asks a series of questions to configure your post and pre-tax commuter and parking coverage lines. You can save your progress and exit the assistant at any time by clicking Save and Exit. To exit without saving, click Cancel.
TIP:
If your organization does not offer a specific type of coverage, you can skip any inapplicable questions.
Commuter
-
Enter a commuter coverage name.
-
Select whether employees are allowed to waive commuter benefits.
-
Enter instructions to help employees better understand a pre-tax commuter benefit.
-
Enter instructions to help employees better understand a post-tax commuter benefit.
-
Note: If you don't offer post-tax commuter benefits, leave this field as-is.
-
Parking
-
Enter a parking coverage name.
-
Select whether employees are allowed to waive parking benefits.
-
Enter instructions to help employees better understand a pre-tax parking benefit.
-
Enter instructions to help employees better understand a post-tax parking benefit.
-
Note: If you don't offer post-tax parking benefits, leave this field as-is.
-
Optional Additional Question
-
Select whether you want to ask an additional question to your employees enrolling in these coverage types. The answers collected will not affect the employee's coverage, and will appear in benefit reports.
-
Enter the questions you want to ask.
-
Enter any specific instructions you have for the above question. (Optional)
-
You can also select when employees are required to answer this question, including:
-
-
Never
-
On election of a benefit
-
On waiving a benefit
-
On election or waiving of a benefit
-
If you have any documents about your company’s coverage options, upload them in Enrollment Setup > Plan Documents.
After making any desired changes, click Save and Continue.
Any required fields that have not been completed will be marked in red. You can’t continue setting up your plans until these fields have been completed.
Note: Coverage lines created in the setup assistant won’t map to Enrollment Setup > Coverage Line until you have activated a plan under that coverage line.
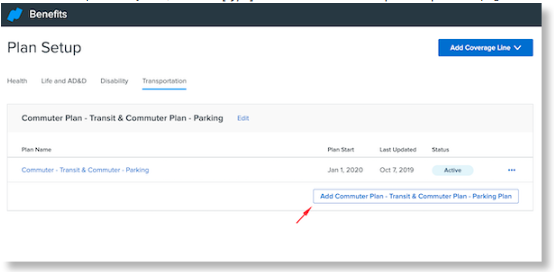
CREATING COMMUTER AND PARKING PLANS
After a coverage line is created, you can create plans for it.
To create a new plan at any time, click Add(Type)Plan on the Benefits Setup > Transportation page.
The plan setup assistant asks a series of questions to configure your plan options. Enter your preferences in the fields provided.
-
Enter the plan carrier.
-
Enter the plan start date.
-
Select whether you want to set up commuter , parking , or both commuter and parking plans.
-
Enter the names of any plans you want to set up.
-
Note: If you offer both commuter and parking plans, we recommend you set them up together.
-
Enter the policy number.
Once you have completed the required fields, click Save and Continue.Note: You can’t save your plan as a draft without completing these fields.
To edit your plan’s carrier, start date, name(s), or policy number after it has been created, click Edit in the top right corner of the plan setup assistant.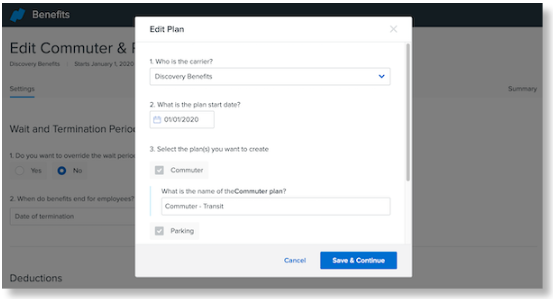
PLAN SETTINGS
Under Plan Settings, you can set your wait and termination periods for the plan and what payroll deduction the plan should map to.
Wait and Termination Periods
Wait periods determine the amount of time an employee has to wait after their hire date before their benefits are effective. Termination periods determine the amount of time an employee’s benefits are effective after they are terminated.
-
Select if you want to override wait periods that are set at the class level.
-
If you override wait periods, use the dropdown menus to specify when you want benefits to start.
-
Select when benefits should end for terminated employees.
Deductions
-
Select which payroll deduction the plan should map to.
-
If you have multiple EINs, each EIN displays in this section to be mapped.
-
-
Select if you want to create post-tax plans.
-
If you select Yes, select which payroll deduction(s) the post-tax plans should map to.
-
After making any desired changes, click Save and Continue.
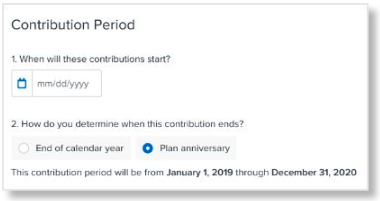
CONTRIBUTION PERIOD
-
Enter when contributions for the plan(s) will start.
-
Select how you determine when the contribution(s) end. You can select End of calendar year or Plan anniversary.
-
Based on your selection, the start and end dates of the contribution period will display.
CONTRIBUTION AMOUNTS
-
Select whether there will be an employer contribution for your commuter and/or parking plans.
-
If you select Yes, select which plans will have an employer contribution. If you are setting up commuter and parking plans together, you can select Commuter, Parking, or Both.
-
Select if the employer will be matching the employer contribution.
-
Select what type of contribution. You can select:
-
Fixed: New employees will receive the full contribution amount distributed across their paychecks for the remainder of the plan year, regardless of when they join the company.
-
Prorated: New employees will receive a portion of the contribution relative to when they joined the plan, distributed across their paychecks for the remainder of the plan year.
-
-
Enter the Annual employer contribution / Maximum employer contribution.
-
The annual employer contribution is the amount the employer gives to employees toward the plan. All amounts should be entered as an annual amount.
-
-
-
Select whether you want to use the default IRS employee maximum. If you select No:
-
Enter the Employee Minimum and Maximum contributions for commuter benefits.
-
Enter the Employee Minimum and Maximum contributions for parking benefits.
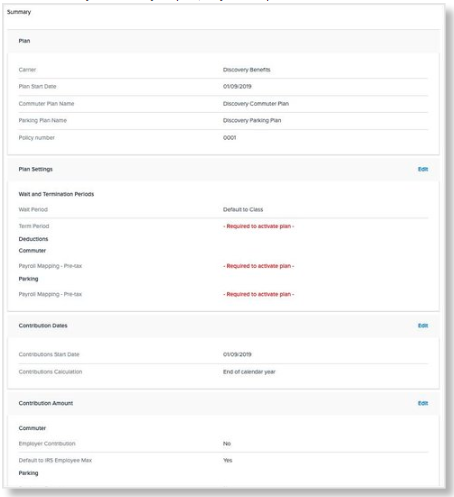
SUMMARY
On the Plan Summary page, you can review all of the details you have configured for your plan.
If any information for your plan is incorrect, click Edit next to the section you want to reconfigure.
To save your plan in a draft state without activating it, click Save and Exit.
To activate your plan and make it available for enrollment on the plan effective date, click Activate Plan.
-
Once you activate the plan, any details concerning the coverage line, plan, and contributions will display in Payroll > Enrollment Setup > Configuration. Access here is read-only—plans can only be edited in the Enrollment Setup Assistant.
-
Once you activate your plan, only certain parts of it can be edited.