Plan Setup Assistant: Disability
A guide for configuring your company's disability plans in the plan setup assistant.
ACCESSING DISABILITY BENEFITS
To access disability benefits configuration, click Manage Benefits on the Namely homepage.
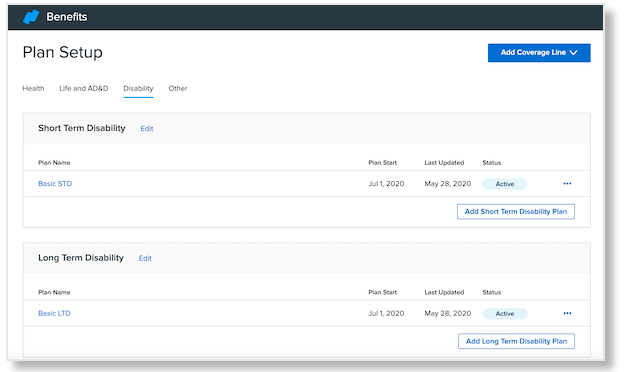
On the Benefits Setup page, you can view your past, current, and future benefits plans. Click Disability to view disability plans once they have been configured.
TIP:
Only active plans will migrate to Enrollment Setup > Plans and be available for employee enrollment. Draft plans will only appear in the setup assistant.
ADDING A COVERAGE LINE
To add a Coverage Line:
-
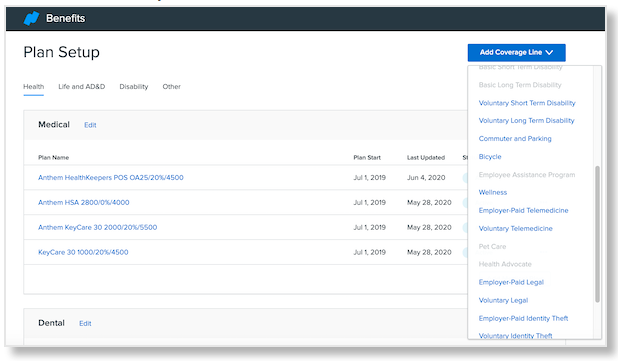
Click Add Coverage Line.
-
Choose the type of coverage line from the dropdown menu.
-
You can choose from Basic Short Term Disability, Basic Long Term Disability, Voluntary Short Term Disability, and Voluntary Long Term Disability.
-
Short Term Disability Calculation FAQs - Answers some commonly asked questions about the calculation of Short Term Disability rates.
-
Long Term Disability Calculation FAQs - Answers some commonly asked questions about the calculation of Long Term Disability rates.
-
The coverage line setup assistant asks a series of questions to configure your coverage line. You can save your progress and exit the assistant at any time by clicking Save and Exit. To exit without saving, click Cancel.
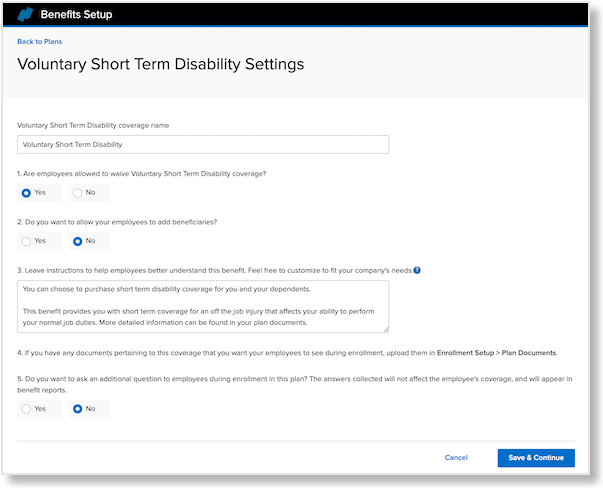
To start configuring your coverage line settings, enter the coverage line name.
Waiving Coverage and Dependent Rules
-
Select if employees can waive coverage.
-
Select if you want to allow employees to add beneficiaries.
-
If you want to provide instructions to your employees to help them understand their coverage options, you can enter them here.
-
If you have any documents about your company’s coverage options, upload them in Enrollment Setup > Plan Documents.
-
If you want to ask an additional question of your employees, like who their primary care physician is, you can enter it here.
After making any desired changes, click Save and Continue.
Any required fields that have not been completed will be marked in red. You cannot continue setting up your plans until these fields have been completed.
TIP:
Coverage lines created in the setup assistant won’t map to Enrollment Setup > Coverage Line until you have activated a plan under that coverage line.
CREATING A PLAN
After a coverage line is created, you can create plans for it.
To create a new plan at any time, click Add on the Benefits Setup page.
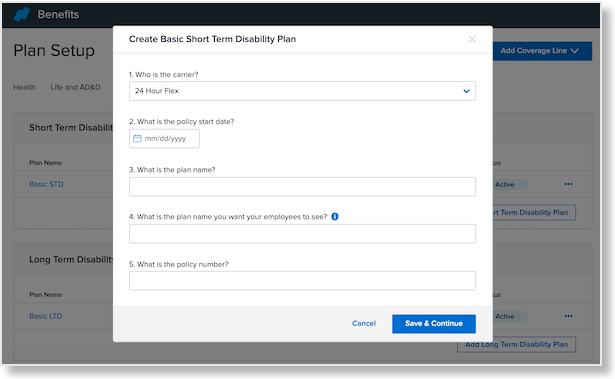
The plan setup assistant asks a series of questions to configure your plan options. Enter your preferences in the fields provided.
-
Enter the plan carrier.
-
Enter the policy start date.
-
Enter the plan name.
-
Enter the plan name you want your employees to see. (optional)
-
Enter the policy number.
Once you have completed the required fields, click Save and Continue.Note: You can’t save your plan as a draft without completing these fields.
To edit your plan’s carrier, start date, name(s), or policy number, after it has been created, click Edit in the top right corner of the plan setup assistant.

PLAN SETTINGS
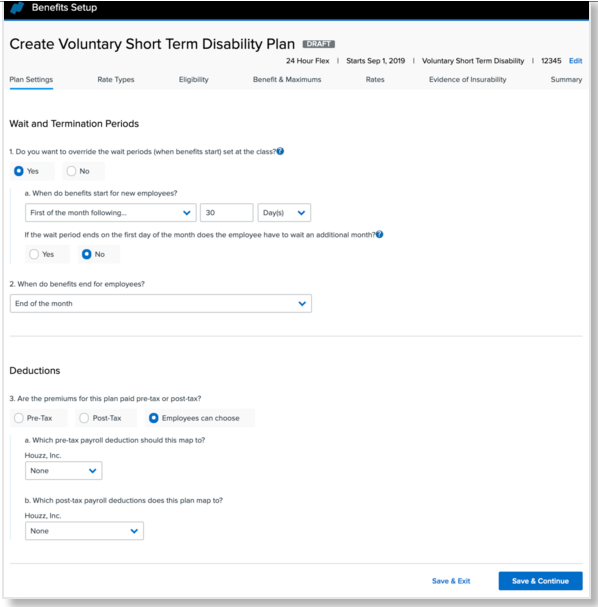
Under Plan Settings, you can set your wait and termination periods for the plan and what payroll deduction the plan should map to.
Wait and Termination Periods
Wait periods determine the amount of time an employee has to wait after their hire date before their benefits are effective. Termination periods determine the amount of time an employee’s benefits are effective after they are terminated.
-
Select if you want to override wait periods that are set at the class level.
-
If you override wait periods, use the dropdown menus to specify when you want benefits to start.
-
-
Select when benefits should end for terminated employees.
Deductions
-
Select whether the premiums for the plan are paid pre-tax or post-tax and which payroll deduction the plan should map to.
-
Voluntary coverage lines provide the option for employees to choose whether their payments are applied pre or post-tax. If you select this option, employees will be given two disability plans to choose from when they enroll in benefits.
-
If you have multiple EINs, each EIN displays in this section to be mapped.
-
After making any desired changes, click Save and Continue.
RATE TYPES
-
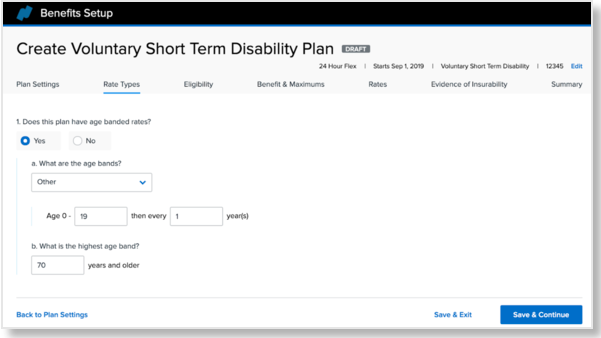
Select if the plan has different rates based on age. If you select yes:
-
Select what the age bands are. You can select:
-
Age 0-19, then every 5 years
-
Age 0-24, then every 5 years
-
Age 0-29, then every 5 years
-
Other
-
If you select Other, you can set up the initial age band and age increments.
-
-
-
Enter the highest age band.
-
After making any desired changes, click Save and Continue.
ELIGIBILITY
If your organization has different plan rates for different employee groups (based on class, branch, division, or a combination of class and branch), you can assign them on the Eligibility page. You can also make employee groups ineligible for your plan.
-
Enter when your eligibility rules and rates are effective.
-
Select how your rates and eligibility are determined:
-
By class
-
By branch
-
Bydivision
-
By class and branch
-
Select the relevant org unit(s) and use the Move to dropdown to assign them to a rate or make them ineligible for the benefit.
By default, the setup assistant will display a single maximum. If you have more than two groups of employees with different maximums, you can add a new one by clicking Add Maximum.
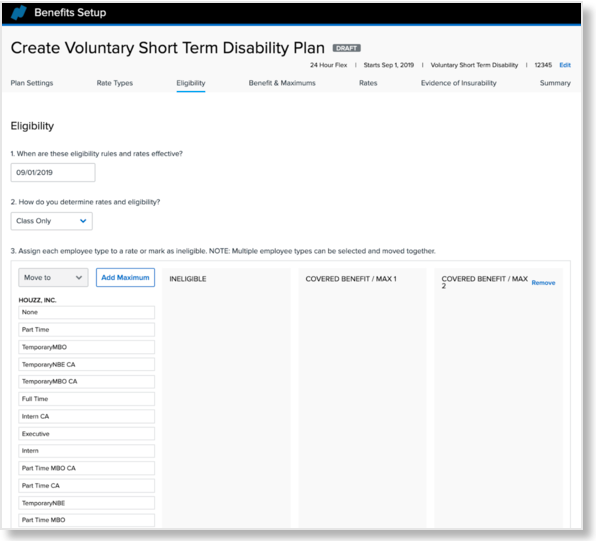
After making any desired changes, click Save and Continue.
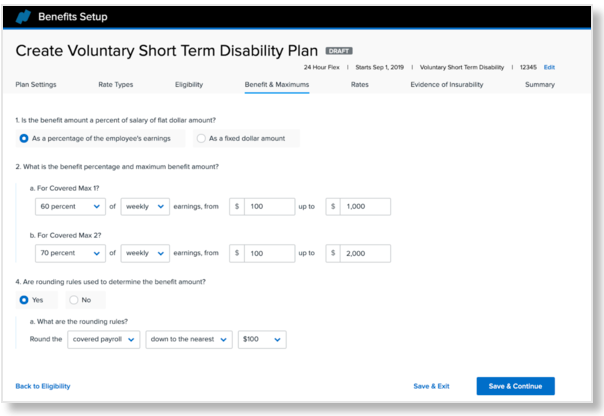
BENEFITS AND MAXIMUMS
On the Benefits and Maximums page, you can define the maximum benefit for your disability plan, as well as whether the maximum is based on a percentage of the employee's earnings or as a fixed dollar amount.
TIP:
You must complete the Rate Types and Eligibility sections before you can advance to the Benefits and Maximums page.
Percentage of Employee's Earnings
-
Select that the benefit amount is a percentage of the employee's earnings.
-
Enter the benefit percent minimum and maximum values as defined by your broker or in your plan documents.
-
Note: Short-term disability is typically a weekly benefit, while long-term disability is typically monthly.
-
If you created multiple benefit/maximums on the Eligibility page, you will be asked to enter the benefit percentages and minimum/maximum values for each of them.
-
-
Select whether rounding rules are used to determine the benefit amount. If you select yes:
-
Enter the rounding rule configuration.
-
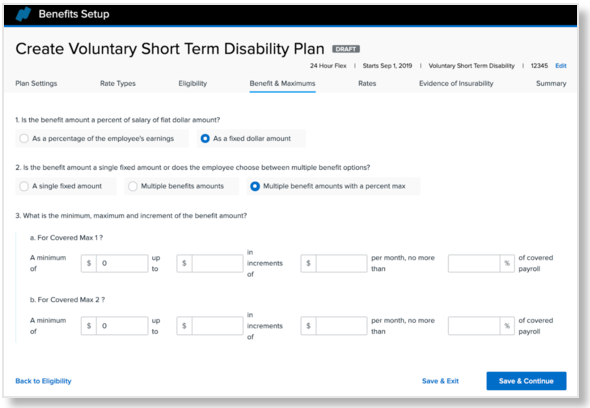
Fixed Dollar Amount
-
Select that the benefit amount is a fixed dollar amount.
-
Select whether the benefit amount is a single fixed amount, the employee can choose between multiple options, or the employee can choose between multiple options with a percent maximum.
-
Note: If you are setting up a basic coverage plan, you can only enter values for a single fixed amount.
-
-
Complete the required fields based on your selection in question 2.
RATES (NON-AGE BANDED)
-
Select how the monthly rate should be calculated.
-
If you select per benefit amount, select whether the benefit rate is given per $10 or $100 of the weekly covered benefit, weekly covered payroll, monthly covered benefit, or monthly covered payroll.
-
For short-term disability, the answer is usually per $10 of weekly covered benefit.
-
For long-term disability, the answer is usually per $100 of monthly covered payroll.
-
-
Enter the total monthly premium.
RATES (AGE-BANDED)
-
Select how the monthly rate should be calculated.
-
Enter the total monthly premium per age band.
-
Note: Voluntary plans will feature an additional that asks whether the employee and employer share the cost of the plan. If it is a shared cost, you'll be prompted to enter the employer contribution percent.
-
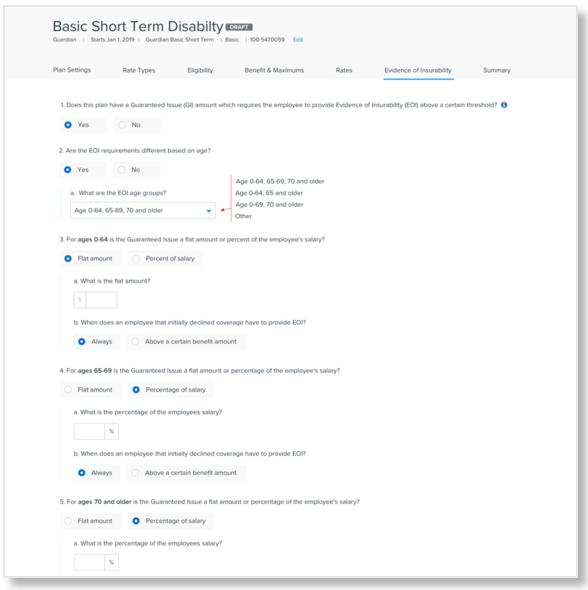
EVIDENCE OF INSURABILITY
Employees are required to complete an evidence of insurability (EOI) document proving they are in good health if they elect over a certain benefit amount for life or disability. That benefit amount is the guaranteed issue amount. Employees are generally given a guaranteed issue amount the first time they can elect the benefit.
-
Select whether your disability plan has a guaranteed issue amount.
-
If you select yes to question 1, select whether EOI requirements are different based on the employee's age.
-
If you select yes, select the EOI age groups from the dropdown, or select Other to set up your own unique age group configuration.
-
After you have completed setting up your age groups, the remaining EOI questions are asked per age group. The initial EOI and update threshold amounts are asked for each age band, while the late threshold is only asked once and applies to all age groups.
-
-
-
Select whether the maximum amount before an EOI is required is a flat dollar amount or a percentage of the employee's salary.
-
Depending on your selection, enter the flat dollar amount or salary percentage.
-
-
Select whether employees already enrolled in this coverage are allowed to increase their benefit without providing an EOI.
-
If you select yes, enter the amount employees can increase by without additional documentation being required.
-
Select what type of life event is required for an employee to qualify.
-
-
Select whether employees who have declined coverage can enroll at a later date without providing an EOI for a certain threshold.
-
If you select Always, employees will be required to submit an EOI for any amount.
-
If you select Above a certain amount, enter the amount above which an EOI is required.
-
PLAN SUMMARY
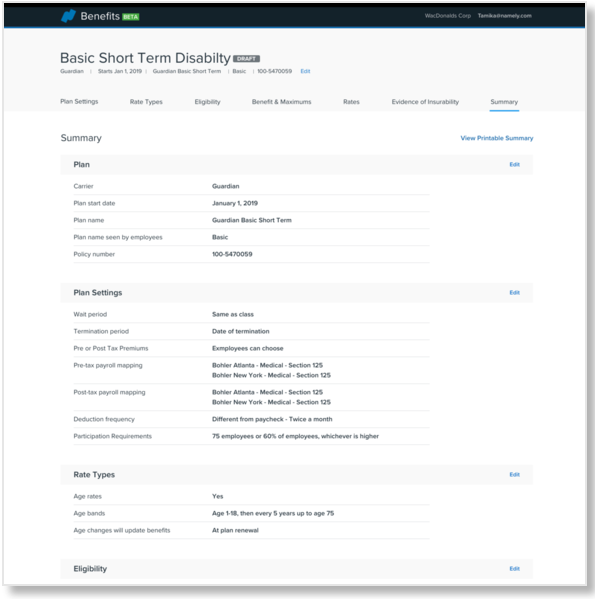
On the Plan Summary page, you can review all of the details you have configured for your plan.
Under Rates, you can view the plan rates on a per-pay basis using the dropdown menu.
If any information is incorrect, click Edit next to the section you want to reconfigure.
-
Note:Changing your rate types will remove any rates you have entered.
To save your plan in a draft state without publishing it, click Save and Exit.
To activate your plan and make it available for enrollment on the plan effective date, click Activate Plan.
TIP:
If you have not completed a section or required field, an error displays and you cannot publish your plan until it has been completed.
ENDING AN ACTIVE PLAN
To end a plan:
-
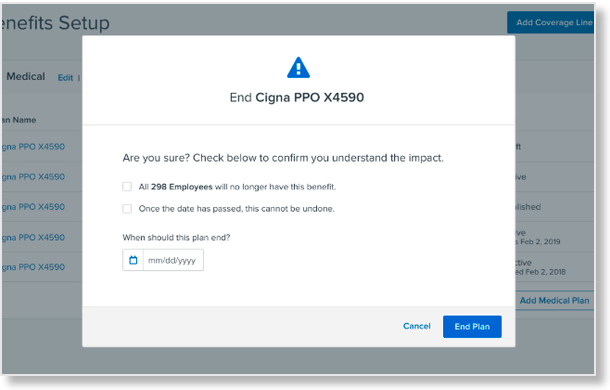
On the Plan Summary page, click End Plan.
-
Confirm that you understand the number of employees who will be affected by this change, and that this action can’t be undone, by clicking the checkboxes.
-
Enter the Plan End Date.
-
Note: If you end a plan, employees won’t be automatically unenrolled from it. Employees will have to be re-enrolled into a new plan, or you can contact Namely for support.
-
-
Click End Plan.