Plan Setup Assistant: Configuring Opt-in Plans
How to use the plan setup assistant to configure your organization's opt-in benefit plans. Opt-in plans include employee assistance programs (EAP), wellness, telemedicine, pet care, health advocate, legal, identity theft, and learning management (LMS).
ACCESSING OPT-IN PLANS
To access opt-in benefits, click Manage Benefits on the Namely homepage. To navigate to your opt-in plans, click the Other tab. (The Other tab only displays after at least one plan of that type has been created.)

ADDING A COVERAGE LINE
To add a coverage line:
-
Click Add Coverage Line.
-
Choose the type of coverage line from the dropdown menu.
-
If you do not see a coverage line you are looking for here, you can use the Custom option or go to Enrollment Setup > Configuration in Payroll for that coverage type.
-
COVERAGE SETTINGS
The coverage line setup assistant asks a series of questions to configure your coverage line. You can save your progress and exit the assistant at any time by clicking Save and Exit. To exit without saving, click Cancel
To start configuring your coverage line settings, enter the coverage line name.
Waiving Coverage and Dependent Rules
-
Select if employees can waive coverage.
-
Select if dependents can enroll in coverage. (This option will not be present on Pet Care coverage.)
-
Enter the maximum age to be considered a child on the plan. (This option will not be present on Pet Care coverage.)
-
Enter the maximum age to be considered a student on the plan. (This option will not be present on Pet Care coverage.)
Optional Additional Question
-
If you want to ask an additional question of your employees, like who their primary care physician is, you can enter it here.
-
If you have any special instructions for employees related to your additional question, you can enter them here.
-
You can also select when employees are required to answer this question, including:
-
On election of a benefit
-
On waiving a benefit
-
On election or waiving of a benefit
-
Never
-
Optional Instructions and Docs
-
If you want to provide instructions to your employees to help them understand their coverage options, you can enter them here, or use the text provided.
-
If you have any documents about your company’s coverage options, upload them in Enrollment Setup > Plan Documents.
After making any desired changes, click Save and Continue.
Any required fields that have not been completed will be marked in red. You can’t continue setting up your plans until these fields have been completed.
TIP:
Coverage lines created in the setup assistant won’t map to Enrollment Setup > Coverage Line until you have activated a plan under that coverage line.
CREATING PLANS
After a coverage line is created, you can create plans for it.
To create a new plan at any time, click Add on the Benefits Setup page.
The plan setup assistant asks a series of questions to configure your plan options. Enter your preferences in the fields provided.
-
Enter the plan carrier.
-
Enter the plan start date.
-
Enter the plan name.
-
Enter the policy number.
Once you have completed the required fields, click Save and Continue.Note: You can’t save your plan as a draft without completing these fields.
PLAN SETTINGS
Under Plan Settings, you can set your wait and termination periods for the plan, what payroll deduction the plan should map to, and whether domestic partners are eligible for the plan. Note: We will not ask for domestic partner eligibility for pet care plans.
Wait and Termination Periods
Wait periods determine the amount of time an employee has to wait after their hire date before their benefits are effective.
Termination periods determine the amount of time an employee’s benefits are effective after they are terminated.
-
Select if you want to override wait periods that are set at the class level.
-
If you override wait periods, use the dropdown menus to specify when you want benefits to start.
-
-
Select when benefits should end for terminated employees.
Deductions
-
Select if you want to map this plan to a payroll deduction. If you do, click Yes and select the deduction the plan should map to.
-
If you have multiple EINs, each EIN will show in this section to be mapped.
-
-
Select if domestic partners are eligible to enroll for this plan. If you select Yes:
-
Select whether only same-sex or same-sex and opposite-sex partners are eligible.
-
Select whether children of domestic partners are eligible.
-
After making any desired changes, click Save and Continue
RATE TYPES
Note: This page will not appear for pet care plans.
-
Select the levels that have rates for the plan.
-
Note: If you chose to cover domestic partners, they will be included in your plan-level options.
-
After making any desired changes, click Save and Continue.
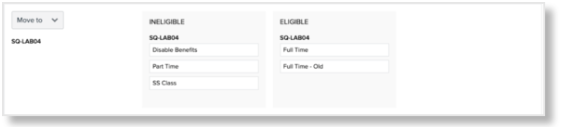
ELIGIBILITY
If your organization has different plan rates for different employee groups (based on class, branch, division, or a combination of class and branch), you can assign them on the Eligibility page. You can also make employee groups ineligible for your plan.
-
Enter when the eligibility rules and rates for the plan are effective.
-
Select how your rates and eligibility are determined:
-
By class
-
By branch
-
By division
-
By class and branch
-
-
Select the relevant org unit(s) and use the Move to dropdown to mark them as eligible or ineligible for the benefit.
After making any desired changes, click Save and Continue.
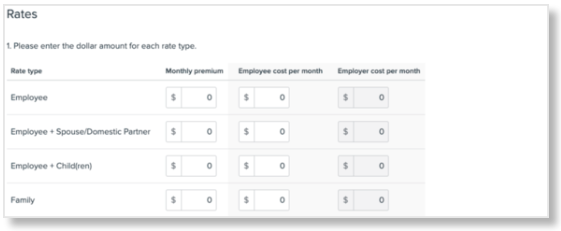
RATES
-
Enter the Monthly premium and the Employee cost per month for each rate and level.
-
The Employer cost per month is automatically calculated.
-
If domestic partners and children of domestic partners are eligible for coverage, their post-tax rates are automatically calculated.
-
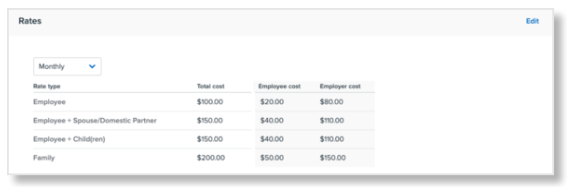
You can review pay-period rates on the Plan Summary tab before publishing your plan.
After making any desired changes, click Save and Continue
PLAN SUMMARY
On the Plan Summary page, you can review all of the details you have configured for your plan. Under Rates, you can view the plan rates on a per-pay basis using the dropdown menu.
If any information for your plan is incorrect, click Edit next to the section you want to reconfigure.
TIP:
Changing your rate types will remove any rates you have entered.
To save your plan in a draft state without activating it, click Save and Exit.
To activate your plan and make it available for enrollment on the plan effective date, click Activate Plan.
TIP:
If you have not completed a section or required field, an error will display and you can’t activate your plan until it has been completed.