New Benefits Administrator Guide
New to Benefits at Namely? Read our guide to familiarize yourself with everything a Benefits administrator needs to know - open enrollment, plans, carrier feed, and more!

Welcome to Benefits Administration! This New Admin Guide will introduce you to benefits at Namely, providing an overview of enrollment processes, plan configuration, ACA, data management, and more.
Learning Objectives
Once you've read through this guide, you'll be able to:
-
Access the Plan Setup Assistant and Enrollment Setup section of Namely Payroll.
-
Describe the core functionality of Ben Admin at Namely.
-
Understand how employees enroll in benefits, how their benefits data is stored in Namely, and how it can be transferred to insurance carriers.
-
Grasp the different options available for Open Enrollment management.
-
Articulate how Namely supports ACA Reporting and COBRA.
UNDERSTAND YOUR SERVICE OFFERING - 3 MIN. READ
READ ON TO UNDERSTAND HOW YOUR SERVICE POD CAN HELP YOU MANAGE YOUR BENEFITS!
Namely has two distinct solutions for benefits configuration and administrative support:
-
Software as a Service - With our core service offering, you'll have a dedicated Client Relationship Manager, Pod Manager, and a Service Pod who are here to help you troubleshoot benefits issues and answer any questions you may have as you're working with Namely.
-
Managed Benefits - In addition to the support provided by our SaaS model, you'll also have a dedicated Benefits Consulting team, consisting of a Benefits Consultant, who serves as your insurance broker, and is also an expert in the Namely benefits product, a Team Lead, and a Benefits Analyst. Together, they'll handle your Open Enrollment configuration, and also handle all enrollment change reporting to your carriers.
This guide will help familiarize you with benefits at Namely regardless of the offering you've purchased, but it is worth noting that you'll receive additional assistance completing the tasks detailed below from our Benefits Consultant and Enrollment Team if you are a Managed Benefits customer:
-
Brokerage services
-
Open Enrollment planning and site configuration
-
Enrollment data transfer to your carriers
We recommend connecting with your Benefits Consultant to ensure proper expectations and timelines are set to solidify your partnership.
TIP:
If you're interested in becoming a Managed Benefits customer, email sales@namely.com!
GETTING STARTED - 1 MIN. READ
BRUSH UP ON YOUR BENEFITS KNOWLEDGE WITH OUR GLOSSARIES.
Before we dive into the nuts and bolts of benefits, let’s review the basics. These two articles define common Benefits and Namely-specific terminology - sort of a crash course in Benefits!
ACCESSING BENEFITS ADMINISTRATION - 4 MIN. READ
WE'LL SHOW YOU HOW TO LAUNCH OUR PLAN SETUP ASSISTANT AND ENROLLMENT SETUP IN NAMELY PAYROLL.
Now that you have a basic understanding of your offerings and what they mean - it's time to jump in and familiarize yourself with our benefits platform.
Your company's benefits are managed in two locations: the Plan Setup Assistant and Enrollment Setup. The chart below outlines the use cases for each application.
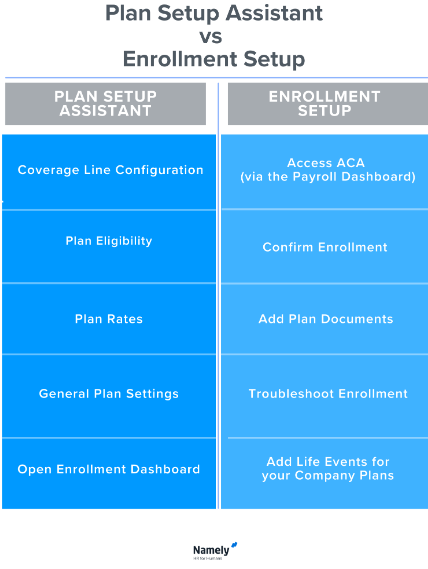
Plan Setup Assistant
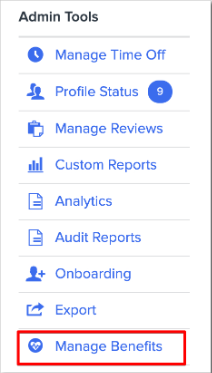
You can access the Plan Setup Assistant by clicking Manage Benefits under Admin Tools button on the left-hand side of your Namely homepage.
This will launch the Benefits Dashboard, your home base for Plan Setup and Open Enrollment management.
Enrollment Setup
Enrollment Setup is located in Namely Payroll. To access it, click Manage Payroll from your Namely homepage and then Enrollment Setup from the top navigation menu.

Roles and Permissions
Your Namely profile needs to be granted specific access to perform administrative tasks. You will not be able to access Enrollment Setup if you do not have one of the below Namely Payroll User Administrative Roles set up:
-
Enroll Only: Allows admins to approve and review benefits portion of the site
-
Payroll & Timesheets & Enroll: Allows admins to approve and review payroll, benefits, and timesheets
-
Payroll & Timesheets & Remote Link & Enroll: Allows admins to approve and review payroll, benefits, and timesheets
-
Payroll Only - Non Approver: Allows full admin access
If you need access to Enrollment Setup, a Payroll Administrator can grant you access by going to the Users section of Namely Payroll and assigning one of the above roles.
TIP:
These roles will also grant access to the ACA Reporting Wizard.
Plan Setup Assistant access is granted in HRIS. Your Access Role will need the below abilities to use it successfully:
-
Benefits Setup: Allows user to access ben admin portal via Manage Benefits option on springboard.
-
Access Benefits admin: Grants the user to "Manage Benefits" on the homepage springboard. The user will also need a user role with proper permission in your Payroll site.
If you don't have access yet - an Administrator in HRIS can get you set up.
ENROLLING IN BENEFITS - 12 MIN. READ
OUR ENROLLMENT WIZARD IS YOUR EMPLOYEE'S GATEWAY TO BEN ADMIN - AND WHERE THEY'LL ENROLL IN BENEFITS, PROCESS CHANGES FOR QUALIFYING LIFE EVENTS AND UPDATE DEPENDENT AND BENEFICIARY INFORMATION.
Enrollment Wizard
Enrolling in plans or making changes to your benefits is a snap with our Enrollment Wizard. The Enrollment Wizard allows employees to enroll in benefits as new hires, during your company's Open Enrollment or when they have a Qualifying Life Event.
As an Administrator, you can also use the wizard to make changes to employee plans by using the Administrator Change life event, which allows you to enter the enrollment wizard as the employee, and make any changes or corrections you may need to make. We'll touch on that feature again a bit later!
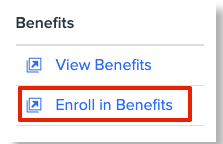
Your employees can access the Enrollment Wizard by clicking Enroll in Benefits on your Namely homepage.
This will launch the Enrollment Wizard, an application that makes enrolling in benefits easy! Let's walk through an enrollment. The first thing we'll need to know - is why do you need to make a change to your benefits?

If you've had a Qualifying Life Event, you'll want to select the first option, I had a major life event and need to update my benefits. Qualifying Life Events are changes in your life that enable eligibility for a special enrollment period. Here are some examples of Qualifying Life Events:
-
Birth of a Child
-
Marriage
-
Divorce
-
Turning 26
-
Moving from Part-Time to Full-Time
Once you've made your Qualifying Life Event selection, you'll be prompted to enter the date the event occurred, to ensure you're eligible for the event. A Qualifying Life Event doesn't make you eligible for special enrollment forever!
Some benefits changes can be made without Qualifying Life Event, and they can be made by clicking the second option, I need to change a specific benefit. Some examples of common changes made from this option:
-
Address change
-
Beneficiary changes
-
COVID-19 Changes
-
Commuter Election Changes
There are two instances where you won't need to make one of the above selections: if you're a new hire, and Open Enrollment. In both of those instances, the enrollment wizard will simply open up an enrollment session for new hire benefits or will prompt you to make elections for Open Enrollment.
Once you've made your selections, you'll be taken to the Who's Covered page, where you can manage who's eligible for benefits. Your information as an employee will populate at the top, along with any dependents you've added. You can add additional dependents from this page as well, by clicking Add Dependent and entering their details. 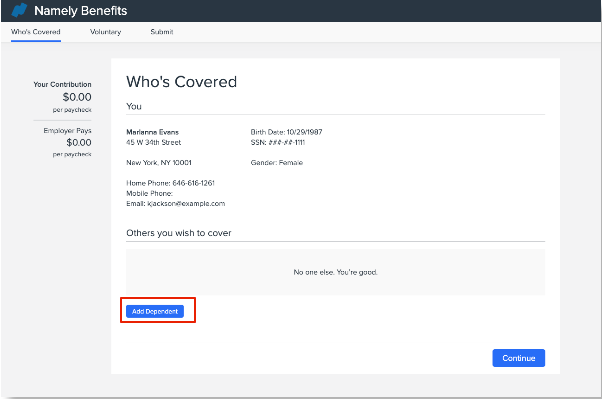
Once you've entered all of the proper dependents, click Continue to enroll. You'll then be taken through a series of screens where you can make your benefits selections.
The pages in the enrollment wizard look a little different depending on the type of coverage that's on offer. Generally speaking though - each page will provide a brief description of the plan or plans that are available. If the plan is eligible for dependents, you'll have the ability to select which dependents will be covered by the plan. If multiple plans are offered, you'll also have the ability to pick the plan of your choosing. The Enrollment Wizard will indicate the cost of each plan and will adjust its pricing if you add dependents to the plan. When you've made your selections, click Save & Continue.
TIP:
You can keep track of how much of your paycheck (and how much of your employers!) will be spent on benefits on the left panel of the screen. You'll notice the Your Contribution and Employer Pays fields calculate costs as you make selections.
Rate Plans
Your Rate Plans - plans that have a fixed rate depending on the selected plan level - will display in the Enrollment Wizard as seen in the below image. These are typically Medical, Dental and Vision plans. 
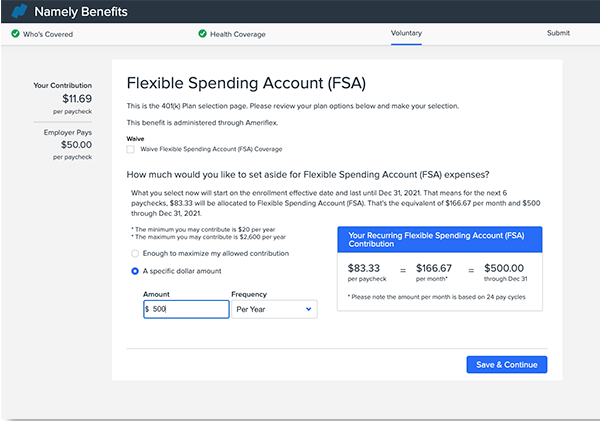
Spending Accounts
The page format for spending accounts, including HSA and FSA, is as pictured below. Employees can elect to maximize their allowed contribution or contribute a specific dollar amount per year or per paycheck. No matter what option they select - the system will calculate their per-pay-period contribution.
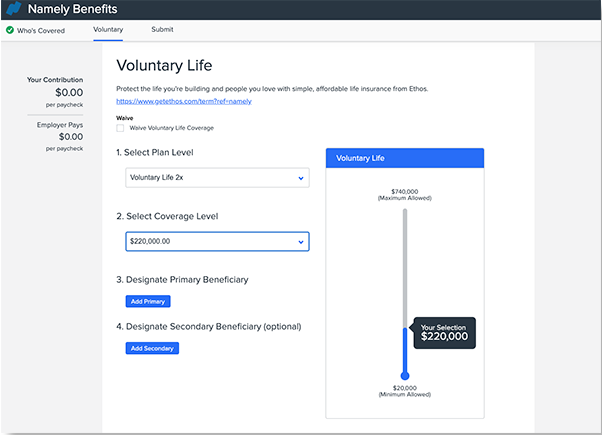
Volume-Based Plans
Most volume-based plans are life insurance plans - plans where employees are selecting a specific volume of coverage (i.e. - $100,000 per year), and typically also require a named beneficiary. Those plans will display in the enrollment wizard as pictured below:
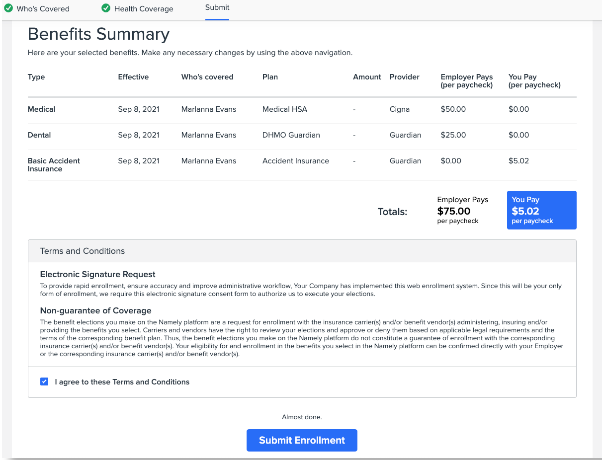
After you've made all of your selections, you'll be able to review them all in your Benefits Summary. This page provides an overview of all of your plan elections, dependents, and costs. If you're satisfied with your selections, check that you agree to the terms and conditions, and click Submit Enrollment.
If you need to make any changes, you can navigate back through the enrollment wizard by clicking Back on your browser, or clicking the page you need to edit from the top of the screen.
Once the enrollment is submitted, a confirmation report will be created for an Administrator to review. Once the report is confirmed, updates will be made to the employee's benefits record and deductions.
Confirmation Reports
Whenever an employee submits a new enrollment or a change to their benefits in the enrollment wizard, a Confirmation Report is created, which serves as a record of the event, and allows you the opportunity to review the changes to ensure the enrollment is appropriate.
No benefits data is updated until the Confirmation Report is reviewed and approved by you or another member of your administrative team - unless the Qualifying Life Event is set up to auto-confirm. We strongly recommend requiring a review of Confirmation Reports to ensure all benefits changes are proper. You also have the ability to reject the enrollment, if there are issues with the employee's elections.
TIP:
You'll receive an email notification whenever you have a Confirmation Report to review! You can manage who receives these alerts at Enrollment Setup > Configuration > General, by adding and removing email recipients in the Email Enroll Confirmation Notice field.
You can review your confirmation reports for all benefits changes by going to Enrollment Setup > Confirmation Reports in Namely Payroll.
TIP:
Open Enrollment confirmation reports can also be managed on the Open Enrollment Dashboard.
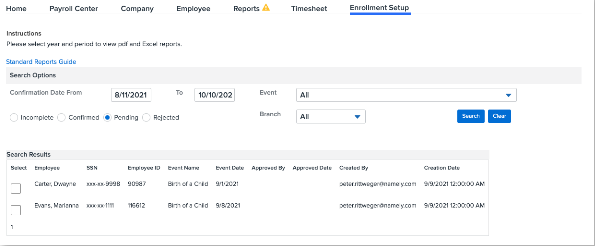
To approve (or reject) a benefit election:
-
Go to Enrollment Setup > Confirmation Reports.
-
Select Pending.
-
Check the box next to the reports you'd like to confirm.
-
Set the dropdown to Confirmed (or Reject)
-
Adjust the date range if necessary.
-
-
Click Update Selected.
Accessing Your Benefits
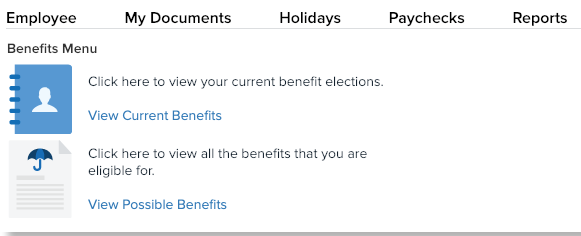
Benefits-eligible employees can always review their benefits elections and data by clicking View Benefits from the left panel on the Namely homepage.

You'll have the option to View Current Benefits, or you can review all benefits you're eligible for by clicking View Possible Benefits.
After clicking View Current Benefits, click Active to view your current benefits or All to view all the benefits you've ever been enrolled in. Click View Current Benefits to receive a PDF of your elections, dependents and rates. You can also click Enrollment Log to review your enrollment history.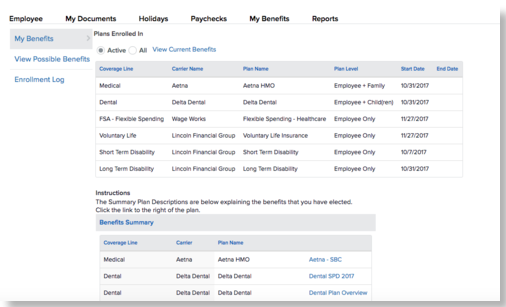
BENEFITS DATA - 10 MIN. READ
REVIEW AND MAKE CHANGES TO YOUR EMPLOYEE'S BENEFITS DATA AND LEVERAGE OUR POWERFUL REPORTING ENGINE.
Namely empowers your employees to enroll in benefits and make benefits changes. It then stores their benefits data in Namely Payroll, which you can review on your employee's profiles and in our reporting engine.
Viewing Data on an Employee Profile
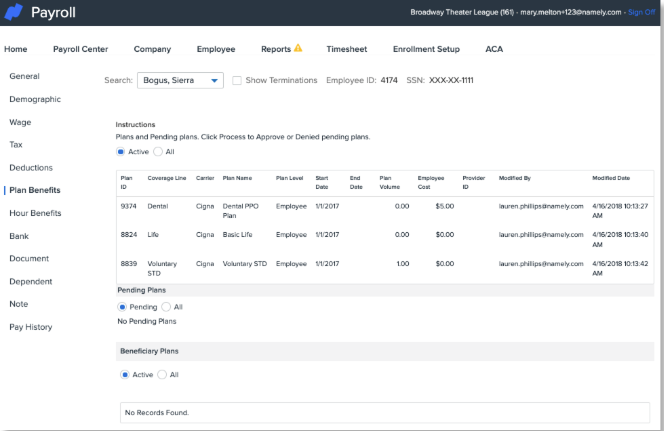
The quickest method to view an employee's benefit elections and changes is from the Plan Benefits page on their payroll profile. This page includes their current and historical plan enrollment data and includes information on rates, volumes, start and end dates, plan levels, carriers, and more.
You can review an employee's Plan Benefits page by following these steps:
-
In Namely Payroll, click Employee.
-
Select the employee from the list, or search the name of the employee.
-
Click Plan Benefits on the left side of the screen.
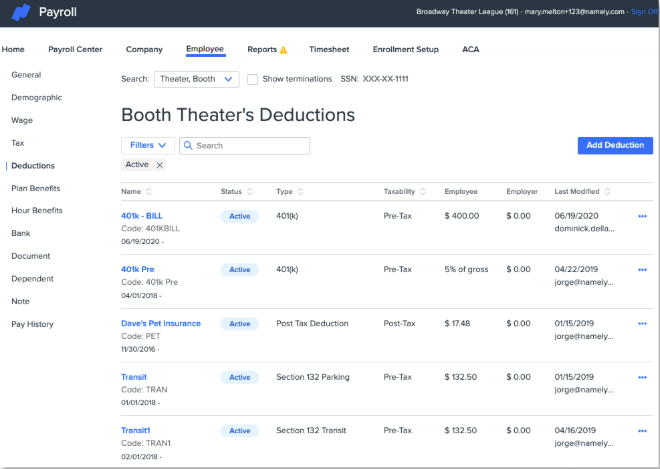
Plan Benefits vs. Deductions
While an employee's Plan Benefits record lists employee and employer costs, it's important to note that the Plan Benefit record and an employee's Deductions are actually two different sets of data. When your plans are set up, they are mapped to a deduction - so when an election is made, the deduction is updated with the appropriate employee and employer amount by the system.
TIP:
This is an important distinction to draw, in the case of any manual adjustments to Plan Benefits or Deductions. You should always ensure both are updated if you're not processing a change to benefits via the Enrollment Wizard.
The steps to review deductions are similar to reviewing Plan Benefits:
-
In Namely Payroll, click Employee.
-
Select or search the name of the employee.
-
Click Deductions on the left side of the screen.
Benefits Reports
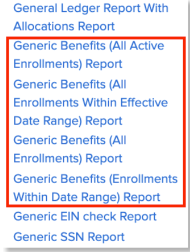
We offer a number of useful reports that will empower you to view your employee Benefits data en masse. Most of the time, you'll be reviewing one of our Generic Benefits Reports, which are helpful for pulling enrollment data:
-
Generic Benefits (Enrollments Within Date Range) Report: This report provides all enrollments within the date range selected, provided that the plan was active within the date range selected. This report includes terminated employees.
-
Generic Benefits (All Enrollments Within Effective Date Range) Report: This report displays all enrollments with an effective date greater or equal to the start date and with an effective date less than or equal to the end date. The difference between this one and the above Date Range report is that this only looks at the effective date, whereas the other looks at the plan effective and plan termed date. This report will capture all plans that were available within the date range selected.
-
Generic Benefits (All Enrollments) Report: This report populates all historical enrollments.
-
Generic Benefits (All Active Enrollments) Report: This report populates all active enrollments (terminated employees don't display.)
Follow these steps to pull a Generic Benefits Report:
-
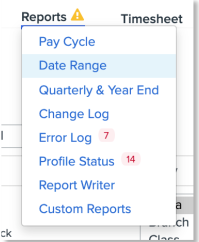
Go to Reports > Date Range.
-
Click on the applicable report under Microsoft Excel Reports or CSV Reports.
TIP:
Generic Benefits Reports are also great for auditing your Namely Benefits data against your carrier billing statements! We recommend comparing this data monthly or quarterly.
Updating Benefits Data
Need to make an update to an employee's benefits data? In most cases, the best way is processing an Administrator Change in the Enrollment Wizard, which we briefly covered above. This method will update both Plan Benefits and Deductions at the same time, while also producing a Confirmation Report that serves as a record of the change.
Some changes will require partnership with your Service Pod. The article Updating your Benefits Data will help you identify those issues, and provide further guidance on making updates to Benefits data.
Imports
If you need to add benefits or make any changes in bulk, our service consultants can help by completing an import, which will update many benefits records at once. Once you have determined and identified what information you will need to import, click on one of the below import articles to learn how to prepare and submit the import template:
-
Benefits Imports: Employee Plans: Use this import if you need to add plans or modify existing plans in bulk.
-
Benefits Imports: Employee Dependents and Dependent Plans: Use this import to add Dependents and add/modify Dependent Plans.
-
Benefits Imports: Beneficiaries: Use this import to add employee beneficiaries.
As soon as you’ve prepared the import template, a case will need to be submitted in the Help Community based on the instructions provided in the import articles. These imports will generally be completed within two business days from the receipt of your completed import template. Import time can vary if we need to follow up to confirm, correct, or collect any additional data.
Managing Benefits Data for Eligibility Changes
Most of the time, an employee's class determines their plan eligibility. Updates to an employee's class are made in HRIS. Oftentimes, a change in class can make an employee eligible for new benefits - or maybe it makes them ineligible for any benefits. A common example of that would be a Full-Time employee moving to Part-Time. No matter the cause, you can update an employee's class by following these steps in HRIS:
-
Go to the employee's profile > Manage (next to the Class field) > Add Record.
-
Enter a Start Date and select a Class.
-
If the new class assignment makes the employee eligible for benefits, select whether the waiting period should be based on the class’ effective start date instead of the employee’s hire date.
-
If the new class assignment makes the employee ineligible for benefits, select whether existing plans should be terminated.
-
Click Save.
TIP:
A minority of clients who have not updated their Namely instance to our Org Units feature make class updates in Namely Payroll.
DATA TRANSFER - 8 MIN. READ
WE'VE GOT YOUR BENEFITS DATA - BUT HOW DOES IT GET TO YOUR INSURANCE CARRIERS? READ ON TO FIND OUT.
Namely collects and stores enrollment data from your employees, but collecting enrollment information is only the first step of enrolling an employee in benefits. That enrollment data ultimately needs to end up with your insurance carriers - that's how employees actually receive their benefits! There are a number of ways to transfer benefits data to carriers.
-
If you're a Managed Benefits client - sit back and relax! Our team of enrollment specialists are here to handle the transfer of your enrollment data to your carriers regardless if you have Carrier Feeds set up or not.
-
If you have a Carrier Feed - then our technology has you covered. Your feed will automatically transfer enrollment data to your insurance carrier.
-
If you're not a Managed Benefits client, and you don't have a feed set up for the benefit, you'll be responsible for making enrollment changes in your carrier portal. Our Generic Benefits Reports will be your best friend!
Carrier Feeds
Carrier Feeds, also known as Electronic Data Interchange (EDI) transfer benefits enrollment information and changes to insurance carriers. Carrier Feeds can include enrollment, demographic, and even payroll data, depending on the benefit offered, and the carrier's specifications and requirements. Carriers have their own unique file formats, and each company and benefit have their own uniquely configured feed. Our feeds are all transferred via SFTP on an encrypted and secure line, directly to insurance carriers.
TIP:
Most Carrier Feed files are sent by Namely on Tuesday evenings - but this varies based on carrier specifications. Your Service Pod is here to support you with any questions or concerns you may have for any of your active feeds.
Our philosophy at Namely is - we'll try to build a feed for any plan, with any carrier - however, some carriers have size requirements - i.e., they'll only build feeds for certain group sizes, or other limitations. If you're interested in setting up a feed, our Project Services team can help! Just submit a Carrier Feed - New project and we'll partner with you to get everything squared away.
TIP:
Another perk for Managed Benefits customers - we build and maintain Carrier Feeds for you at no cost! If you're interested in becoming a Managed Benefits customer, contact sales@namely.com.
Something to keep in mind - Carrier Feeds require maintenance every year! We'll touch on this more later in the guide, but each year, you'll need to submit an Open Enrollment Carrier Feed Review and Modification Project ahead of your company's Open Enrollment to ensure we make all required changes to keep the data flowing seamlessly.
If you have any issues with your Carrier Feed, your Service Pod is here to help. Most Carrier Feed issues are data issues. We recommend reviewing the data for the employees who are not sending successfully to remedy any feed issues.- oftentimes an enrollment won't send because an employee's tax profile is incomplete or if there are discrepancies in plan benefits dates.
TIP:
Carrier Feeds only send data housed in Namely Payroll. Some Namely Payroll data is updated in HRIS, but the data has to be in Namely Payroll to be transmitted on a feed!
Manual Enrollments
If you don't have a feed set up for a benefit, you'll need to process enrollment data and changes directly with your insurance carriers. Sometimes carriers have dedicated enrollment portals, where you can manage changes on your own, online. Some carriers want changes sent to them via email. It varies carrier by carrier, but at the end of the day, you'll have the same goal - getting the info to the carrier so your employee has the proper coverage!
TIP:
Some Carrier Feeds need to be temporarily taken down to complete Open Enrollment updates. If that's the case - you'll need to temporarily handle any enrollments and changes. Don't worry - one of our EDI Consultants will advise you ahead of Open Enrollment if this is the case.
Our Generic Benefits (All Active Enrollments) Reports in Namely Payroll can help you manage manual enrollments. This report lists all active enrollments for your employees, so it's a helpful reference when processing numerous changes with your carriers.
To access the Generic Benefits (All Active Enrollments) Report in Namely Payroll:
-
Click Reports > Date Range.
-
Select the appropriate filters, such as the Year, Period, Pay date.
-
Click on Generic Benefits (All Active Enrollments) under Microsoft Excel reports or CSV Reports.
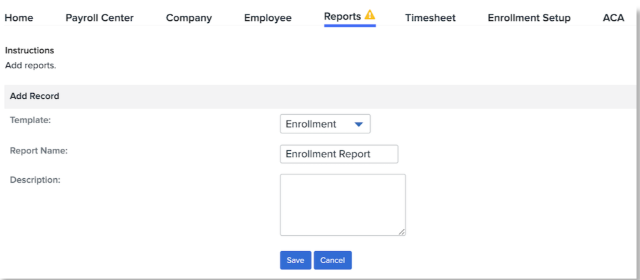
Our Report Writer can also help you pull enrollment, coverage line and dependent data. To access the Report Writer in Namely Payroll:
-
Click Reports > Report Writer > Add.
-
Select the applicable template, enter the Report Name and Description.
-
Click Save.
-
Apply the necessary Filters and include the applicable Available Fields.
-
Click Generate Report.
BENEFITS SETTINGS AND CONFIGURATION - 20 MIN. READ
LET'S TAKE A LOOK UNDER THE HOOD AND SEE HOW COVERAGE LINES, PLANS, LIFE EVENTS AND MORE ARE BUILT.
Now that we've taken you on a journey from enrolling in benefits to transferring data to a carrier - it's time to look at the nuts and bolts of our Benefits Administration system.
Coverage Line and Plan Configuration
Benefits Plans and Coverage Lines are built, updated, and maintained in our Plan Setup Assistant. The Plan Setup Assistant is designed to make Benefits configuration easy and intuitive. With this tool, you can:
-
Configure new plans
-
Update rates and contributions
-
Adjust wait and plan termination periods
-
Map plans to deductions
-
Determine plan eligibility
-
Upload plan documents
-
And much more!
To launch the Plan Setup Assistant, click Manage Benefits from your Namely homepage. 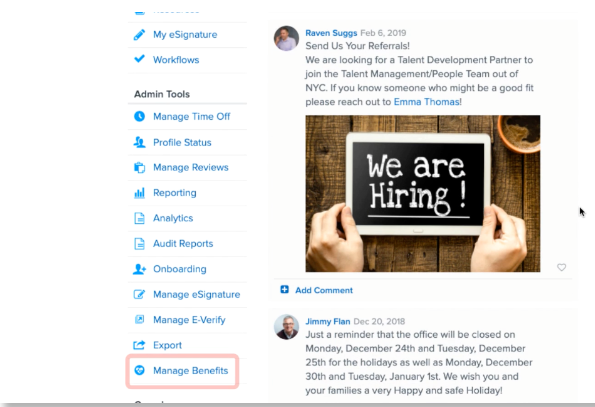
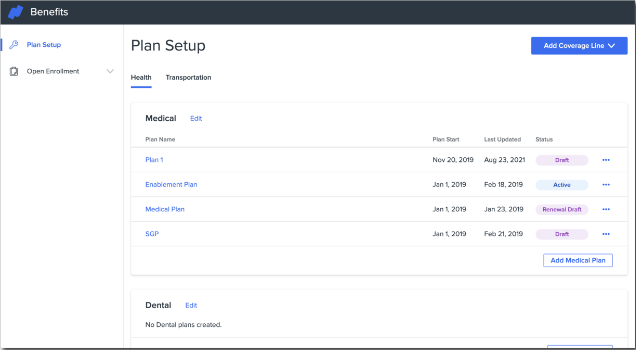
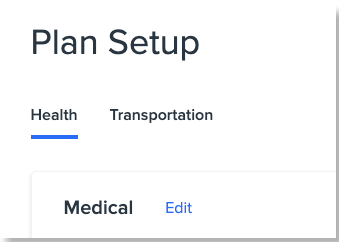
You'll be taken to the Plan Setup screen. You can view your plan status, add new coverage lines and plans, and edit, renew, void, or end plans from this screen. 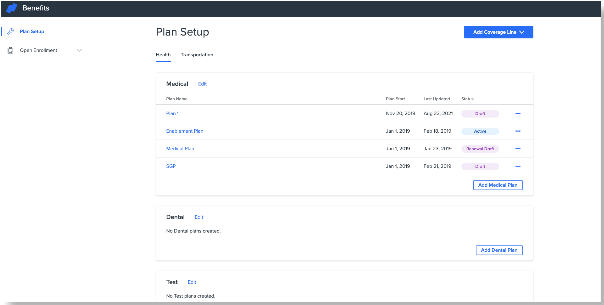
You'll note that the page groups certain Coverage Lines together in a tabbed view.
TIP:
A Coverage Line is a type of benefit your company offers. Examples include: Medical, Dental, Vision, HSA and Retirement.
These are the different coverage line groupings possible in Namely:
|
Medical, Dental, Vision |
Opt-in Plans |
Disability |
|
Transportation |
HSA/FSA |
Life and AD&D |
You can click the above links to view detailed guides to building the above plan types. This guide focus on a general overview of the Plan Setup Assistant.
Coverage Lines
Anyway - back to the Plan Setup page! As noted - Coverage Lines are the types of plans your company offers - Medical, Dental, Basic Life, and more - and you must add them prior to building plans. Click Add Coverage Line to select the type of Coverage Line you'd like to add.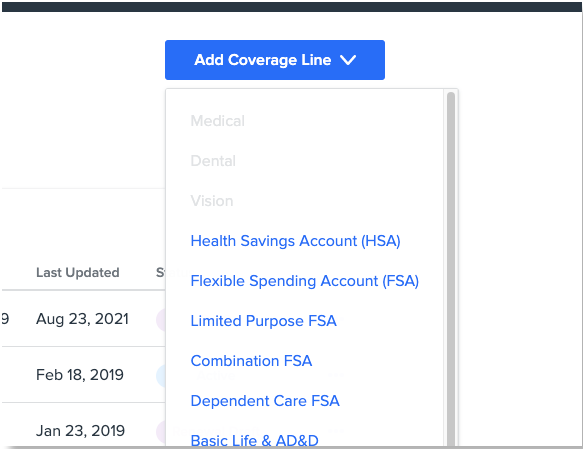
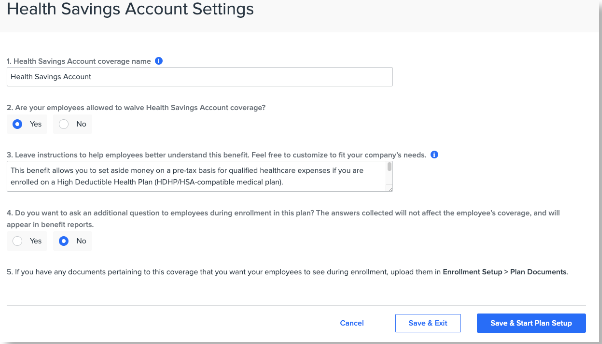
The Plan Setup Assistant will ask you some basic questions about the coverage line you select. The questions are different depending on the type of coverage line, but generally speaking, these are the items you'll configure on the Coverage Line level:
-
Coverage Line name
-
If the coverage can be waived
-
Child and student age settings
-
Dependent eligibility
-
Plan instructions (these will appear in the enrollment wizard!)
Plans
Plans are the specific insurance plans that your company offers. After your Coverage Lines are set up, you can add plans to them. Below is an example of Medical plans on offer. You'll notice each plan has a status field.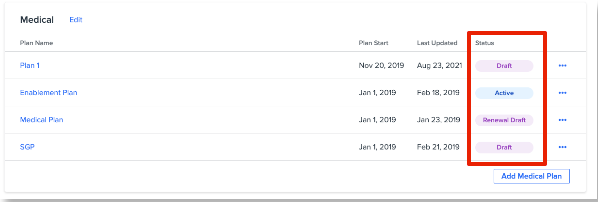
Here's what each status means, and how you can modify them:
-
Active: The plan has been published and eligible employees can enroll.
-
To edit an Active plan, click Edit. See Editing an Active plan for more information.
-
To renew an Active plan, click Renew. See Renewing an Active Plan for more information.
-
To end an Active plan, click End Plan. See Ending an Active Plan for more information.
-
-
Ended: This plan has ended and employees can no longer enroll. This plan can no longer be modified.
-
Draft: This plan is in the works! It has not been published and employees cannot see or enroll.
-
To edit a draft plan, click Edit.
-
To delete a Draft plan, click Delete.
-
-
Renewal: This status shows if you've clicked Renew to make changes to a plan for an upcoming plan year, but have not yet published the changes. Renew is typically used for Open Enrollment plans.
Once you're ready to set up a plan, select the appropriate option above, and then the Plan Setup Assistant will ask you a series of questions to configure your plan options. You'll first be prompted to enter some basic plan details:
-
Carrier
-
Start Date for the plan.
-
The Plan's name.
-
A unique, employee-facing name for the plan (optional)
-
The plan policy number.
After the above information is entered, click Save and Continue to proceed to Plan Settings. To edit your plan’s carrier, start date, name(s), or policy number, after it has been created, click Edit in the top right corner of the plan setup assistant.
Plan Settings
Plan Settings allows you to set the following:
-
Wait Periods - the amount of time an employee has to wait after their hire date before their benefits are effective.
-
Termination Periods - The amount of time an employee's benefits are effective after they are terminated.
-
Deductions - Which payroll deduction the plan should map to.
After entering this information, click Save and Continue.
The Plan Setup Assistant will differ from this point onward depending on the type of plan you're building because different Coverage Lines require different information and rate structures. For the purposes of this overview, we'll walk through the workflow of building a Medical, Dental or Vision plan. More detailed guides to each type of plan build are available in the table at the beginning of this section. Each guide will also include instructions on how to Renew or Edit an active plan - the processes are similar!
Rate Types
You'll let the system know if you have age-banded rates, and if they are tiered in this section. Once you've made that determination, you'll want to indicate the plan levels that have rates for the plan (employee, employees + dependent, employee + domestic partner, and so forth.)
After making any desired changes, click Save and Continue.
Eligibility
If your organization has different plan rates for different employee groups (based on class, branch, division, or a combination of class and branch), you can assign them on the Eligibility page. You can also make employee groups ineligible for your plan.
By default, the setup assistant will display a single rate option. You can create additional rates if you have different plan rates for different employee groups. You can select your relevant Org Unit(s) and use the Move to dropdown to assign them to a rate or make them ineligible for the benefit. 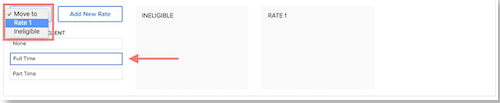

-
To create a new rate, click Add New Rate.
-
Select the relevant org unit(s) and use the Move to dropdown to assign them to the new rate.


Click Save and Continue.
Rates
Next, you'll want to enter the rates for your plan. The Plan Setup Assistant will ask you for the Total Cost per month and the Employee cost per month. The system will calculate the Employer cost. If domestic partners or children of domestic partners are eligible for coverage, the system will also calculate post-tax rates.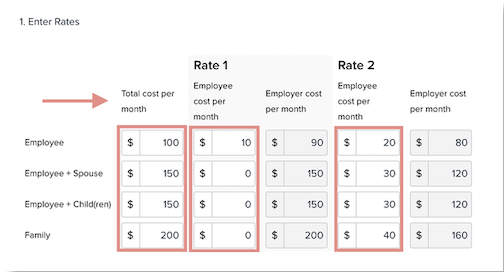
You also have the ability to enter Age-Banded and Tiered rates, using the Copy and Paste function. This will allow you to copy your rates from a CSV file into Namely.
We cover that topic in more detail in our Plan Setup Assistant: Medical, Dental, Vision article.
Plan Details
If you have any plan documents (like a Summary of Benefits, or Plan Description) you'd like to make available to your employees when they enroll in benefits for review, you can upload them in Namely Payroll. Go to Enrollment Setup > Plan Documents to complete the upload.
You can also indicate the Plan Type (PPO, HMO or EPO) whether the plan is eligible for an HSA or HRA, and funding type, if applicable. Finally - you can choose to display costs of in-and out-of-network coverage for different plan items. 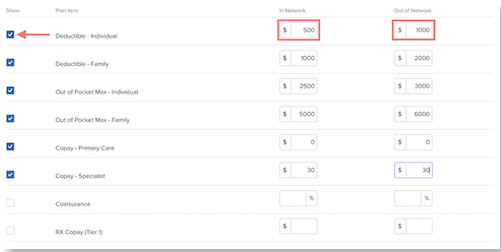
Plan Summary
Before you public your plan, you'll get a chance to review its details on the Plan Summary page. View your plan's rates on a per-pay basis using the Rates drop-down menu. If any information is incorrect, click Edit next to the section you want to reconfigure.
To save your plan in a draft state without publishing it, click Save and Exit.
To activate your plan and make it available for enrollment on the plan effective date, click Activate Plan.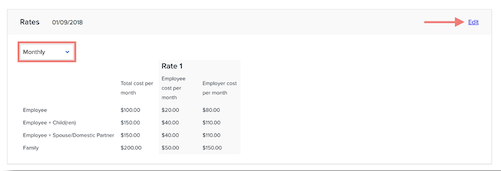
Life Events
Qualifying Life Event setup is managed in Namely Payroll under Enrollment Setup > Configuration. Some examples of Qualifying Events include:
-
New hire enrollment
-
Marriage
-
Birth
-
Change in spouse's coverage
-
Dependent age
-
Death of a loved one
-
Full-time to part-time or part-time to full-time
To create a new life event:
-
Click Life Events.
-
Click Add.
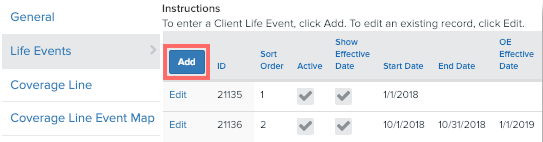
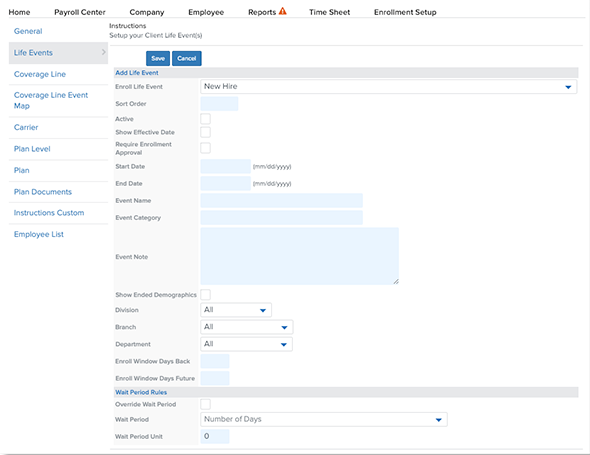
You'll be taken to this screen, where you can add all of the pertinent information about the Life Event, including:
-
The name of the Event
-
The type of event
-
The order in which the life event appears in the Enrollment Wizard
-
Who is eligible for the life event (by Division, Branch and Department.)
-
How many days in the past, or the future from the actual event the employee is eligible for enrollment for
-
Wait periods
For more information, read our article on Creating Life Events.
Mapping Plans to Life Events
After you've created your Life Event, you'll want to select the Coverage Lines that are available for the event. You can do this, or manage the plans available for any of your existing life events by clicking Coverage Line Event Map from Enrollment Setup > Configuration in Namely Payroll. Click Add to add a new plan mapping or Edit to edit an existing mapping.
TIP:
Reminder! A Coverage Line is a grouping of plans, for example - a medical coverage line would include all of the medical plans your company offers.
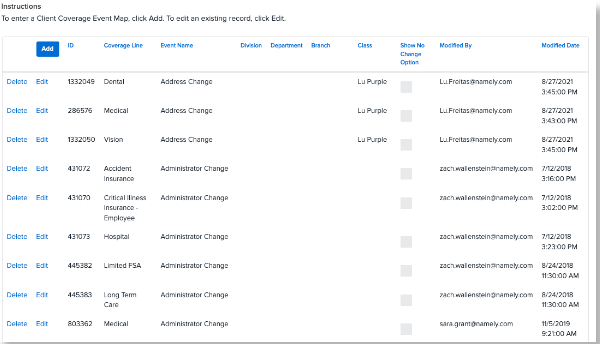
Each individual mapping tells the system:
-
The Coverage Line you're mapping.
-
Which Life Event you want the Coverage Line to be available for.
-
Which Divisions, Departments, Branches or Classes should be eligible for the coverage line in the event.
The more detail included in each mapping record, the more restrictive the mapping is. For example, a coverage line event mapping of Coverage Line = Medical and Life Event = Marriage, tells the system that Medical is available for the Marriage event for all employees. If you add "Full-Time" to the Class field, it will only make the Medical plan available for the Marriage event for members of the Full-Time class.
For more information on mapping coverage lines to life events, read Creating and Mapping Coverage Lines.
Employee List
If you need to make changes to an employee's benefits on their behalf, the Employee List is here to help! The Employee List has two functions:
-
Allows you to enter the Enrollment Wizard as another employee and make elections.
-
Reset their enrollment session. The Enrollment Wizard saves an employee's progress as they enroll. If they don't complete an enrollment session, the next time they attempt to enroll, they'll be brought back to their old session for completion. Hitting reset will send them back to the start.

You can access the Employee List by clicking Enrollment Setup > Configuration > Employee List. Most of the time, you'll access this page to complete Administrator Changes to make corrections to employee elections, or to reset enrollments, which resolves many common Enrollment Wizard Errors.
TIP:
We recommend resetting employee enrollments before you launch your Open Enrollment - this will wipe out any incomplete sessions that might prevent employees from enrolling.
OPEN ENROLLMENT - 9 MIN. READ
LEARN HOW NAMELY HELPS YOU MANAGE YOUR COMPANY'S OPEN ENROLLMENT FROM END-TO-END.
Open Enrollment can be a busy time of the year, which is why we’re committed to assisting you every step along the way. Through planning, submitting, and testing, we’ll help you and your team create the most effective Open Enrollment process for your organization.
There are three options available for Open Enrollment setup in Namely:
-
If you're a Managed Benefits customer - we've got you covered! We'll handle everything, from brokering your plans to site configuration, to transmitting data to carriers!
-
Set it up yourself! Our Plan Setup Assistant is here to help you configure your site once you've confirmed your plans and rates with your broker.
-
Partner with our Project Services team! For a fee, our team can work with you to set up your new plans and Open Enrollment dashboard, and will also handle necessary carrier feed updates for you.
As your renewal date approaches, we'll reach out to you to advise you to fill out our Open Enrollment Assessment, which will advise you on the Open Enrollment projects you'll need to submit. This assessment should be completed at least three weeks before the start of your Open Enrollment - even if you plan on configuring your Open Enrollment on your own.
TIP:
If you're a SaaS client and have a Carrier Feed set up, you'll need an OE Carrier Feed Review & Modification project to make necessary updates to your feeds, even if you decide to set up your Open Enrollment site on your own.
Self Configuring Your Open Enrollment
You can self-configure your Open Enrollment with our Plan Setup Assistant. These guides might look familiar to you - we talked about them in the Benefits Configuration section! They'll help you walk through building your renewal plans for your company's Open Enrollment:
|
Medical, Dental, Vision |
Configuring Opt-in Plans |
Disability |
|
Transportation |
HSA/FSA User Guide |
Life and AD&D |
Once your plans have been set up, you'll manage Open Enrollment from the Open Enrollment Dashboard. More on that below!
Partnering with Project Services Plan For Open Enrollment
If you decide you'd like our assistance setting up Open Enrollment, submit the projects recommended by the assessment in our Project Services Catalog at least three weeks before the start of your Open Enrollment. Your project submission should include your final benefit plan selections, coverage details, and negotiated rates for your upcoming plan year, on your Namely Open Enrollment Form.
The Open Enrollment projects available to you are as follows:
-
OE Carrier Feed Review & Modification: Impact assessment and updates to existing Carrier Feeds feeds based on changes made for the new plan year.
-
Open Enrollment: Configuration of new benefits plans and/or updates to existing plans for the new plan year. This will allow employees to make updates to elected benefits directly from Namely.
After you've submitted your project, a consultant will contact you within five business days to get the ball rolling.
Here's a sample timeline for an Open Enrollment project: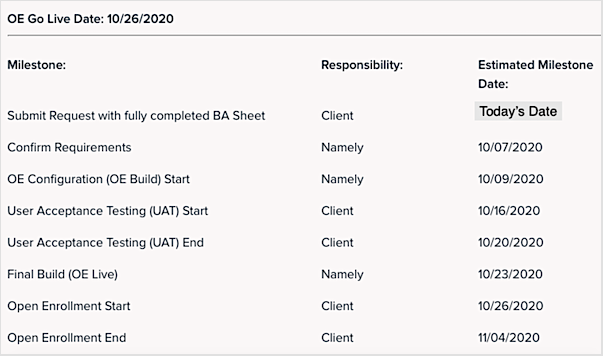
Testing Your Open Enrollment
Open Enrollment is one of the biggest events of the year. Your entire company will be logging into Namely to make their benefits selections. We recommend taking your Open Enrollment for a spin prior to launching it to your employees, whether we built it for you or not.
We recommend testing your Open Enrollment with a number of different employees based on your plan set up. Some questions to consider include:
-
Do I have multiple benefits classes? If so, test your Open Enrollment with an employee from each class.
-
Do I have different rates for plans with dependents? If so, test your Open Enrollment with different combinations of dependents.
-
Do I have any age-banded plans? If so, test your Open Enrollment with employees who fall into different age bands.
-
Do I have plans that are only available in certain states? If so, test with employees in those states, and employees not in those states, to ensure they're offered the correct plans.
-
Do I offer domestic partner benefits? If so, test with a domestic partner to ensure the rates are calculating correctly.
For a full list of considerations please review our Testing Your Open Enrollment article.
Open Enrollment Dashboard
Between plan configuration, staying on top of employee enrollments, and reviewing and confirming elections - Open Enrollment is a busy time for Benefits Administrators. We make it easy to manage Open Enrollment with our Open Enrollment Dashboard. The following tasks can be managed from the dashboard:
-
Set your Open Enrollment start and end dates.
-
Determine which employees are eligible to enroll.
-
Offer an active or passive Open Enrollment.
-
Track employee enrollment status.
-
Confirm elections.
-
Finalize your Open Enrollment.
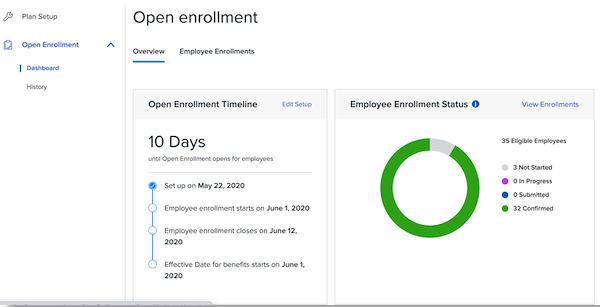
You can access the Open Enrollment Dashboard by clicking Manage Benefits on the Namely homepage and then Open Enrollment.
ACA - 7 MIN. READ
STAY COMPLIANT AND FILE YOUR ACA REPORTS TIMELY AND ACCURATELY WITH OUR ACA REPORTING WIZARD.
If you qualify as an Applicable Large Employer (ALE) the Affordable Care Act (ACA) mandates that your company must file specific forms to confirm you are providing adequate healthcare coverage to your employees.
TIP:
Not sure if your company qualifies? Your average Full-Time Equivalent (FTE) employee count and plan funding mechanism are the factors you'll want to consider. The IRS provides guidance on identifying full-time employees and on determining if your company is an ALE. We recommend consulting with your Managed Benefits team or third-party broker to determine if you need to file ACA reports with the IRS.
To comply with ACA standards your company should be familiar with the following forms:
-
1095-B - This form is filed by your insurance company, unless you are self-insured, and is provided to employees as proof of coverage. Form 1094-B is a version of this form sent to the IRS.
-
1095-C - This form is provided to employees and documents any applicable offer of health coverage. This form is issued by employers with fifty or more full-time employees (including FTEs) to employees. Form 1094-C is a version of this form sent to the IRS.
TIP:
New Jersey and Washington, D.C. also have reporting requirements.
In addition to the above forms, you must provide what the IRS describes as Minimum Essential Coverage that has Minimum Value and is Affordable. The IRS defines these terms as follows:
-
Minimum Essential Coverage - Government-sponsored programs, eligible employer-sponsored programs, plans in the individual market, and grandfathered health plans in effect when the ACA was passed in 2010.
-
Minimum Value - The plan's share of the total allowed costs of benefits provided under the plan is at least 60% of such costs.
-
Affordable - The employee's required contribution with respect to the plan may not exceed 9.5 percent of the applicable taxpayer's household income.
Sound like a lot of information to pull together? Never fear - Namely is here to help you prep your benefits data and file your forms with our ACA Reporting Wizard.
Using the ACA Wizard
ACA filing is all about clean data and we understand how challenging data cleanup can be, especially when you have data in multiple places. The ACA Wizard, which is accessed in Namely Payroll, will help you flag data that should be reviewed and then compile it all into the reports you'll need to file with the IRS.
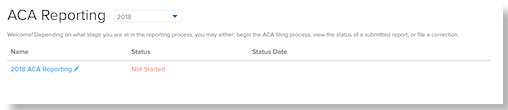
You can access it by clicking ACA from the top navigation in Namely Payroll, and then ACA Reporting for the current year.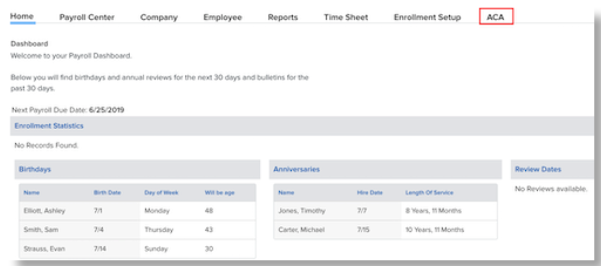
The wizard will ask you to review and update the ACA Information Page first. This form can be edited, and we recommend taking the time to double-check your selections and making any last-minute changes before you proceed.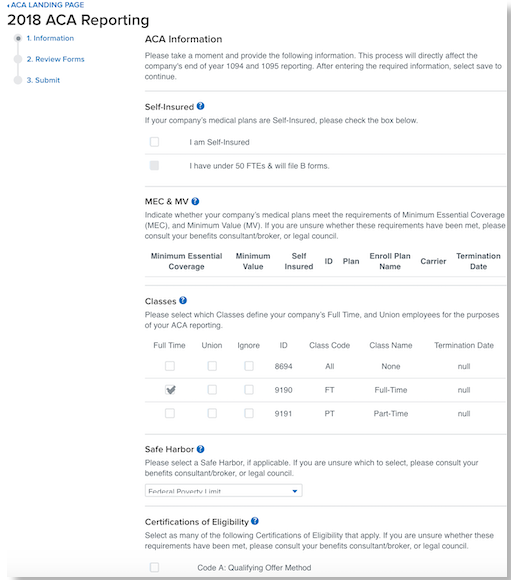
Once you have reviewed and completed the page, click Next to proceed to the next page where you can review your forms. To generate your 1094 and 1095 forms, click Generate Forms.
You'll be provided with links to download forms:
-
Download 1094 Form - This will download a PDF version of your completed company 1094 form. Please download and verify the information in the form.
-
Download 1095 Form - This will download a PDF version of the completed 1095 forms for all of your employees.
-
Download 1095 Report - This will provide CSV version of all of the 1095 data for all of your employees.
If the system encountered any data issues, they'll be flagged for your review in yellow below the form generation button.
Flags and Resources
The ACA Wizard reviews and flags any potential discrepancies in the data that would cause your reports to be rejected by the IRS. Some common data issues that the wizard will catch include:
-
Invalid City, U.S. State, Address, or Zipcode
-
Unsupported wait or term period
-
Enrollment or Demographic precedes hire or plan start date
-
Enrollment start dates match the end date
-
Submission generated while tax year still in progress.
-
Invalid business name or contact number.
-
Enrollment without a MV/MEC qualification.
-
More than 50 records in a form 1094(B) submission.
-
Voided Records
-
Safe harbor code calculation edge case.
TIP:
Some flags will be classified as Warnings. Reports with Warnings can still be submitted to the IRS, but require review and could potentially cause issues.
For a full list of Errors and Warnings please read our ACA Reporting Common Errors and Warnings article. You'll want to resolve any of these data issues prior to submitting your forms to the IRS. After your data is all cleaned up, you'll certify and submit your forms to the IRS. You must check off all three verifications before you will be allowed to submit. The submit button will be gray and unclickable until all three boxes have been checked. 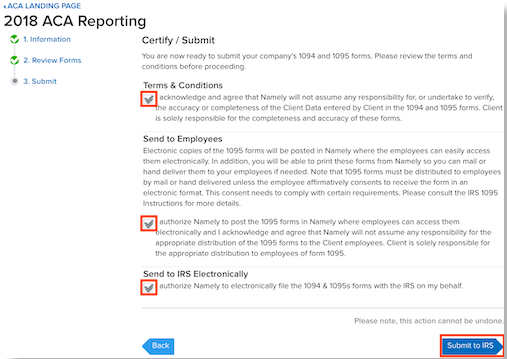
Once you've submitted your forms, you can return to the ACA Wizard's front page by clicking the ACA Landing Page link on the top left of the page. You can check your reporting status and download completed 1094 and 1095 forms for your company from this page.
-
Click Download to save the completed 1094 and 1095 forms for your entire company. You will have the ability to print the 1095 forms to distribute to your employees.
-
Select See Details in the Status column to view additional details on your current reporting status.
COBRA - 7 MIN. READ
ENSURE YOU'RE PROCESSING TERMINATIONS AND COVERAGE LOSSES PROPERLY TO DELIVER COBRA PACKAGES ON TIME, EVERY TIME.
If your company has at least twenty active employees, then you must offer COBRA benefits to your employees. COBRA, which stands for the Consolidated Omnibus Budget Reconciliation Act is a health insurance program that allows an eligible employee and their dependents the continued benefits of health insurance coverage in the case of voluntary or involuntary job loss, reduction in work hours, the transition between jobs, death, divorce, and other life events.
TIP:
You must notify all COBRA eligible employees of their rights in their Summary Plan Descriptions (SPD) within 90 days of plan participation.
COBRA is enforced as a result of a specific eligible event. A list of events include:
-
the death of the covered employee
-
a covered employee's termination of employment or reduction of the hours of employment
-
the covered employee becoming entitled to Medicare
-
divorce or legal separation from the covered employee
-
a dependent child ceasing to be a dependent under the generally applicable requirements of the plan.
For more information about COBRA requirements and background information we recommend reviewing the below resources from the US Department of Labor:
TIP:
You are required to notify your group health plan administrator within 30 days after the applicable employee’s employment has been terminated, or hours are reduced.
Namely can help you report these events to your COBRA provider to ensure your employees receive their COBRA packages and coverage in a timely manner with a COBRA Carrier Feed.
COBRA For Terminated Employees
If you have a COBRA feed set up, a file will send when you terminate an employee in Namely, provided you select a COBRA termination reason. These are government-defined causes of termination that make an employee eligible for COBRA.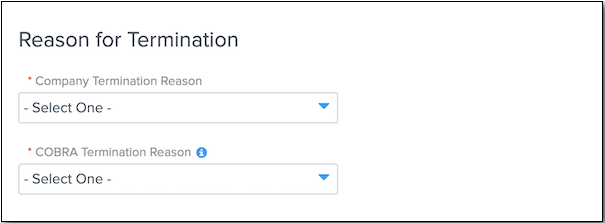
The list of COBRA Termination Reason's available in Namely are:
-
Reduction in Force
-
Terminator for Cause
-
Deceased
-
Resigned
-
Retired
-
Resigned without Notice
-
Other
-
Laid Off
-
Transferred
-
Medicare Eligible
-
Gross Misconduct
-
Transfer EIN
To terminate an employee in Namely, go to their profile in HRIS, and click the Terminate button.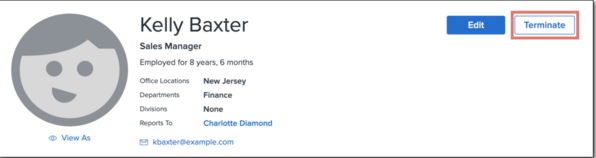
COBRA for Employees Switching Classes
Sometimes, employees switch from an eligible benefit class to an ineligible benefit class. This requires benefits to be terminated without the employee being terminated. To update an employee's class, follow these steps in HRIS:
-
Go to the employee's profile > Manage (next to the Class field) > Add Record.
-
Enter a Start Date and select a Class.
-
If the new class assignment makes the employee eligible for benefits, select whether the waiting period should be based on the class’ effective start date instead of the employee’s hire date.
-
If the new class assignment makes the employee ineligible for benefits, select whether existing plans should be terminated.
-
Click Save.
If you have a COBRA feed, a file will be sent.
Employee COBRA Data
You can view your employee’s COBRA information in Namely Payroll. Go to the applicable employee’s profile and click General. Scroll to the COBRA section.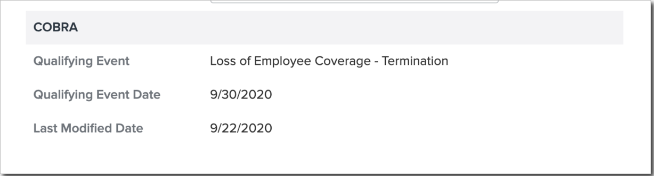
COBRA and ACA
If you have self-funded medical plans, then you must report on COBRA elections for your terminated employees and dependents as part of your ACA Reporting requirements.
TIP:
You should consult with your broker to confirm if this is a filing requirement for your company.
For further information on submitting your data please view our ACA COBRA Data Requirements article.
KNOWLEDGE CHECK AND ADDITIONAL RESOURCES
TEST YOUR KNOWLEDGE AND REVIEW OUR ADDITIONAL RESOURCES TO LEARN MORE!
|
Knowledge Check: Benefits |
|
Knowledge Check: Open Enrollment |
|
Namely Toolkit: ACA Reporting |
|
Namely Toolkit: Open Enrollment |