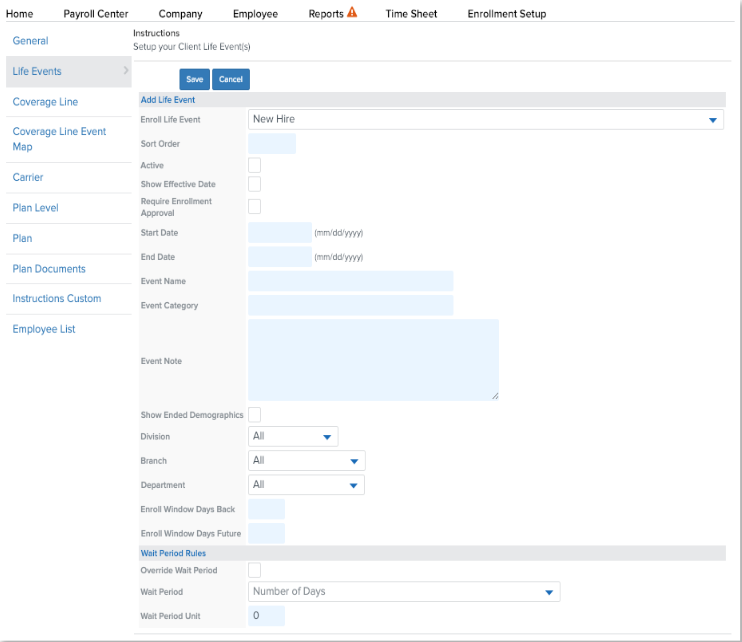
Creating Life Events
How to create a new Life Event.
Need some extra help with your benefits configuration? Namely offers a wide range of additional services that allow our clients to focus on what matters most—building a better workplace. Check out our Project Services Catalog and see how we can tackle the complex tasks for you.
WHAT ARE LIFE EVENTS?
Employees can make updates to their benefits when they experience a qualifying life event. These may include:
-
New hire enrollment
-
Open enrollment
-
Marriage
-
Birth
-
Change in spouse's coverage
-
Dependent age
-
Death of a loved one
-
Full-time to part-time or part-time to full-time
To access Benefits Configuration, go to Payroll > Enrollment Setup > Configuration.
CREATE A NEW LIFE EVENT
To create a new life event:
-
Click Life Events.
-
Click Add.

-
Select the life event from the Enroll Life Event dropdown menu.
-
Enter the Sort Order.
-
The sort order is the order an employee views the life events on their enrollment page.
-
-
Select Active to make the life event available immediately.
-
Note: You can always make the life event active after setting it up.
-
-
If the life event requires approval, select the checkbox next to Require Enrollment Approval.
-
Enter the Start Date.
-
Enter an Event Name to display in the enrollment wizard.
-
Enter the Event Category.
-
Note: The Event Category is typically the same as the Event Name.
-
-
Limit who is eligible for the life event using the Division, Branch, and Department dropdown menus (optional).
-
Enter the number of days after the life event employees are eligible to change their benefits in the Enroll Window Days Back field.
-
Note: a New Hire event is exceptional in that the enrollment window is based on the benefits eligibility date and not the date of hire. This means that you will need to set the Enroll Window Days Back field to the number of days before the benefits eligibility date that the employee is allowed to enroll in their new hire benefits. For example, if an employee is hired on March 2nd, and benefits are effective First of the month after the date of hire- i.e., April 1st- you will need to set Enroll Window Days Back to 30 days so that the employee has the 30 days before the effective date to make their elections.
-
-
Enter the number of days before the life event employees are eligible to change their benefits in the Enroll Window Days Future field.
-
Note: a New Hire event is exceptional in that the enrollment window is based on the benefits eligibility date and not the date of hire. This means that you will need to set the Enroll Window Days Future field to the number of days after the benefits eligibility date that the employee is allowed to enroll in their new hire benefits. For example, if an employee is hired on March 2nd, and benefits are effective on the date of hire- you will need to set Enroll Window Days Future to 30 days so that the employee has the 30 days after the effective date to make their elections.
-
-
If you want to set a Wait Period for the life event, select Override Wait Period, select a Number of Days, and enter a Wait Period Unit, if applicable.
-
Note:Override Wait Period should not be used on New Hire or Open Enrollment life events; when it is used, Override Wait Period is typically used for contributory plans (e.g., commuter or HSA) where the carrier allows for changes to be effective the first of the month following the life event.
-
-
Click Save.

Note: Wait Period Rules can be set under Company > Class and edited at the plan level, if needed.
TIP:
Need to configure benefits for a rehired employee? Refer to Best Practices For Rehire Benefits for more information!