Configuring Voluntary Accident Plans
This article is a walkthrough of how to create a Voluntary Accident option for employees, detailing how to create the coverage line, associate a plan, add rates, build and connect a deduction, and configure rules, if applicable.
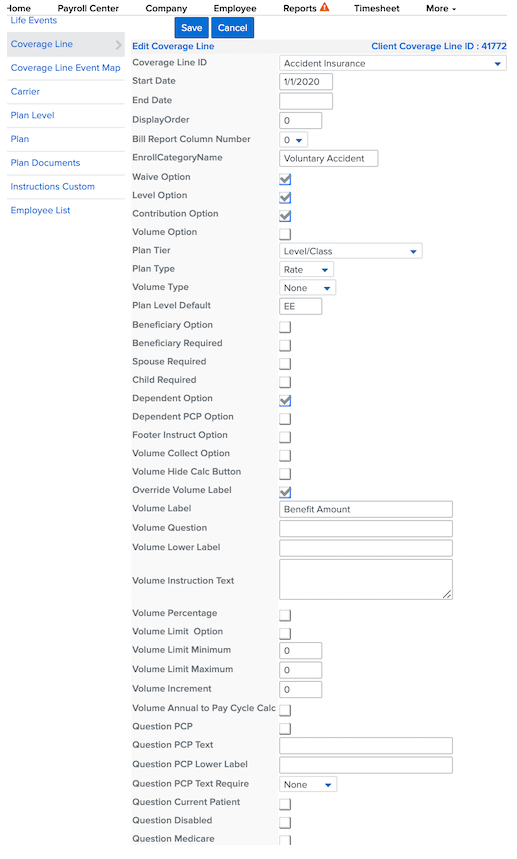
Adding a Coverage Line
To add a coverage line for a Tiered Accident Plan:
-
Navigate to Namely Payroll.
-
Click Enrollment Setup.
-
Click Coverage Line > Add.
See below for an example of the coverage line setup for a typical Tiered Accident Plan:
Adding the Carrier (if applicable)
To add a new carrier, if this is the first time you are configuring a plan with the Accident carrier:
-
Click Enrollment Setup > Carrier > Add.
-
Use the dropdown menu to select the carrier.
-
Enter in a custom Carrier Name.
-
Click Save.

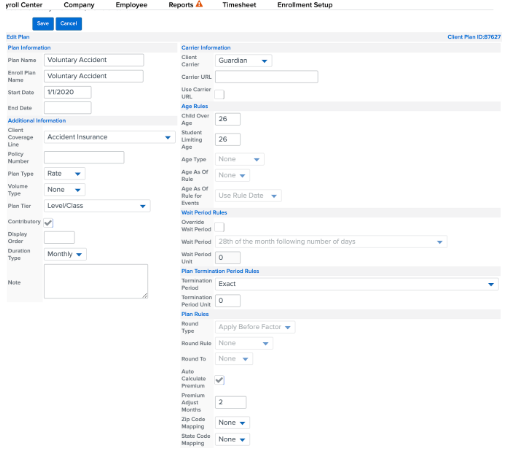
Creating Plans
To create a Tiered Accident plan:
-
After your coverage line has been created, click Plan > Add Plan.
-
Enter the required fields:
-
Plan Name
-
Start Date
-
Child Over Age
-
Student Limiting Age
-
Premium Adjust Months
-
If the Accident Plan has a different waiting period than the class eligibility, use Override Wait Period.
See below for an example of a typical Accident Plan setup:
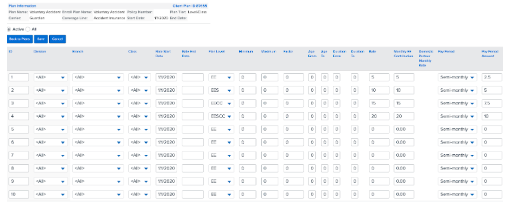
Adding Rates
To add rates once the plan has been created:
-
Use the Coverage Line dropdown to select Accident Coverage.
-
Click Edit Rate next to your newly created plan > Add Plan Rates.
-
Fill out the necessary Plan Levels from the dropdown selections.
-
Add in the Rate (total premium), Monthly EE Contribution, and Per Pay Period Amount > Save.
See below for an example of a typical rate setup:
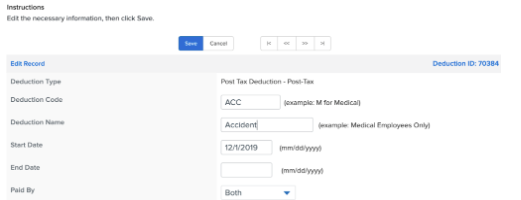
Creating a Deduction
To create a deduction and connect it to your newly created Tiered Accident plan:
-
In Namely Payroll, click Company > Deductions > Add.
-
Enter the following fields:
-
Deduction Type
-
Deduction Code
-
Deduction Name
-
Start Date
-
Paid By
See below for an example of a typical Accident deduction:
Note: in order to attach the deduction to the plan immediately, the start date must be before the current date or it will not appear in the next steps.
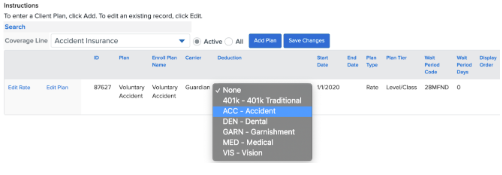
Next, you must connect the deduction you've just created to the plan:
-
After the deduction has been created, go back to Enrollment Setup > Plan.
-
Choose Accident from the Coverage Line dropdown menu.
-
Attach the deduction by using the dropdown list from the Deduction field on the plan.
-
Click Save Changes.
Adding Rules (if applicable)
Most Accident plans require enrollment in a medical plan. Some only require a general enrollment in a medical plan of your choosing, while others will require enrollment in a plan sponsored by the employer.
If the employee is required to be enrolled in plan sponsored by the employer, submit a case in the Help Community. A rule will be added on the backend by a service consultant to tie the Medical coverage line to the Accident coverage line.