Bank Reconciliation Process
This article describes the CertiPay Bank Reconciliation process that allows users to balance the payroll checks written within CertiPay to their bank statement.
The Bank Reconciliation process in CertiPay consists of three steps:
-
Step 1: Define the parameters of the reconciliation process.
-
Step 2: Reconcile the list of checks found based on the specified parameters.
-
Step 3: Confirm the changes to be made to the checks.
To access the Bank Reconciliation page, from the CertiPay home page, click the Payroll Accounting list and select Bank Reconciliation.
The Bank Reconciliation page displays with the Step 1: Define Parameters tab displayed.
Step 1: Define Parameters
From this tab, you specify the date range and the paycheck type to create a list of checks to be reconciled.

From the Step 1: Define Parameters tab, do the following:
|
Bank Statement Reconciliation Period |
Enter the desired date range, beginning and ending date, to bring the entire working set of checks to view. |
|
Filter paychecks within reconciliation period |
By default Outstanding is selected. Click the drop-down list and select the desired status:
|
Once you have set the parameters, click Begin Reconciliation Process. The Step 2: Reconcile Checks tab is displayed and selected.
Step 2: Reconcile Checks
From this tab, you can filter the list of checks and then select the checks that have cleared your bank account.
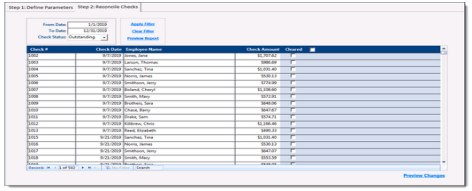
Specify the following filtering options:
|
From Date To Date |
Update the date range, beginning and ending date, to filter the list of checks to only those within the range. Note: Specifying a date range on this tab only filters the existing list of checks, it does not requery the database. |
|
Check Status |
Update the check status to view Outstanding, Cleared, or All checks in the indicated date ranges. |
When you've specified the options, do the following:
-
Click Apply Filter to apply the specified Date and Check Status filter values.
-
Click Clear Filter to remove the specified Date and Check Status filter values, returning the list to the checks originally captured from Step 1.
-
Click Preview Report to view a printable version of the displayed list.
Review each check in the list. If a check has cleared your bank account, select its check box in the Cleared column.
Note: If all displayed checks have cleared, you can select the check box in the heading of the Cleared column to select all of the check boxes in the table.
When finished, click Preview Changes. The Step 3: Confirm Changes tab is displayed and selected.
Step 3: Confirm Changes
From this tab, you must review the checks to be reconciled in the database.
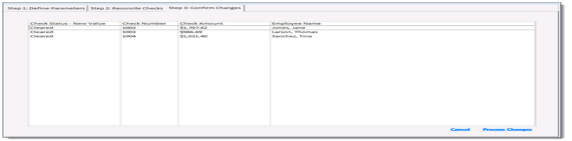
Confirm that the listed checks are to be cleared, and when finished click Process Changes.
A confirmation window displayed. Click OK to confirm and the Step 1: Define Parameters tab is displayed and selected.