I-9 Approval Process User Guide
OVERVIEW
This purpose of this document is to provide guidance on approving the I9 in the Onboarding System.
COMPLETING SECTION 1 OF FORM I-9
Have the employee complete Section 1 at the time of hire (by the first day of their employment for pay) by logging in to Onboarding to complete/sign/submit the form.
A preparer and/or translator may help an employee complete Form I-9. The preparer and/or translator must read the form to the employee, assist them in completing Section 1, and have the employee sign or mark the form where appropriate. The preparer and/or translator must then complete the Preparer and/or Translator Certification block. If the employee used multiple preparers or translator, each subsequent preparer and/or translator must complete a separate Preparer/Translator Certification block on a Form I-9 Supplement and attach the Supplement to the employee’s form.
You are responsible for reviewing and ensuring that your employee fully and properly completes Section 1.
IF YOU NEED TO COMPLETE THE I9 FOR THE EMPLOYEE:
LOG IN TO ONBOARDING
-
From the Division Home Page, Navigate to the Employees Section > Current Employees
-
On the Current Employees Page, Click on the word “GO” under Account Access

-
Once on their profile’s Employee Dashboard, click on Forms > Fill Out My Forms
-
Select the I9
-
Populate the fields
-
Review the form
-
Have the employee type their name and click Submit
-
Once the form is submitted, log out
Once you have completed the I9, you can log back in as yourself and approve it as usual.
EMPLOYEE I9 COMPLETION
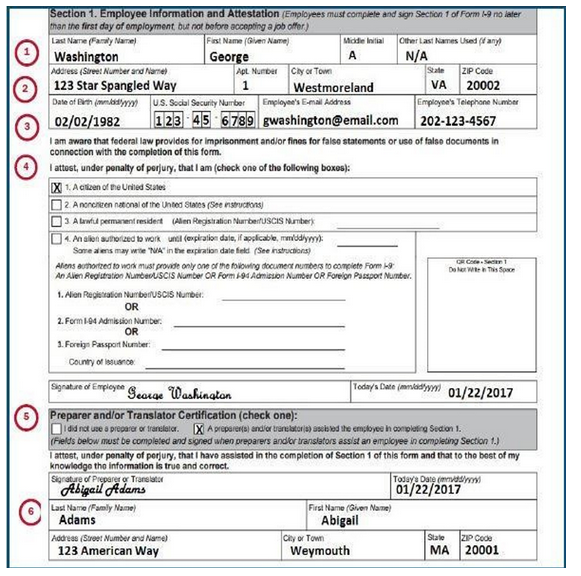
1. Have the employee enter their full legal name and other last names that they have used in the past or present (such as a maiden name) if any.
-
Have employees with two last names (family names) include both in the Last Name Employees who hyphenate their last names should include the hyphen (-) between the names. Employees with only one name should enter it in the Last Name field and enter “Unknown” in the First Name field. “Unknown” may not be entered in both the Last Name and the First Name fields.
-
Employees with two first names (given names) should include both in the First Name field. Employees who hyphenate their first name should include the hyphen (-) between the names.
-
Have the employee enter their middle initial in the Middle Initial field.
-
Have the employee enter their maiden name or any other legal last name they may have used in the Other Last Names Used field. Enter “N/A” if the employee has not used other last names. DO NOT REENTER THE SAME LAST NAME FROM ABOVE.
2. The employee should enter their home address, apt. number, city or town, state and ZIP Code. Employees who have no Apt. Number should leave the field blank. Employees who do not have a street address should enter a description of the location of their residence, such as “Two miles south of I-81, near the water tower.”
3. Employees should enter their date of birth as a two-digit month, two-digit day, and four-digit year: (mm/dd/yyyy) in this field. For example: January 8, 1980 should be entered as 01/08/1980.
4. Have the employee read the warning and attest to their citizenship or immigration status by checking one of the following boxes provided on the form:
-
A citizen of the United States
-
A noncitizen national of the United States: An individual born in American Samoa, certain former citizens of the former Trust Territory of the Pacific Islands, and certain children of noncitizen nationals born abroad.
-
A lawful permanent resident: An individual who is not a U.S. citizen and who resides in the United States under legally recognized and lawfully recorded permanent residence as an immigrant. This term includes conditional residents. Asylees and refugees should not select this status but should instead select “An alien authorized to work” below. Employees who select this box should enter their seven to nine-digit Alien Registration Number (A-Number) or USCIS Number in the space provided. The USCIS Number is the same as the A-Number without the “A” prefix.
-
An alien authorized to work: An individual who is not a citizen or national of the United States, or a lawful permanent resident, but is authorized to work in the United States. For example, asylees, refugees, and certain citizens of the Federated States of Micronesia, the Republic of the Marshall Islands, or Palau should select this status.
5. Have the employee sign and date the form, entering the date in Section 1 as a two-digit month, two-digit day, and fourdigit year (mm/dd/yyyy).
6. If the employee used a preparer and/or translator to complete the form, that person must certify that they assisted the employee by completing the Preparer and/or Translator Certification block. If the employee did not use a preparer and/or translator, have the employee check the box marked “I did not use a preparer or translator.”
EMPLOYER I9 APPROVAL PROCESS
-
From the Division Home Page, Navigate to the Employees Section > View Current Employees Click on the applicable Employee’s Name
-
Click on the "Manage" Link for I9


-
Click “View I-9” and review for accuracy (refer to the previous page of this training guide)
-
Close the tab
-
If something needs to be corrected, change the “Change Status To” drop down to “Rejected” and click update! o Enter in a note if needed to advise the employee of what needs to be changed
-
If everything is correct, change the “Change Status To” drop down to “Approved” and click update!
Once the form has been approved, you will be prompted to enter in the Employer Responses for Section 2 of the I9. Some of this information may be pre-populated for you.
-
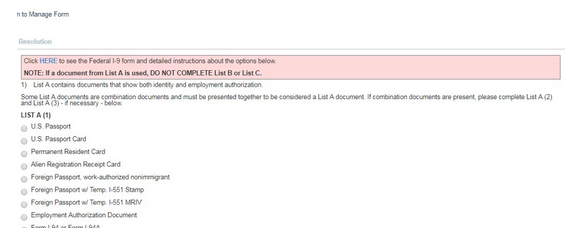
Follow the prompts to key in the proof document information.
-
If a document from List A is provided, no additional documentation is needed.
-
See the I-9 Documentation Samples guide for assistance if needed

-
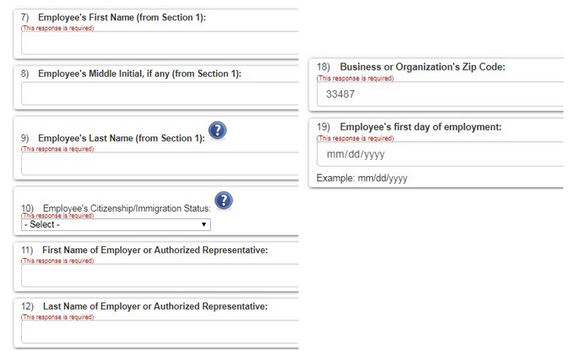
Once the documentation items have been entered, you then will be asked questions regarding the employee and yourself. All required fields are marked as such.
-
When you have completed the above, you will be asked to sign the form electronically. This is YOUR name, as the approver.
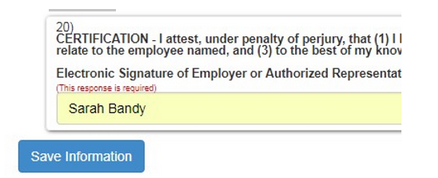
Click “Save Information” when done.
Congratulations! Your employee’s I9 is now APPROVED! You should now move on to the E-Verify process. This is detailed in a separate training guide.
ERRORS IN DATA ENTRY ON THE EMPLOYER SIDE
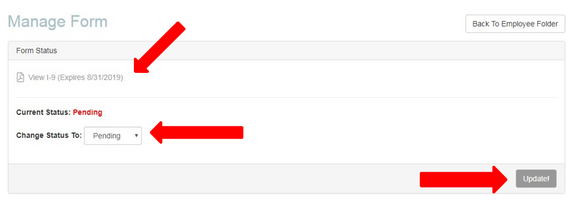
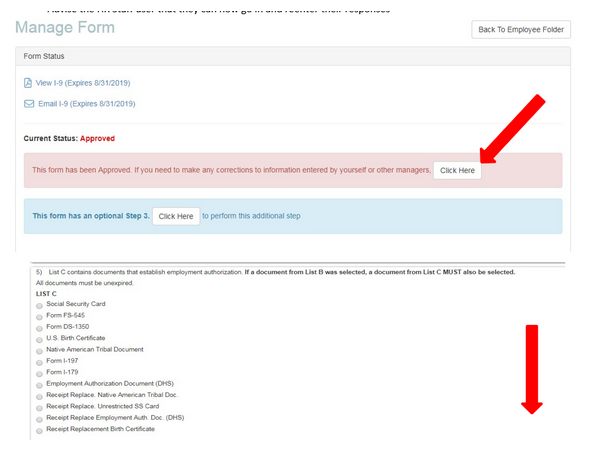
If you realize later that there was an error in your entries, you will need a user with HR Admin access to revert the form back to a pending status using the green “Click Here” button below.
***As a Staff User, you will NOT see this button. An Admin User will need to complete this process***
-
Click on the “Click Here” button
-
Click “Update”
-
Advise the HR Staff user that they can now go in and reenter their responses
I-9 RE-VERIFICATION PROCESS
In the event that you need to Re-Verify an employee’s I-9, follow the below steps.
-
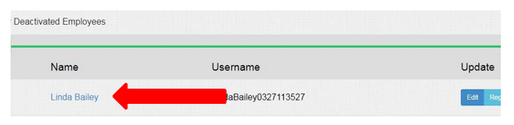
Navigate to the employee’s folder
-
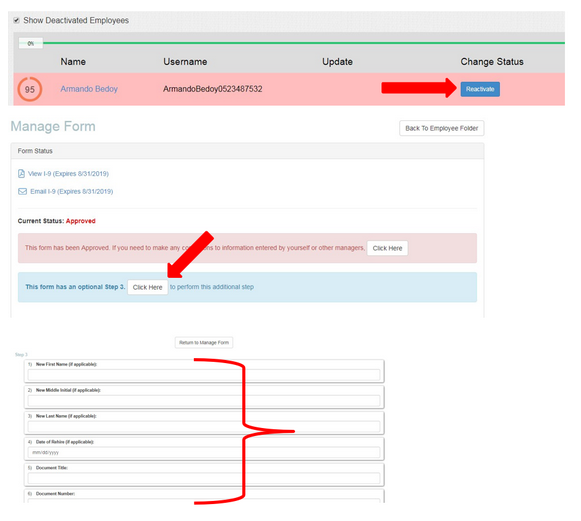
If they have been deactivated, reactivate them by clicking on the blue “Reactivate” button
-
Click on the “approved” link for the I-9
-
Click on “Manage”
-
You will see a line highlighted in blue that says “This form has an optional step 3. Click Here to perform this additional step. Click on the blue “Click Here” button
-
Populate the option information fields
-
Click “Save Information”
-
Close the Window