Creating eForms
eForms was created to give you the flexibility of sending and tracking Offer Letters via the system, but is versatile enough that you can use with other documents also! With eForms, you can easily capture approvals on a document at any point during your hiring process. Document approvers may be internal or may simply be the applicant depending on the document you are using. You simply initiate the form on an applicant and all approvals are captured electronically. Once the document is approved, you are notified so you can take the next steps. This process saves you time from manually emailing and tracking down the approvals, which helps you hire faster!
Once enabled, only Admin users have access to set up eForms; but all user types who are granted access can send eForms.
Essentially, Admins will create the eForms templates in the system and Managers can send the eForms documents to the applicant to be signed electronically.
Creating an eForm in Settings
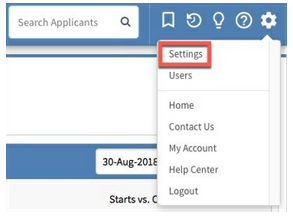
Click on the Gear icon at the top of your screen and select Settings.
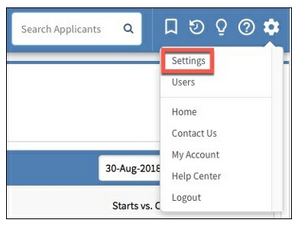
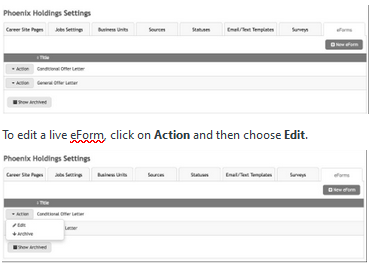
Click on the eForms tab.
To create a new eForm, click the New eForm button.

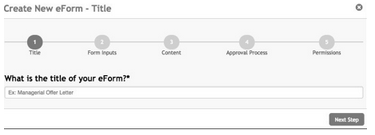
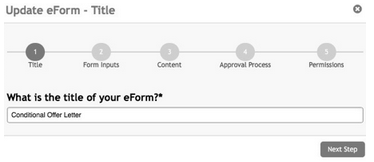
Step 1 - Title:
The Create New eForm - Title window will open.
You will walk through five (5) steps to create a new eForm, the first is assigning your form a title.
Enter a title/name for your eForm (e.g. Offer Letter) and click Next Step to save and continue.
Step 2 - Form Inputs:
Next, you will determine whether the eForm will have custom fields that will need to be entered by the system user before sending the eForm to the applicant. For example, will you need to enter a salary and start date on an Offer Letter? Or will you just need a signature on a Non-Disclosure Agreement?
Click the radio button for No, I just need signatures if no custom data will be needed on the eForm.
Click the radio button for Yes, I need to add more details if you will be adding information.
Once you've made a selection, click Next Step. Note that this button is shaded out until a selection is made.
If you selected "No", you will be taken to Step 3, Content. Skip to that section below.

If you selected "Yes", the Create New eForm - Questions page will open.
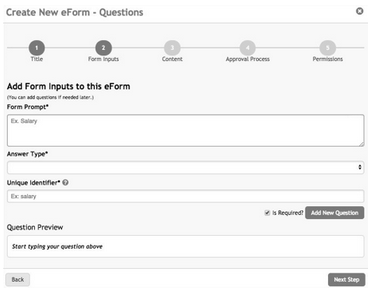
This process is the similar to creating Job Screening Questions.
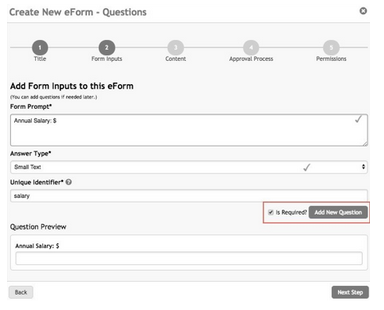
Form Prompt: Essentially, this is the custom field that will need to be entered manually by a system user before sending the eForm to the applicant.
Answer Type: Answer types allow the eForm creator to designate a format and, if desired, acceptable answers for questions. There are 8 answer types.
Small Text - free-format answer style, but with a small box for a relatively short answer.
Large Text - essay style, free-format answer. Use this if you want more than just a word or single sentence answer.
Drop Down Menu - applicants can only choose ONE answer from the list you create. Since an answer MUST be selected, be sure to include an "opt out" answer for the applicant like "none", "0" or "does not apply".
Checklist - applicants can choose more than one answer with this option. At least one answer MUST be selected, so be sure to include an "opt out" answer for the applicant like "none", "0" or "does not apply".
Option Button - is the same as the drop-down answer type, but with a radio button rather than a drop-down.
Yes/No - is a drop-down menu, but the answer fields will auto-fill with Yes and No.
Drop Down Menu - US States - is a drop-down menu, but the answer fields will auto-fill with the
US states (and matching state abbreviation) in alphabetical order. The list includes District of Columbia - DC and Puerto Rico - PR. A state must be selected in order for the applicant to continue.
Checklist - US States - provides a checklist version of the US States as previously described. The checklist option allows applicants to select multiple states as their answer.
Unique Identifier: The system will automatically generate the identifier for our database and a hashtag you will use in the next step. As the name suggests, each identifier name must be unique.
Tip:
You can update this when you are creating the question to be more specific than what the system selects. For example, if you will need a Supervisor Name and a Supervisor Title, you should label them accordingly.
Question Preview: Displays the form prompt and answer type as the applicant will see it.
The Is Required checkbox will be selected by default. This means that the system user will be required to enter information into the eForm before it can be sent to the applicant. Check the box to deselect it if the field is optional.
After completing the form, click Add New Question to save the current question and to create additional questions.
A new section will appear at the bottom of the page showing previously saved questions.
Repeat the process of completing the form until all questions have been added.
When no additional questions are needed, click Next Step to continue.

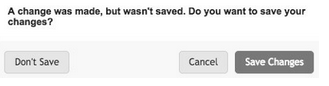
If you attempt to continue without saving your question, the system will prompt you to save your changes.
Click Save Changes to save and continue.
Click Cancel to continue editing entries on this page.
Click Don't Save to exit the eForms page without saving the last entry
Step 3 - Content:
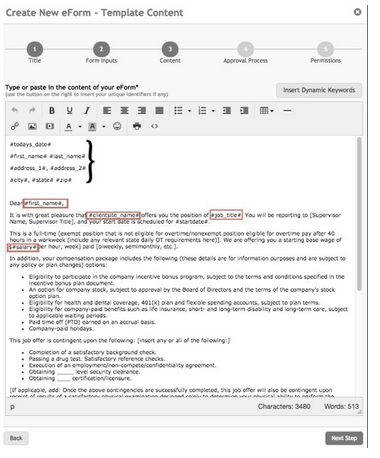
The Create New eForm - Template Content page will open. Copy and paste or type in the content of your eForm. e.g. paste in the text from your Offer Letter
Next, you will add in dynamic keywords that will change on the eForm when being sent to the applicant, like their name, the date, the proposed salary, the proposed start date, your name, etc. Use the Insert Dynamic Keywords (hashtags) to pull data in from the application.
e.g. Inserting #first_name# into the eForm will pull the name "John" from the application record if the applicant's name is John Doe.
Unique identifiers created in the previous step will be displayed at the top of this page.
Replace any information that will change on the form with a Dynamic Keyword by clicking on the keyword phrase.
Close the keyword list by clicking on the Insert Dynamic Keyword button.

Tip:
We really recommend using the default Dynamic Keywords options for those items that can be pulled from the application like the applicant's name and address. Creating Form Inputs for these fields is redundant and will create unnecessary work for the system user initiating the eForm.
Replace any information that will change on the form with a Dynamic Keyword by clicking on the keyword phrase. Close the keyword list by clicking on the Insert Dynamic Keyword button.
Click Next Step to save and continue.
Step 4 - Approval Process:
The Create New eForm - Approval Process page will open. This step is for you to identify any INTERNAL system users who may need to approve the eForm prior to sending it to the applicant. By default, the form is set to have the applicant as the only approver.
However, we know that every organization's process is unique, so we've made this section flexible. You can create internal approvers that will need to review and sign off on the eForm before it will be sent to the applicant.
If you wish to add internal approvers, add them by their title as the specific person will be added when the eForm is initiated.
e.g. If a department supervisor, the CEO and an HR manager must approve an Offer Letter before it goes out to an applicant, you would add a field for each of these internal approvers.
Approval is required, by default, but this can be deselected by checking the Is Required? checkbox.
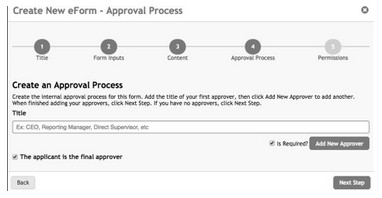
Click Add New Approver to save each approver. Repeat this process until all approvers have been added.
If the form is internal only - meaning it will NOT go to the applicant - this can be deselected by clicking The applicant is the final approver checkbox.
Click Next Step to save and continue.
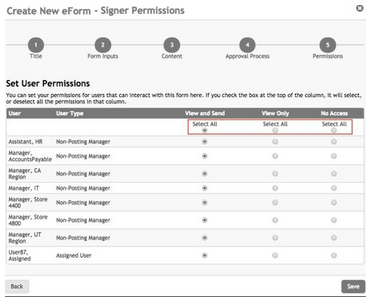
Step 5 - Permissions:
The Create New eForm - Signer Permissions page will open.
This final step is where you will determine who can access the eForm. By default, all Admins on the account have access to View and Send. This page gives you access to grant permissions to your restricted users.
Your options are:
View and Send - User will be able to view the document, enter the manual fields and initiate sending it to approvers, if any, and ultimately to the applicant.
View Only - User will be able to view the information but cannot initiate the document.
No Access - User is unable to view or access the document.
Click the radio button for each user in the appropriate permission column. Use the Select All button to grant access to all users at once.
Click a different radio button to change the access for a user or users. Permissions can always be changed at a later time, if needed.
Click Save to save permissions and complete the steps for creating the eForm.
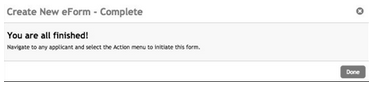
You will see a success message and can click Done to exit the page.
Managing an eForm in Settings
Making changes to your eForm is simple, you'll just be following the same steps.
Click on the Gear icon at the top of your screen and select Settings.
Click on the eForms tab.
You can click Action and Archive to archive eForm templates you will no longer be using.
Click on Show Archived to view archived eForms. From the archived page, you can unarchive eForms by clicking Edit and Unarchive.
Walk through each of the steps, making changes, as needed. If no changes are needed in a particular step, simply click Next Step to continue
Creating an eForm in eForms Tab
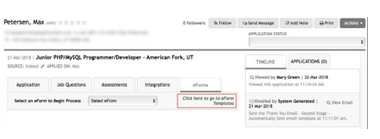
Admin users can create an eForm on the fly from the eForms tab in the application record.
From within the applicant record, click the eForms tab.
Click the Click here to go to eForm Templates link to be redirected to eForm templates under Settings.
Initiating an eForm
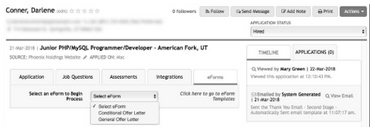
You, and restricted users with access, will be able to use the eForm immediately.
Navigate to the desired applicant, and click the eForms tab from within the applicant record.
Select the appropriate eForm from the Select eForm drop-down menu
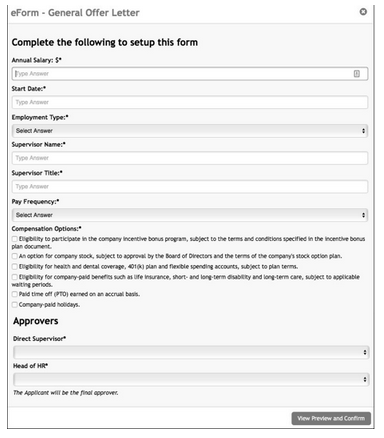
The eForm setup form will enter. Complete all fields, noting that fields with an asterisk "*" are required.
Note that the applicant will always be the final approver for any document created from eForms.
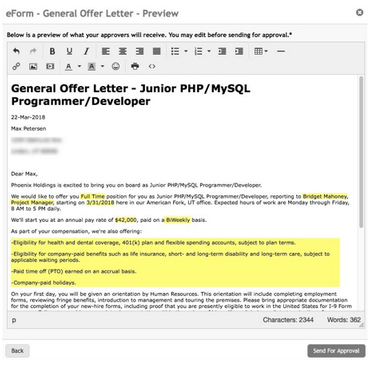
Click View Preview and Confirm to continue.
The Preview page will open.
Review the document to be sure that the information has pulled in completely and accurately. Pay particular attention to the manual field entries.
You can edit the form, if necessary, to add or remove information. You may also use the formatting buttons at the top of the page.
When you are satisfied with the way the document appears, click Send for Approval.
This will begin the approval process by sending an email to the first person in the approval chain.